Hack 73 Fix Flash Falloff
| < Day Day Up > |
| Built-in flashes on digital point and shoots sure are handythat is, up to about eight feet. Here's how to brighten those dark areas when your flash runs out of juice before your subject does . During the holidays and other social events, the setting is usually larger than our little flashes can cover. So, the people in the front of the scene get overexposed and the folks in the back fade to black. Thanks to a nifty tool in Photoshop called an overlay mask , you can correct this uneven treatment of your guests.
After opening your picture, open the Layers floating palette, found in the Window drop-down menu. Select Layer Figure 6-23. Adding an Overlay layer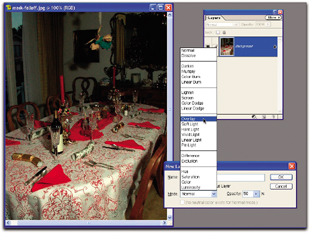 Check your Tools palette to ensure that your foreground color is white and the background black. Then, click on the Gradient tool, as shown in Figure 6-24. Figure 6-24. Choose the Gradient tool from the Tools palette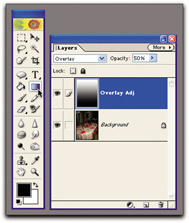 Use your Gradient tool to draw a black-and-white linear (rather than, say, radial) gradient straight up the image, from the brighter guys to the darker ones. Try to follow the flash falloff itself. You can begin your gradient off the image or in the middle of the image, wherever it works best. You can also redraw it until it's just right. It's just right when you have a dark mask over the bright area, fading evenly to white over the dark area. The image now looks much more evenly illuminated. Click on the Background label in the Layers palette to highlight the background layer. Then, open the Levels dialog box (Enhance Figure 6-25. The final adjustment, using the Levels dialog box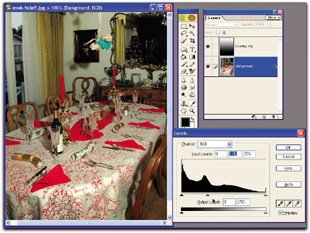 What an amazing difference between Figure 6-23 and Figure 6-25! It's like having a powerful flash that can light up the entire room. Save the image as a Photoshop file ( .psd ). This will preserve the layers so that you can go back and readjust in the future if you wish. Then, select Save As and choose JPEG for the format. This will flatten the file (eliminate the layers) and reduce its size so that you can share it with friends and family more easily especially those who were in the back of the picture and are now cast in a new light, thanks to your Photoshop prowess. Mike Pasini |

 New Layer. Choose Overlay from the Mode pop-up menu and set the opacity to 50%, as shown in Figure 6-23.
 | < Day Day Up > |
EAN: 2147483647
Pages: 161