Querying a Database Directly Using PHP
| I l @ ve RuBoard |
| Now that we have looked at querying a database with ODBC, we can move on to looking at how you can directly query a database using PHP. PHP supports many database APIs, including mSQL, MySQL, Microsoft SQL Server, Oracle, dBASE, Postgres, Informix, Ingres, and InterBase. PHP supports so many, in fact, that covering them all would take a book in itself. Therefore, I will cover only DBMSs that are commonly found on the Windows platform. Microsoft SQL ServerMicrosoft SQL Server (hereby referred to as MS-SQL Server, pronounced "sequel server") probably needs no introduction, but if you don't know much about it, it is Microsoft's flagship database product. It is a Windows-only server that is one of the most common enterprise DBMSs in the Windows world. In fact, it has long played a role in Microsoft's enterprise strategies. As such, developers enjoy close integration between it, the Windows operating system, and other Microsoft products. Installing MS-SQL Server and setting security settings is beyond the scope of this book, but you can learn more from the following:
You can find further information and a trial download at http://www.microsoft.com/sql/evaluation/trial/2000/default.asp. Setting Up MS-SQL Server with PHPSupport for MS-SQL Server within PHP resides in a PHP extension that must first be loaded by PHP in order for the SQL Server functions to work correctly. To allow this module to be loaded, you must first remove the semicolon ( ; ) from the following line in your PHP.ini file: ;extension=php_mssql.dll Remember to make sure that your PHP extension path has been set. (See Chapter 2, "Installation and Optimization," for further information.) Now restart your web server. If you don't get any errors (if you do, double-check the extension path), the SQL Server functions are ready for use. Setting Up a DatabaseThe examples in this chapter use the Pubs database. It is installed by default when you install SQL Server. Setting a ConnectionNow that the SQL Server functions are available, you can start to use SQL Server and PHP together: <?php //connect to database $msqlconc = mssql_connect("emma", "sa", ""); //disconnect from database mssql_close($msqlconc); ?> First you connect to the database and store the connection in memory: $msqlconc = mssql_connect("emma", "sa", ""); Note that the mssql_connect command requires the server name , a username, and, if required, a password. In this example, these are as follows :
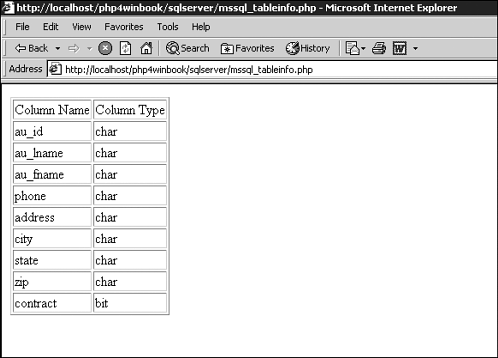
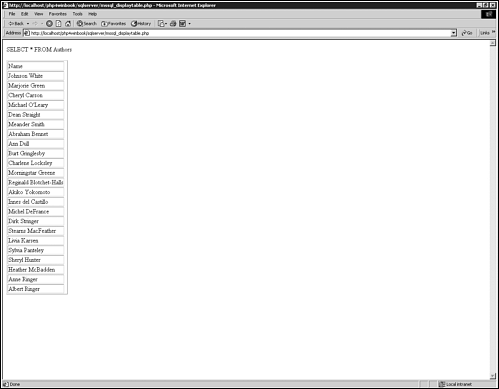
The sa user is installed by default with SQL Server. However, you should set up and use users who have the correct security settings. In order to preserve memory and free up server resources, you disconnect from SQL Server: mssql_close($msqlconc); You can develop this script further using the following: <?php //connect to database If(!($msqlconc = mssql_connect("emma", "sa", ""))) { print("could not connect to MS-SQL Server database"); } else { print("Connected to database "); //disconnect from database mssql_close($msqlconc); } ?> When the mssql_connect function connects to SQL Server, it returns a link identifier if successful or FALSE on error. You can catch this in your script to detect connection values using the following: If(!($msqlconc = mssql_connect("emma", "sa", ""))) Then, in the success block, you can see if the expression evaluated to TRUE and the connection failed: { print("could not connect to MS-SQL Server database"); } or if the connection was successful: else { print("Connected to database"); //disconnect from database mssql_close($msqlconc); } As with ODBC, you can use a persistent connection: <?php $msqlconc = mssql_pconnect("emma", "sa", ""); ?> This lets you create a connection that remains open for the duration of the application. This means that you don't need to keep opening and closing connections in a web application. However, you should use it carefully , because a persistent connection can't be closed with the mssql_close method; it closes only when the web server is stopped . Too many open connections take up server resources. Querying a DatabaseNow that you have connected to a database, the next step is to query the database. As I mentioned, this chapter uses a test database called Pubs. It is preinstalled with SQL Server. <?php //connect to database If(!($msqlconc = mssql_connect("emma", "sa", ""))) { print("could not connect to MS-SQL Server database"); } else { mssql_select_db("pubs", $msqlconc); //create SQL query $query = "SELECT * FROM Authors"; mssql_query($query, $msqlconc); //disconnect from database mssql_close($msqlconc); } First you select the database you want to query: mssql_select_db("pubs", $msqlconc); Next you create a SQL query that queries the database and runs the SQL query against the database: $query = "SELECT * FROM Authors"; mssql_query($query, $msqlconc); If you run this script, you won't see any output, because you haven't yet displayed the query results. Displaying the SQL Server Table StructureWhen you query a table within a database, you can gather information about the table itself ( size , type and number of columns , and so on), as well as data within the table. To display table information, you can use the following: <?php //connect to database If(!($msqlconc = mssql_connect("emma", "sa", "emma"))) { print("could not connect to MS-SQL Server database"); } else { mssql_select_db("pubs", $msqlconc); //create SQL query $query = "SELECT * FROM Authors"; //run SQL query $runquery = mssql_query($query, $msqlconc); //gather number of fields $numfields = mssql_num_fields($runquery); print("<TABLE BORDER=""1"">\n"); print("<TR><TD>Column Name</TD><TD>Column Type</TD></TR>"); for ($p=0; $p < $numfields; $p++) { $fname = mssql_field_name($runquery, $p); $ftype = mssql_field_type($runquery, $p); print "<TR><TD>" . $fname . "</TD><TD>" . $ftype . "</TD></TR>"; } print("</TABLE>"); //disconnect from database mssql_close($msqlconc); } ?> First you create and run the SQL query that selects the table and columns you want to display: $query = "SELECT * FROM Authors"; $runquery = mssql_query($query, $msqlconc) Next you see how many fields your query will return: $numfields = mssql_num_fields($runquery); Then you loop through each column using the number of fields to see how many you need to loop through: for ($p=0; $p < $numfields; $p++) Finally, you display the name and type of each column in turn : $fname = mssql_field_name($runquery, $p); $ftype = mssql_field_type($runquery, $p); mssql_field_name references each column by number. This is why you must first look at how many columns you have and then loop through each one. Column references start at zero. This is why the counter is incremented. If you run the script, you should see information about the table structure, as shown in Figure 6.8. You might wonder why you would want to do this. Table information can be handy to use in certain situations: for temporary names when displaying table data, type conversions between the database data and PHP data, and so on. Figure 6.8. MS-SQL Server database authors table structure. Displaying MS-SQL Server Table DataDisplaying data is not all that different from querying table information. You query the database using SQL, run the query, determine how many results the query has returned, and loop through the results to display. Instead of columns, you are dealing with rows: <?php //connect to database If(!($msqlconc = mssql_connect("emma", "sa", ""))) { print("could not connect to MS-SQL Server database"); } else { mssql_select_db("pubs", $msqlconc); //create SQL query $query = "SELECT * FROM Authors"; //run SQL query $runquery = mssql_query($query, $msqlconc); //gather number of rows $numfields = mssql_num_fields($runquery); print($query . "<BR><BR>\n"); print("<TABLE BORDER=1>\n"); print("<TR><TD>Name<TD></TR>"); $lname = array(); $fname = array(); while($db_row = mssql_fetch_array($runquery)) { $lname[] = $db_row["au_lname"]; $fname[] = $db_row["au_fname"]; } $iCount = count($lname); for ($i=0; $iCount; $i++) { print("<TR<TD>" . $fname[$i] . " " . $lname[$i] . "<TD></TR>"); } print("</TABLE>"); //disconnect from database mssql_close($msqlconc); } ?> Here you use the mssql_fetch_array function. It lets you place the query results into an array: while($db_row = mssql_fetch_array($runquery)) However, the array is a reference array. That is, the query results are formatted into an array structure. To work with the query results, you must copy the results array into a new array: $lname = array(); $fname = array(); Each reference array is named by column name, so for every column, you create a new array for that data: $lname[] = $db_row["au_lname"]; $fname[] = $db_row["au_fname"]; To work without new arrays, all you do is iterate through the contents: $iCount = count($lname); for ($i=0; $i<$Count; $i++) { print("<TR<TD>" . $fname[$i] . " " . $lname[$i] . "<TD></TR>"); } To be able to work with changing table sizes, you first detect the number of items within the array: $iCount = count($lname); This script has two arrays. It's safe to assume that both arrays are the same size, so you can use either array from your table to determine the size. After you have the size, you iterate through the contents, referencing each element within the array by number: for ($i=0; $i<$Count; $i++) { print("<TR<TD>" . $fname[$i] . " " . $lname[$i] . "<TD></TR>"); } If you run this script, you see the query results, as shown in Figure 6.9. Figure 6.9. MS-SQL Server database authors table data. OracleOracle has been around a long time. I first used it on the VAX platform and have used it and seen it running on Windows, Linux, and other platforms. One of the most common enterprise RDBMSs in the world, it is used to power high-profile sites such as Yahoo! and Amazon. Installing Oracle and setting security settings is beyond the scope of this book, but you can learn more from Oracle8 Server Unleashed by Joe Greene (Sams Publishing, 1998). For further information on Oracle and a trial download, go to http://otn.oracle.com/. Setting Up Oracle with PHPSupport for Oracle within PHP resides in a PHP extension that must first be loaded by PHP in order for the Oracle functions to work correctly. To allow this module to be loaded, you must remove the semicolon ( ; ) from the following line in your PHP.ini file: ;extension=php_oci8.dll PHP supports two Oracle database versions: v7 and v8. Oracle v7 is supported through the php_oracle.dll extension, and Oracle v8 is supported through the php_oci8.dll extension. Oracle v7 functions begin with ora (such as ora_logoff ), and Oracle v8 functions begin with oci (such as oci_logoff ). Most Oracle v7 functions are available in Oracle v8 (but have slightly different names, as just mentioned). As such, this book looks at Oracle v8 functions only. Oracle v9 currently is not yet supported by PHP. The Oracle extension uses the Oracle client to pass commands to the Oracle database. Therefore, the Oracle client must be installed correctly for the PHP extension to work (this is true for both v7 and v8). Remember to make sure that your PHP extension path has also been set (see Chapter 2 for further information). Now restart your web server. If you don't get any errors (if you do, double-check the extension path), the Oracle functions are ready for use. Setting Up a DatabaseOracle sets up databases according to users. This is a security measure, so not all database tables are visible to all users. They are visible only to the database users you specify when you create your database and database tables. This chapter uses one of the default Oracle users, scott, and that user's related tables. Setting a ConnectionNow that you have the Oracle functions available, you can start to use Oracle and PHP together. <?php //connect to database $oracle_connection = ocilogon("scott", "tiger"); //disconnect from database ocilogoff($oracle_connection); ?> First you connect to the database and store the connection in memory: $oracle_connection = ocilogon("scott", "tiger"); The ocilogon command requires a username and password. In this example, these are as follows:
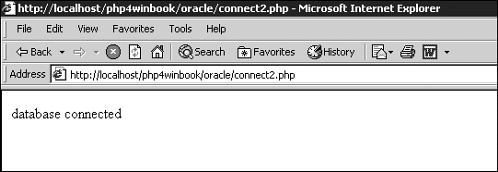
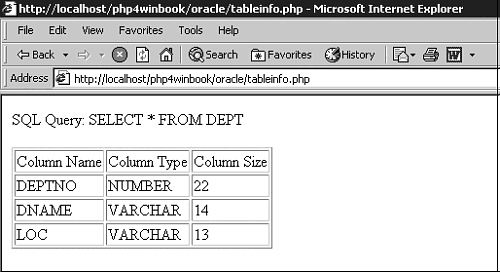
The scott user is installed by default with Oracle. However, I advise that you set up and use users that have the correct security settings. In order to preserve memory and free up server resources, you disconnect from Oracle: ocilogoff($oracle_connection); You can develop this script further using the following: <?php //connect to database If(!($oracle_connection = ocilogon("scott", "tiger"))) { print("could not connect to Oracle database"); } else { print("database connected"); //disconnect from database ocilogoff($oracle_connection); } ?> When the ocilogin function connects to Oracle, it returns a link identifier if successful or FALSE on error. You can catch this in your script to detect connection values using the following: If(!($oracle_connection = ocilogon("scott", "tiger"))) Then, in the success block, you can see if the expression evaluated to TRUE and the connection failed: { print("could not connect to Oracle database"); } or if the connection was successful: else { print("database connected"); ocilogoff($oracle_connection); } If you run this script, you should see that the database connected, as shown in Figure 6.10. Figure 6.10. A successful Oracle connection. As with SQL Server and ODBC, you can use a persistent connection: <?php $oracle_connection = ociplogon("scott", "tiger"); ?> This lets you create a connection that remains open for the duration of the application. This means that you don't need to keep opening and closing connections in a web application. However, you should use this method carefully, because you can't close a persistent connection with the ocilogoff method. The connection closes only when the web server is stopped. As I have noted previously, too many open connections take up server resources. Displaying Oracle Version InformationThe PHP functions can handily tell you what Oracle version you are using: <?php //connect to database If(!($oracle_connection = ocilogon("scott", "tiger"))) { print("could not connect to Oracle database"); } else { $serverver = ociserverversion($oracle_connection); print("The server version is " . $serverver); //disconnect from database ocilogoff($oracle_connection); } ?> Here you use the ociserverversion function: $serverver = ociserverversion($oracle_connection); If you run this script, you should see the Oracle server version, as shown in Figure 6.11. This function can be useful for several reasons, but it is most useful if you are running Oracle v7 and v8 and need to run the same generic script against them. Using this function can help your script choose either Oracle v7 PHP functions or Oracle v8 PHP functions. Figure 6.11. Oracle server information. Displaying the Oracle Database Table StructureTo display table information, you can use the following: <?php //connect to database If(!($oracle_connection = ocilogon("scott", "tiger"))) { print("could not connect to Oracle database"); } else { //create SQL query $query = "SELECT * FROM DEPT"; //parse query ready for Oracle use $p_query = ociparse($oracle_connection, $query); ociexecute($p_query); if($dberror = ocierror($p_query)) { print "An error occurred when attempting to run a query against the database, Here you create and run the SQL query that selects the table and columns you want to display: $query = "SELECT * FROM DEPT"; $p_query = ociparse($oracle_connection, $query); ociexecute($p_query); Note that the SQL query must be parsed by the ociparse command before it is executed. Next you see if the query returns any errors, catch those errors, and display any error information: if($dberror = ocierror($p_query)) { print "An error occurred when attempting to run a query against the database, If no errors are detected , you can move on to looking at the table structure that the query returns. The first stage is to look at the number of columns that the query has returned: $numofcols = ocinumcols($p_query); Next you must look at each column in turn to see its details. You do this by looping through each one using the number of columns to determine how many you must loop through: for($cols=0; $cols <= $numofcols; $cols++) { print("<TR>"); print("<TD>" . ocicolumnname($p_query, $cols) . "</TD>"); print("<TD>" . ocicolumntype($p_query, $cols) . "</TD>"); print("<TD>" . ocicolumnsize($p_query, $cols) . "</TD>"); print("</TR>"); } As you loop through the columns, you use the ocicolumnname function to show the column name, ocicolumntype to show the column type function, and ocicolumnsize to show the column size. If you run the script, you should see the table information, as shown in Figure 6.12. Figure 6.12. The Oracle database table DEPT structure. Displaying Oracle Database Table DataAs alluded to earlier, displaying data is not all that different from querying table information. You query the database using SQL, run the query, determine how many results the query has returned, and loop through the results to display. Instead of columns, you are dealing with rows: <?php //display contents of an Oracle DB table //connect to database If(!($oracle_connection = ocilogon("scott", "tiger"))) { print("could not connect to Oracle database"); } else { //create SQL query $query = "SELECT * FROM DEPT"; //parse query ready for Oracle use $p_query = ociparse($oracle_connection, $query); ociexecute($p_query); if($dberror = ocierror($p_query)) { print "An error occurred when attempting to run a query against the database, As in the previous example, you first create and run the SQL query that selects the table and columns you want to display: $query = "SELECT * FROM DEPT"; $p_query = ociparse($oracle_connection, $query); ociexecute($p_query); Next you find the number of columns the query returns using the ocinumcols function: $numofcols = ocinumcols($p_query); Next you loop over the columns to display the name of each column using the ocicolumnname function. You use that name to name each column in the HTML table: for($cols=1; $cols <= $numofcols; $cols++) { print("<TD>" . ocicolumnname($p_query, $cols) . "</TD>"); } Now you look at the data in the table. To do this, you loop over each row the query returns: while(ocifetch($p_query)) Next you look through each row to display the data in each column in that row using the ociresult function: for($rowcols=1; $rowcols <= $numofcols; $rowcols++) { print("<TD>" . ociresult($p_query, $rowcols) . "</TD>"); } If you run the script, you should see the data from the DEPT table, as shown in Figure 6.13. Figure 6.13. The Oracle database table DEPT data. MySQLMySQL and PHP have long enjoyed a close relationship. One term often used in Linux circles is Linux Apache MySQL PHP (LAMP), which refers to a software toolkit. MySQL, like PHP, is open-source. The license for MySQL is slightly different from that for PHP. MySQL is licensed under a dual license ”either the GNU Public License or a proprietary license for proprietary use. MySQL is available for many OSs, including Windows and Linux. MySQL on the Windows platform is often slightly behind its Linux version in terms of versions and stability. It requires that licences must be purchased for commercial use on the Windows platform. However, if you intend to roll out your project on a Linux box, but you are developing on the Windows platform, MySQL is a great choice (and you can also run PHP and Apache on the Windows platform to further mirror your Linux solution). Installing MySQL and setting security settings is beyond the scope of this book, but you can learn more from MySQL by Paul DuBois (New Riders Publishing, 1999). You can find further information and a download of MySQL at http://www.mysql.com/downloads/index.html. Setting Up MySQL with PHPUnlike SQL Server or Oracle, MySQL support is built directly into PHP binaries for Windows. You don't need to modify the PHP.ini file. All the functions you need are immediately available. Setting Up a DatabaseMySQL has no default database that we can make use of, so for the purposes of this chapter, I have set one up. First, I created a database called edb. I then created a table for that database using the following SQL script: CREATE TABLE names ( ID INT UNSIGNED NOT NULL AUTO_INCREMENT PRIMARY KEY, name VARCHAR(30) NOT NULL ) After the table has been created, you need to add some data to it using the following SQL script: INSERT INTO names (name) VALUES ('Andrew'),('Emma'),('Terry'), ('Mary'),('Thomas') Various GUI tools (including an open-source PHP version called phpMyAdmin) are available to administer PHP. However, you might find it easier to use the command line, because this is the main method of using and administering MySQL. It is well-documented. If you intend to use MySQL on both Windows and Linux, all the commands are the same. I recommend MySQL by Paul DuBois (New Riders Publishing, 1999) as a reference on creating databases and database tables and populating database tables using the command line. Setting a ConnectionNow that you have a database available, you can start using MySQL and PHP together: <?php $dbcon = mysql_connect("localhost", "Andrew", ""); mysql_close($dbcon); ?> First you connect to the database and store the connection in memory: $dbcon = mysql_connect("localhost", "Andrew", ""); The mysql_connect command requires a server name and address, a username, and a password. In this example, these are as follows:
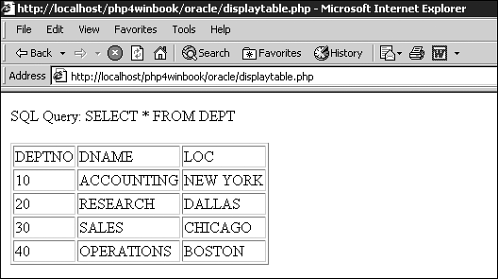
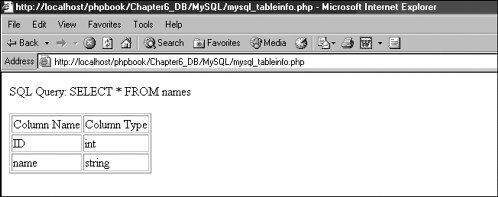
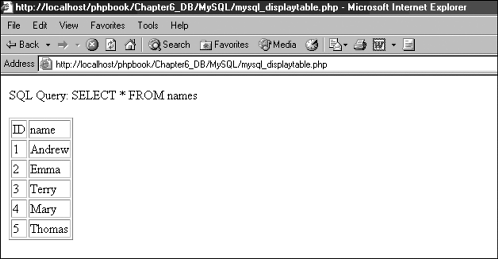
MySQL has only the root user by default, so you should set up users with the correct permissions. For this example, I have set up a new user called Andrew. In order to preserve memory and free up server resources, you disconnect from MySQL: mysql_close($dbcon); You can develop this script further using the following: <?php if(!($dbcon = mysql_connect("localhost", "Andrew", ""))) { print("could not connect to MySQL database"); } else { print("database connected"); mysql_close($dbcon); } ?> When the mysql_connect function connects to MySQL, it returns TRUE if it connects successfully or FALSE if the connection fails. You can catch this in your script to detect connection values using the following: if(!($dbcon = mysql_connect("localhost", "Andrew", ""))) Then, in the if logic, you see if the connection failed: { print("could not connect to MySQL database"); } or if the connection was successful: else { print("database connected"); mysql_close($dbcon); } If you run this script, you should see that the database connected, as shown in Figure 6.14. Figure 6.14. A successful MySQL connection. As with Oracle, SQL Server, and ODBC, you can use a persistent connection: <?php $dbcon = mysql_pconnect("localhost", "Andrew", "") ?> This lets you create a connection that remains open for the duration of the application. This means that you don't need to keep opening and closing connections in a web application. However, you should use this method carefully, because you can't close persistent connections using the mysql_close method. These connections close only when the web server is stopped. Too many open connections take up server resources. Querying a DatabaseMySQL gives you two ways to query a database. The first method is as follows: <?php //connect to database If(!($dbcon = mysql_connect("localhost", "Andrew", ""))) { print("could not connect to MySQL database"); } else { if(!(mysql_select_db("edb", $dbcon))) { print("database select failed - error number: " . mysql_errno() . " error Using the mysql_select_db function, you first select the database you want to query, while testing that the connection was successful: if(!(mysql_select_db("edb", $dbcon))) If it was successful, you define the SQL query you want to run: $query = "SELECT * FROM names"; Then, using the SQL query, you query the database using the mysql_query function: $query_result = @ mysql_query($query, $dbcon); Displaying the MySQL Database Table StructureTo display table information, you can use the following: <?php //connect to database If(!($dbcon = mysql_connect("localhost", "Andrew", ""))) { print("could not connect to Oracle database"); } else { $query = "SELECT * FROM names"; if(!(mysql_select_db("edb", $dbcon))) { print("database select failed - error number: " . mysql_errno() . " error First you connect to and query the database: $query = "SELECT * FROM names"; if(!(mysql_select_db("edb", $dbcon))) { print("database select failed - error number: " . mysql_errno() . " error message: " Next, using the result from the query, you run through each column the query returns using the mysql_num_fields function: for ($b = 0; $b < mysql_num_fields($query_result); $b++) As you run through each column, you display that column's name and type using the mysql_field_name and mysql_field_type functions: print("<TD>" . mysql_field_name($query_result, $b) . "</TD>"); print("<TD>" . mysql_field_type($query_result, $b) . "</TD>"); If you run the script, you should see that the table information is displayed, as shown in Figure 6.15. Figure 6.15. The MySQL database names table structure. Displaying MySQL Database Table DataDisplaying data from MySQL table data is generally like displaying it from the other databases' tables: <?php //connect to database If(!($dbcon = mysql_connect("localhost", "Andrew", ""))) { print("could not connect to Oracle database"); } else { $query = "SELECT * FROM names"; if(!(mysql_select_db("edb", $dbcon))) { print("database select failed - error number: " . mysql_errno() . " error First you connect to and query the database: $query = "SELECT * FROM names"; if(!(mysql_select_db("edb", $dbcon))) { print("database select failed - error number: " . mysql_errno() . " error message: " Next you display the names of each column in the database table to make up the HTML table. You use the mysql_numfields and mysql_field_name functions, which you met in the previous example: for ($col_count = 0; $col_count < mysql_numfields($query_result); $col_count++) { print("<TD>" . mysql_field_name($query_result, $col_count) . "</TD>"); } Next you run through each row the query returns using the mysql_numrows function: for ($row_count = 0; $row_count < mysql_numrows($query_result); $row_count++) { You then store each row in an array as it is returned: $row = @ mysql_fetch_row($query_result); You then run through all the columns the query returns. Again you use the mysql_numfields function: for ($col_count = 0; $col_count < mysql_numfields($query_result); $col_count++) As you run through each column, you use the column position to reference the row array: print("<TD>" . $row[$col_count] . "</TD>"); This in effect lets you separate the array into individual fields referenced by the column value. If you run the script, you should see data from the names table, as shown in Figure 6.16. Figure 6.16. MySQL names table data. |
| I l @ ve RuBoard |
EAN: 2147483647
Pages: 99
