Working on a LAN
Configuring a computer to work on a local area network (LAN) used to be quite an ordeal. With Windows 2000, it's generally a simple matter of installing a network adapter in your computer. Windows 2000 detects your network adapter when you start your computer and then starts the local area connection automatically.
TIP
If you have more than one network adapter installed, rename each local area connection to clearly identify which network it connects to. Simply right-click the icon and choose Rename.
If you need to connect to a Novell NetWare network, or your network uses a protocol other than TCP/IP (Transmission Control Protocol/Internet Protocol), you'll need to configure your network connection.
Configuring a Network Connection
When you install Windows 2000 (or when you install a new network adapter), Windows creates a local connection that includes the following components:
- Client For Microsoft Networks. A network client provides access to computers and resources on a network; this client works with Windows-based networks.
- File And Printer Sharing For Microsoft Networks. This service allows other computers on your Windows-based network to access shared resources on your computer.
- Internet Protocol (TCP/IP). A network protocol is the set of rules that computers on a network use to communicate. TCP/IP is the default protocol in Windows 2000 and provides easy connectivity across a wide variety of networks, including the Internet.
This default collection of clients, services, and protocols is generally all you need for working with a Microsoft network (that is, one where all computers are running Windows 2000, Windows NT, Windows 98, or Windows 95). To see the installed components, right-click the Local Area Connection icon and choose Properties. See Figure 16-2.
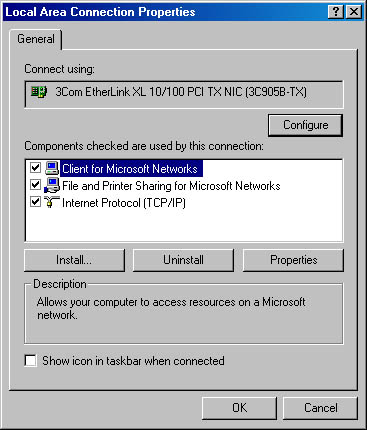
Figure 16-2. To enable or disable an installed component, click its check box.
You can install and enable additional clients, services, and protocols, but for best performance, you should install only the ones you need. If you install and enable several protocols, for example, Windows 2000 attempts to connect using each one, which generates extra network traffic—and serves no purpose if other computers on the network don't use the same protocol.
How do you know which ones you need?
- If your computer is part of a large network, ask your system administrator. (Sorry, but too many variations exist to cover here. If you're connecting to a NetWare network, you'll probably need to add the Client Service For NetWare client; when you do that, Windows also installs two protocols: NWLink NetBIOS and NWLink IPX/SPX/NetBIOS Compatible Transport Protocol.)
- If you have a small network (where you are the administrator), start with the default configuration. If the other computers on your network are running Windows 2000, you don't need to make any changes. If the other computers use earlier versions of Windows or Windows NT, you'll need to see which protocol is being used on those systems; they might be using only NetBEUI. You can add the NetBEUI protocol to your Windows 2000 system, but you'll need to keep TCP/IP if you plan to connect to the Internet. If your other Windows computers use NetBEUI, a better solution is to change them to use TCP/IP. Unfortunately, TCP/IP isn't as easy to configure in other Windows versions as it is in Windows 2000; if you can't find the information you need to configure TCP/IP on the other systems, stick with NetBEUI, which doesn't require any special settings.
NOTE
You must be logged on as a member of the Administrators group to make any changes in the connection's properties dialog box.
To install a new component:
- In the connection's properties dialog box, click Install.
- In the Select Network Component Type dialog box that appears, select a component type:
- A client provides access to resources on a particular type of network, such as NetWare.
- A service provides other network features, such as network backup agents.
- A protocol is the language used to communicate with other computers. In addition to TCP/IP, Windows 2000 includes support for IPX/SPX (the protocol used on most NetWare networks), AppleTalk, and NetBEUI (a protocol used on some Microsoft networks).
- Click Add.
- Select the component you want to add, and then click OK.
After you add a component, it's available to all your network and dial-up connections. (You can confirm this fact by examining the General or Networking tab of each connection's properties dialog box.) The component isn't actually used by a connection, however, unless you enable it, which you do by selecting the check box next to the component name on the General or Networking tab.
To remove an installed component, highlight it and click Uninstall.
Configuring TCP/IP Connections
TCP/IP, the default network protocol used by Windows 2000, is perhaps best known for the alphabet soup of acronyms that inevitably enter the discussion. Some of these—in particular DHCP (Dynamic Host Configuration Protocol) and DNS (Domain Name System)—refer to methods for assigning and finding IP (Internet Protocol) addresses. Each network adapter has a unique IP address, which is expressed as a series of four numbers (each from 0 through 255) separated by periods, like this: 192.0.0.237
In a nutshell, DHCP is a widely used service that assigns a unique IP address to each computer as it joins the network, and DNS finds the proper IP address when you enter the name of a computer (say, by clicking a computer name in My Network Places). While this system works well, it requires somebody to set up and administer these services—usually on a Windows NT Server or Windows 2000 Server.
![]()
To the rescue comes a new feature, which includes an acronym within its acronym: APIPA (Automatic Private IP Addressing). This feature, new in Windows 2000, makes it easy to create a small private network, without any administration headaches. (A private network is an internal network that isn't part of a public network, such as the Internet.) When Windows 2000 starts, APIPA looks for a DHCP server. If it finds one, it obtains an IP address from the DHCP server; otherwise, APIPA assigns a unique IP address to the connection. APIPA periodically checks to make sure that the assigned IP address remains unique on the network and assigns a new address if it is not.
APIPA uses blocks of addresses that are reserved for private networks (169.254.0.1 through 169.254.255.254), so you don't need to worry about conflicts with IP addresses of Internet hosts. However, this means that your connection's IP address might not be unique on the Internet, so you can't use it to access the Internet. Not a problem. The IP address applies only to your network adapter, which connects you to your local area network. If you connect to the Internet via a dial-up connection or a different network adapter (such as one connected to a cable modem), that connection will have its own IP address. If you connect via a proxy server or a router on your network, the proxy server or the router translates your private IP address to a globally unique address provided by your ISP (Internet service provider).
All this is a long way of saying that through the miracle of DHCP, DNS, and APIPA, you'll probably never have to venture into the arcane TCP/IP settings.
If your ISP gives you a static IP address, which is common with "always-on" connections such as cable and digital subscriber line (DSL), or if you need a static IP address for any other reason, do this:
- In the Network And Dial-Up Connections folder, right-click the connection you want to modify and choose Properties from the shortcut menu.
- Highlight Internet Protocol (TCP/IP) and click the Properties button.
- Select Use The Following IP Address.
- Type the IP address, subnet mask, default gateway, and DNS server address(es).
The Internet Protocol (TCP/IP) Properties dialog box appears.
Your ISP or your network administrator should provide this information.
Joining a Domain or Workgroup
SEE ALSO
For information about domains and workgroups, see the "Domains and Workgroups" sidebar in section "Using My Network Places."
During the Windows 2000 setup process, you have the opportunity to join an existing domain or workgroup. If you bypassed that opportunity, or if you want to join a different domain or workgroup, you can—as long as you are logged on as a member of the Administrators group. Your computer can be part of only one domain or workgroup, so if you join a new one, your computer account on the old one will be disabled.
To join a domain or workgroup:
- In the Network And Dial-Up Connections folder, open the Advanced menu and choose Network Identification.
- Click the Properties button.
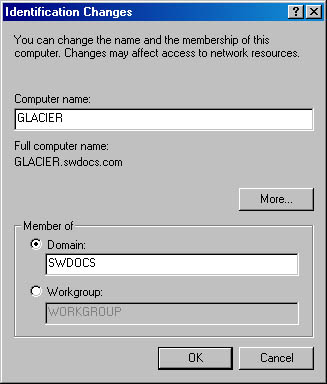
- Type the computer name if you want to change it.
The Network Identification tab of the System Properties dialog box shows your computer's current name and domain or workgroup.
The Identification Changes dialog box appears, as shown next.
The computer name must include only letters, numbers, and hyphens. If you are using the TCP/IP protocol, the name can be up to 63 characters long; otherwise, the maximum length is 15 characters.
NOTE
Do not include the domain name in the Computer Name box. (As you can see in the dialog box just shown, the full computer name in a Windows 2000 domain includes the computer name followed by a period and the domain name.)
- Under Member Of, select Domain or Workgroup.
- Type the name of the domain or workgroup you want to join.
If you're creating a new workgroup, choose a name that isn't the same as the name of any computer that will join the workgroup. The workgroup name can be up to 15 characters. Although some punctuation symbols are permitted, you can avoid problems by using only letters, numbers, and hyphens in the name. (You create a workgroup simply by using this procedure on each computer and typing the same workgroup name on all computers.)
NOTE
You can't create a domain with Windows 2000 Professional; you can only join an existing domain. Only machines running Windows 2000 Server can be set up as domain controllers.
- Click OK.
- If you're joining a domain
- Windows asks you to provide the user name and password of an account that is authorized to join the domain. Your network administrator should give you this information. Type the information and click OK.
- The domain controller sends you a welcome message.
- When prompted by Windows, restart your computer to effect the changes.
EAN: 2147483647
Pages: 317