ListView
The ListView control displays a list of items in one of five possible views, determined by the control’s View property. The View property can take the following values:
-
Details - For each item, displays a small icon, the item’s text, and the subitems’ text on a row.
-
LargeIcon - Displays large icons above the item’s text. Entries are arranged from left to right until they wrap to the next row.
-
List - Displays small icons to the left of the item’s text. Each entry is placed on its own row.
-
SmallIcon - Displays small icons to the left of the item’s text. Entries are arranged from left to right until they wrap to the next row.
-
Tile - Displays large icons to the left of the item’s text. Entries are arranged from left to right until they wrap to the next row.
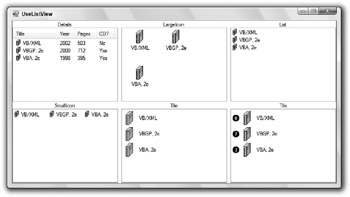
Figure G-8 shows each of these views for the same list of items. The second tiled view shown in the lower-right corner uses the control’s CheckBoxes and StateImageList properties, and is described shortly.

Figure G-8: The ListView control can display five views.
Set the control’s LargeImageList and SmallImageList properties to ImageList controls containing the images that you want to use for the LargeIcon and SmallIcon views.
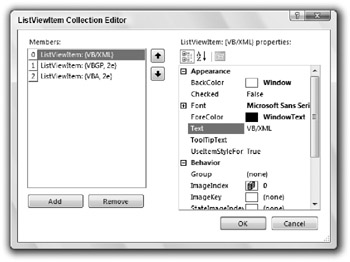
Each of the ListView control’s items may contain one or more subitems that are displayed in the Details view. To create the items and subitems, open the form designer, select the ListView control, click the Items property in the Properties window, and click the ellipsis (...) button to the right. This displays the ListViewItem Collection Editor shown in Figure G-9.

Figure G-9: Use the ListViewItem Collection Editor to define a ListView control’s items at design time.
Click the Add button to make a new item. Set the item’s Text property to the string you want the control to display. If you have attached ImageList controls to the ListView, set the new item’s ImageIndex property to the index of the image you want to display for this item in the LargeIcon and SmallIcon views.
For example, the program in Figure G-8 contains two ImageList controls. The imlBig control contains 32 × 32 pixel images and the imlSmall control contains 16 × 16 pixel images. Each holds one image of a book. All of the items in the ListView items have ImageIndex set to 0, so they all display the first images in the imlBig and imlSmall controls.
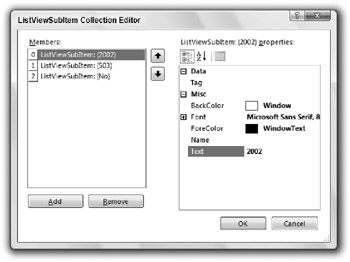
To give an item subitems, select it in the ListViewItem Collection Editor, click on its SubItems property, and then click the ellipsis (...) button to the right to display the ListViewSubItem Collection Editor shown in Figure G-10. Use the Add button to make subitems. Set the subitems’ Text properties to determine what the Details view displays.

Figure G-10: Use the ListViewSubItem Collection Editor to define a ListView item’s subitems.
If you set the ListView control’s CheckBoxes property to True, the control displays check boxes next to its items. If you set the control’s StateImageList property to an ImageList control, then the control displays the images in that list. When the user double-clicks on an item, the control toggles the image index between 0 and 1 and displays the first or second image. In Figure G-8, the ListView on the lower-right uses check box images that look like circles with numbers inside. If you set CheckBoxes to True but do not set the ListView control’s StateImageList property, the control displays simple boxes containing check marks.
If CheckBoxes is True, the program can use the CheckedIndices or CheckedItems collections to see which items the user has selected. If the StateImageList control holds more than two images, an item is considered checked if it is displaying any picture other than the first one. The following code lists the currently checked items in the lvwMeals ListView control:
For Each checked_item As ListViewItem In lvwMeals.CheckedItems Debug.WriteLine(checked_item.ToString) Next checked_item The control’s SelectedIndices and SelectedItems collections let the program see which items the user has currently selected. The user can select items by clicking on them. If the user holds down the Ctrl key while clicking, any items that are already selected remain selected. If the user clicks an item, holds down the Shift key, and then clicks another item, the control selects all of the items in between the two.
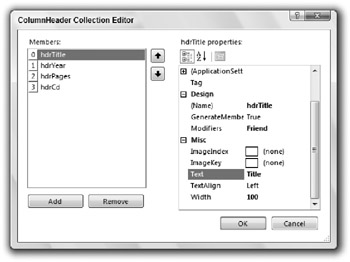
If you are using the ListView in Details mode, you must define the control’s columns. Open the form designer, select the control, click the Columns property in the Properties window, and click the ellipsis (...) button to the right to display the ColumnHeader Collection Editor shown in Figure G-11.

Figure G-11: Use the ColumnHeader Collection Editor to define the columns a ListView displays in Detail mode.
Use the Add button to create column headers and then set each header’s text. If you don’t define enough columns for all of the subitems, some of the subitems will not be visible to the user.
The LabelEdit control has several other properties that determine its appearance and how the control interacts with the user. The following table describes some of the most important of these.
| Property | Purpose |
|---|---|
| AllowColumnReorder | If True, the user can rearrange the columns by dragging their column headers while in Detail mode. |
| FullRowSelect | If True, then clicking an item or any of its subitems selects the item. If False, the user must click the item, not a subitem, to select the item. If AllowColumnReorder is True, you may want to set FullRowSelect to True also so the user doesn’t need to figure out which rearranged column contains the item itself. |
| GridLines | If True, the control displays gray lines between the rows and columns while in Detail mode. |
| HeaderStyle | When in Detail mode, this can be None to not display column headers, Clickable to allow the user to click column headers, or Nonclickable to not let the user click column headers. If this is Clickable, the program can catch the control’s ColumnClick event to learn the index of the column clicked. For example, you may want to sort the ListView control’s items using the clicked column. |
| LabelEdit | If True, the user can modify the items’ labels. The user can never change the subitems’ labels. |
| MultiSelect | If True, the user can use the Ctrl and Shift keys to select multiple items. |
| Sorting | Indicates whether the control displays its items sorted ascending, sorted descending, or not sorted. |
ListView Helper Code
In addition to using the ListView control’s collection property editors at design time, you can manipulate the control’s items and subitems at runtime using code.
The control’s Columns collection contains ColumnHeader objects representing the control’s column headers. You can use the collection’s Add, Count, Remove, RemoveAt, and other methods to manage the text displayed above the columns.
The ListViewMakeColumnHeaders subroutine shown in the following code uses the Columns collection to define a ListView control’s column headers. The routine takes as parameters a ListView control and a ParamArray of values that contain title strings, alignment values, and widths. The code clears the control’s Columns collection and then loops through the ParamArray. For each triple of array entries, the control creates a column header using the title string, alignment value, and width.
' Make the ListView's column headers. ' The ParamArray entries should be triples holding ' column title, HorizontalAlignment value, and width. Private Sub ListViewMakeColumnHeaders(ByVal lvw As ListView, _ ByVal ParamArray header_info() As Object) ' Remove any existing headers. lvw.Columns.Clear() ' Make the column headers. For i As Integer = header_info.GetLowerBound(0) To _ header_info.GetUpperBound(0) Step 3 Dim col_header As ColumnHeader = lvw.Columns.Add( _ DirectCast(header_info(i), String), _ -1, _ DirectCast(header_info(i + 1), HorizontalAlignment)) col_header.Width = DirectCast(header_info(i + 2), Integer) Next i End Sub The following code shows how a program might use subroutine ListViewMakeColumnHeaders to define the lvwBooks control’s column headers. Because the Pages and Year columns contain numeric values, the control aligns them on the right of their columns.
' Make the ListView column headers. ListViewMakeColumnHeaders(lvwBooks, _ "Title", HorizontalAlignment.Left, 120, _ "URL", HorizontalAlignment.Left, 120, _ "ISBN", HorizontalAlignment.Left, 90, _ "Picture", HorizontalAlignment.Left, 120, _ "Pages", HorizontalAlignment.Right, 50, _ "Year", HorizontalAlignment.Right, 40) The ListView control’s Items collection contains ListViewItem objects that represent the control’s items. Each ListViewItem has a SubItems collection that represents the item’s subitems. These collections provide the usual assortment of methods for managing collections: Count, Add, Remove, RemoveAt, and so forth.
The ListViewMakeRow subroutine shown in the following code uses these collections to add an item and its subitems to a ListView. The routine takes as parameters the ListView control, the name of the item, and a ParamArray containing the names of any number of subitems. The code uses the ListView control’s Items.Add method to make the new item. It then loops through the subitem names, using the new item’s SubItems.Add method to make the subitems.
' Make a ListView row. Private Sub ListViewMakeRow(ByVal lvw As ListView, ByVal image_index As Integer, _ ByVal item_title As String, ByVal ParamArray subitem_titles() As String) ' Make the item. Dim new_item As ListViewItem = lvw.Items.Add(item_title) new_item.ImageIndex = image_index ' Make the subitems. For i As Integer = subitem_titles.GetLowerBound(0) To _ subitem_titles.GetUpperBound(0) new_item.SubItems.Add(subitem_titles(i)) Next i End Sub If you set a ListView column’s width to -1, the control automatically resizes the column so it is wide enough to display all of its data. If you set a column’s width to -2, the control makes the column wide enough to display all of its data and its header text.
The ListViewSizeColumns subroutine shown in the following code sizes all of a ListView control’s columns so that they fit their data. If the allow_room_for_header parameter is True, it also allows room for the column headers.
' Set column widths to -1 to fit data, -2 to fit data and header. Private Sub ListViewSizeColumns(ByVal lvw As ListView, _ ByVal allow_room_for_header As Boolean) Dim new_wid As Integer = -1 If allow_room_for_header Then new_wid = -2 ' Set the width for each column. For i As Integer = 0 To lvw.Columns.Count - 1 lvw.Columns(i).Width = new_wid Next i End Sub These helper routines make working with ListView controls a bit easier.
Custom ListView Sorting
The ListView control’s Sorting property enables you to sort items in ascending or descending order, but it only considers the items, not the subitems. It doesn’t even use the subitems to break ties when two items have the same values.
Fortunately, the ListView control’s ListViewItemSorter property provides the flexibility to change the sort order in any way you like. To use this property, you must create a class that implements the IComparer interface. The ListView control will use an object of this type to decide which items to place before other items.
The following example shows how to use the IComparer interface. You can also find examples in the section “Array.Sort” in Chapter 18 and in the section “Derived Controls” in Chapter 12.
The ListViewComparer class shown in the following code allows a ListView to sort in ascending or descending order on any of its columns. The control uses private m_ColumnNumber and m_SortOrder variables to remember which column to sort and the direction in which to sort. The class’s constructor initializes these values.
The key to the IComparer interface is the Compare function. This routine must compare two objects: x and y. It should return a value less than zero, zero, or greater than zero, depending on whether object x should be considered as less than, equal to, or greater than object y according to the sort.
This version of the Compare function starts by converting the two generic objects x and y into ListView?Items. For each item, the code initializes a string to either the appropriate item or subitem’s text, or to a blank string if the item does not have that subitem. For example, if the program is trying to sort using the fifth subitem, but an item only has two subitems, the code cannot try to access that item’s fifth subitem.
After it has strings representing the two items, the code uses the String class’s Compare method to compare them.
' Implements a comparer for ListView columns. Class ListViewComparer Implements IComparer Private m_ColumnNumber As Integer Private m_SortOrder As SortOrder Public Sub New(ByVal column_number As Integer, ByVal sort_order As SortOrder) m_ColumnNumber = column_number m_SortOrder = sort_order End Sub ' Compare the items in the appropriate column ' for objects x and y. Public Function Compare(ByVal x As Object, ByVal y As Object) _ As Integer Implements System.Collections.IComparer.Compare Dim item_x As ListViewItem = DirectCast(x, ListViewItem) Dim item_y As ListViewItem = DirectCast(y, ListViewItem) ' Get the subitem values. Dim string_x As String If item_x.SubItems.Count <= m_ColumnNumber Then string_x = "" Else string_x = item_x.SubItems(m_ColumnNumber).Text End If Dim string_y As String If item_y.SubItems.Count <= m_ColumnNumber Then string_y = "" Else string_y = item_y.SubItems(m_ColumnNumber).Text End If ' Compare them. If m_SortOrder = SortOrder.Ascending Then Return String.Compare(string_x, string_y) Else Return String.Compare(string_y, string_x) End If End Function End Class The following code shows how a program might use the ListViewComparer class to enable the user to sort in ascending or descending order on any column in Details view. The user can click any column to sort on that column. If the user clicks the same column again, the program reverses the sort order.
This code keeps track of the column that it is currently using for sorting in its m_SortingColumn variable.
When the user clicks a column header, the lvwBooks control’s ColumnClick event handler fires. The event handler begins by getting a reference to the column that the user clicked and determines the sort order it should use. If the current sorting column is Nothing, then the program sets the new sort order to Ascending.
If the current sorting column is not Nothing, then the program compares that column to the newly clicked column. If the two are the same, the program switches the sort order. It knows the current sort order because the sorting column begins with > if the program is sorting in ascending order, and < if the program is sorting in descending order.
If the current sorting column is not Nothing and the newly clicked column is different from the current sort column, then the program sorts in ascending order.
Having decided on a sort order, the program removes the > or < from the front of the current sorting column’s header if the program is currently sorting on a column.
The code then saves a reference to the new sorting column and adds a > or < to its column header to indicate the direction of the sort. The program sets the ListView control’s ListViewItemSorter property to a new ListViewComparer object that is initialized, so it sorts the correct column in the proper order. Finally, the program calls the control’s Sort method to make it resort its items.
' The column currently used for sorting. Private m_SortingColumn As ColumnHeader ' Sort using the clicked column. Private Sub lvwBooks_ColumnClick(ByVal sender As System.Object, _ ByVal e As System.Windows.Forms.ColumnClickEventArgs) Handles lvwBooks.ColumnClick ' Get the new sorting column. Dim new_sorting_column As ColumnHeader = _ lvwBooks.Columns(e.Column) ' Figure out the new sorting order. Dim sort_order As System.Windows.Forms.SortOrder If m_SortingColumn Is Nothing Then ' New column. Sort ascending. sort_order = SortOrder.Ascending Else ' See if this is the same column. If new_sorting_column.Equals(m_SortingColumn) Then ' Same column. Switch the sort order. If m_SortingColumn.Text.StartsWith("> ") Then sort_order = SortOrder.Descending Else sort_order = SortOrder.Ascending End If Else ' New column. Sort ascending. sort_order = SortOrder.Ascending End If ' Remove the old sort indicator. m_SortingColumn.Text = m_SortingColumn.Text.Substring(2) End If ' Display the new sort order. m_SortingColumn = new_sorting_column If sort_order = SortOrder.Ascending Then m_SortingColumn.Text = "> " & m_SortingColumn.Text Else m_SortingColumn.Text = "< " & m_SortingColumn.Text End If ' Create a comparer. lvwBooks.ListViewItemSorter = New ListViewComparer(e.Column, sort_order) ' Sort. lvwBooks.Sort() End Sub This example is rather complicated because it allows the user to sort on any column in either order. Building a comparer class that sorts the items in one order considering both the item values and the subitem values to break ties would be a bit simpler.
EAN: N/A
Pages: 417