Web Server Image Maps
| |
How to link parts of an image to different Web pages.
Over the course of our tour of Web technologies, we've seen how HTML offers hypertext links, where clicking on a hyperlink causes a jump to the page to which the anchor points. We've also seen how images can be hyperlinks . If an anchor is created for a given image and a reader clicks on that image, the browser will request the hypertext page referenced by the anchor.
Each image can have one hypertext link. When you click on a given image, you'll jump to a given document. You might, for example, have three or four small images (icons, in other words), with each representing a different choice to the reader.
It's time now to talk about another technique: image mapping. With image mapping, where you jump to depends upon which part of an image you click on. A single image can thus be a vector to many possible paths. Image maps require that your Web browser somehow communicate with a process on the Web server; it must pass coordinates that describe exactly where on the screen the user clicked.
Fix Up Your Image
This example shows how image maps work. The image below is a graphic in .gif format. Try placing the cursor over one of the shapes in the image and clicking the mouse button.
The figure is an image map. In this example, I've created a fairly large (almost full-screen) graphic image and saved it as a .gif file called sample.gif. Note that the graphic is divided into several regions Circle City and Squaresville, for example. There's also a pale-yellow background area, which is not marked as a region per se.
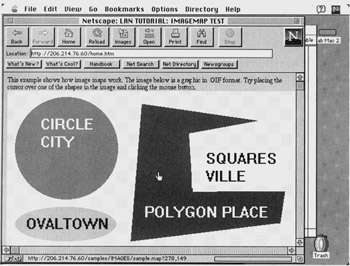
Using the Web browser, a reader can position the cursor over any one of these regions, then click the mouse button. Because this is an image map, clicking on the circle will result in a hyperlink jump to the HTML document circle.htm. If, instead, the user clicked on the polygon, the document poly.htm would be fetched . This particular example is set up so that if the user clicks on the graphicbut not on one of the marked regionsa default document will be displayed. (I named my default document misc.htm.) Also, you're not required to choose destination document names according to the shape of the region they correspond toI just happened to do so for this example.
Listing 1HOME.HTM
<HTML> <HEAD> <TITLE>LAN TUTORIAL: IMAGEMAP TEST</TITLE> </HEAD> <P>This example shows how image maps work. Figure 1 is a graphic in .gif format. Try placing the cursor over one of the shapes in the image and clicking the mouse button.</P> <A HREF="/images/sample.map"> <IMG SRC="/images/sample.gif" ALIGN="BOTTOM" ismap border=0></A> </HTML>
Listing 1 shows the HTML code necessary to make this image map work. If you've been following this series of tutorials, which began with "Providing Internet and World Wide Web Services," you're probably familiar with most of the HTML code shown here, so I'll just focus on the line that reads as follows :
<AHREF="/images/sample.map"><IMG SRC="gifs/sample.gif"ALIGN="BOTTOM" ismap border=0 ></A>
This is the key line for this image map example.
The most important word in that line is the key word ISMAP, which tells the user's Web browser that this is an image map. The first part of the line, <A HREF="/images/sample.map">, is the name of the map file, which will be used to interpret which hypertext link to take, based on where the user clicked on the image. The second part of the line, <IMG SRC="/images/sample.gif" ALIGN="BOTTOM" ismap border=0>, gives the browser the name of the graphic that it should display. In this case, the file name is sample.gif. As always, you can reference a file on a completely different Web server, if you give the complete URL, including server name and full directory path , to the file.
If the user clicks the mouse while the cursor is positioned over the graphic, the Web browser sends a request to the Web server. The URL referenced in the request is the file name of a map file, to be used by the image map program running on the Web server. Map files are plain ASCII text files that list cursor coordinates which bound certain regions of the image with the URLs to be fetched if that particular region is selected. These coordinates are in pixels (picture elements), with the upper-left corner of the graphic referenced as location (0, 0).
Also appended to the URL are the coordinates of the cursor at the moment of the mouse-click. The image map program (which is really a Common Gateway Interface, or CGI, program running on the Web server) takes the coordinates reported by the Web browser and looks in the map file to see if the cursor coordinates fall into a region defined in the map file. If they do, it looks (also in the map file) for the URL of the document to be fetched, fetches it, and sends it to the browser, fulfilling the browser's request.
Listing 2SAMPLE.MAP
default /samples/misc.htm circle (110,107) (204,107) /samples/circle.htm oval (15,215) (197,274) /samples/oval.htm poly (248,23) (462,54) (334,78) (342,184) (510,184) (502,244) (226,278) /samples/polygon.htm rect (356,110) (516,173) /samples/rect.htm
Mapping Made Easy
Listing 2 shows the map file I used for the sample program. I named this file sample.map. The first line in sample.map gives the default URLthis is the URL of the document to be fetched in those cases where the user clicks on the graphic, but doesn't click on a defined region. In my case, I decided to call a document named misc.htm.
Format specifics for the map file depend on the specific Web server you're using and its image map program, but in general, there is one line of text for each region you define. On each line, the first item of information is the type of region, which includes rectangles, polygons, circles, and ovals.
After describing the type of region, you need to give the coordinates for the boundary. For a rectangle, you need to supply the ( x , y ) coordinates of the upper-left and lower-right corners. For a polygon, give the coordinates for each of the polygon's points. For a circle, give the coordinates of the center, plus a second set of coordinates that describe a point on the perimeter. For an oval, give upper-left and lower-right coordinates.
The last item of information you need to give for each line in the map file is the URL of the document you want delivered if that region is selected. Either give a full or partial URL, as appropriate.
Reading Maps
Image maps are used frequently on the World Wide Web, so if you surf around, you will find many examples to explore. Most Web browsers have a field somewhere in their display that, if you place the cursor over a hyperlink, shows the URL of the document that will be fetched if you click on that link. This also applies to image maps. The difference is that for image maps, you see an extended URL that includes not only a file name, but one that's followed by a question mark, plus a pair of numbers separated by a comma. Those two numbers represent the current cursor coordinates, and they change as you move the mouse. (Don't click the mouse button just yetsimply move the mouse around to explore the image map area.) If you move the mouse around, you can determine the boundaries of the overall image map area. (You won't be able to see which regions have been defined within that areathat information is in the map file on the Web server. But the underlying graphic usually gives you plenty of cluesthere might be fancy buttons on the screen, for example.)
The file name to the left of the question mark is the name of the map file that defines the regions and the URLs they point to. When you click somewhere on an image map, the entire line you see displayedincluding file name, the question mark, and cursor coordinatesis sent as a request for a document.
Image map files are stored in a particular directory (the location of the directory may vary, depending on the Web server). When the request for this URL comes in, the server knows it is an image map request because of the directory cited. The server then hands the URL-encoded data to the image map program (a CGI program), which is also running on the server. The image map program examines the data to see which map file to request and to determine the cursor coordinates for the mouse-click. It then gets the map file and compares the user-generated cursor coordinates with the entries in the map file to see which region the mouse-click was in and which URL corresponds with that region. Knowing that, it directs the Web server to fetch the document that resides at that URL, and the Web server sends it to the browser.
Making Maps
Once you have a graphic to display, you need to create a map file that is keyed to that graphic. There are various commercial and shareware programs available that can help you with this taskthough I haven't tried them out, so I can't vouch for them. For this example, I took these steps:
First, create the graphic by using a paint program or other image editor. Size the graphic according to how you want it to look on the user's browser. I always make sure my screen's resolution is set to 640dpi by 480dpi before doing any image editing. If you were to edit with 1,024dpi by 768dpi resolution, for example, you could easily create a graphic that's far to big to fit on the screen of a user with 640dpi by 480dpi resolution.
Second, create the HTML code for the document in which you're going to place the image map. (This would be comparable to Listing 1.)
Third, create a map file. You won't know the exact coordinates to enter, but for the moment, you can enter just about anything.
Load the HTML document, the graphic, and the map file into the appropriate directories on your Web server.
Load the document, using a Web browser. When you place the cursor over the image map, the browser will display the cursor coordinates. Don't click the mouse at this pointjust move the mouse around and note the ( x , y ) coordinates for the various regions you want to define. Also, decide what shapes (circle, rectangle, and so on) are most appropriate for each region. Write your figures down on a scratch pad, then load the map file into a word processor and edit it to reflect the correct cursor coordinates for each region. Be sure to double-check the accuracy of each URL.
Finally, test the finished map file by firing up your Web browser and clicking on the image map. Does clicking on each region take you to the document you had intended? If not, go back and make minor adjustments. If it works as advertised, pat yourself on the back, map-maker!
For the example shown here, I used Microsoft's Internet Information Server 2.0, running on Windows NT Server 4.0. Not every Web server supports image maps (but the majority seem to), so if you're planning to roll your own image maps, consult the documentation for your server to see if you do have the required support. Different Web servers use different default directories to store certain files, such as the map files. Again, consult your documentation to see which directories you should use. The syntax for image map anchors and map files may vary, so this is something else you'll want to verify in your documentation.
This tutorial, number 100, by Alan Frank, was originally published in the December 1996 issue of LAN Magazine/Network Magazine.
| |
EAN: 2147483647
Pages: 193