Inserting Data from Excel Worksheets
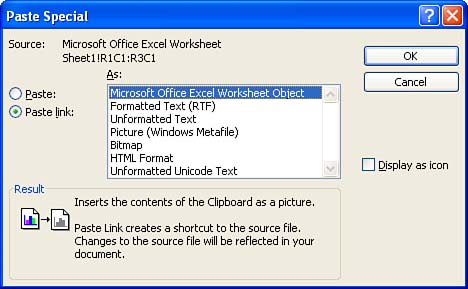
| If you want to insert data from an Excel worksheet, you can, of course, copy it into a Word document with the Copy and Paste commands. (Select the desired cells in Excel, issue the Copy command, switch to the Word document, click at the desired location, and issue the Paste command.) When you use this method, Word puts the Excel data in a table, which you can format and modify with the techniques you learned in Hour 15, "Columns and Tables." In Figure 20.1, the data in the table was pasted from an Excel worksheet. Figure 20.1. Excel data that you insert with the Copy and Paste commands appears in a Word table. This method has two drawbacks. First, the Excel formulas are converted to plain numbers, so they won't update if you revise any of the numbers in the table. Second, no link exists between the pasted data in the Word document and the original data in the Excel worksheet, so revising the data in Excel does not update it in Word. Linking to an Excel WorksheetOne way to avoid these shortcomings is to link the pasted data in Word to the original data in the Excel worksheet. Then whenever you update the data in Excel, it is automatically updated in the Word document. To insert linked data from Excel into your Word document, follow these steps:
The data is pasted into Word as an object, as shown in Figure 20.3 (the object may be pasted in as an inline or floating object, depending on your settings). You can use techniques you learned in Hour 17, "Manipulating Images," for working with pictures, drawing objects, and WordArt to position the Excel object in your document and format its appearance. Figure 20.3. Your Excel data appears as an object in Word. To edit the data in Excel, double-click the linked object in your Word document. In a moment, the associated worksheet opens in Excel with the linked cells selected (see Figure 20.4). When you revise the data in Excel, it is instantly updated in the Word document. (You can't edit the linked data in the Word document.) Figure 20.4. With the Paste Link option, any changes you make to the data in Excel are immediately reflected in your Word document.
If you move or rename the Excel workbook that contains the source data for linked Excel data in Word, you have to tell Word where to find the file. To do so, follow these steps:
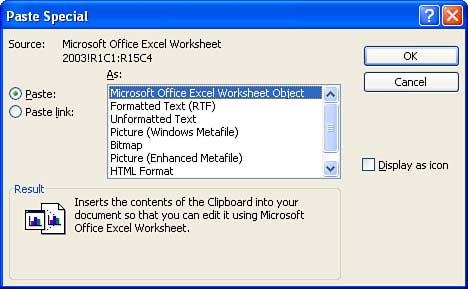
Embedding Data from an Excel WorksheetAnother option is to embed the Excel data in your Word document. When you use this technique, double-clicking the embedded object displays the Excel interface menus , toolbars , and so onwithin the Word window, so you can use Excel controls to revise the data without ever leaving Word. When you embed data, the Excel data "lives" in the Word document and is not linked to original data in Excel. When you edit the data in the Word document, it does not get updated in the original Excel worksheet, and vice versa. To embed Excel data in a Word document, follow these steps:
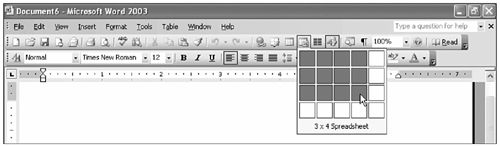
Just as when you link the data, embedded data is pasted into Word as an object. However, Word responds differently when you double-click an embedded object. Instead of displaying the source data in Excel, it displays the Excel interface in the Word window, as shown in Figure 20.6. Figure 20.6. You can use Excel controls to edit the embedded data in your Word document. You can also start an embedded Excel worksheet from scratch in your Word document instead of beginning with data that you pasted from an existing Excel worksheet. To do so, click the Insert Microsoft Excel Worksheet toolbar button in the Standard toolbar, drag across the number of cells that you want to start out with in the drop-down grid (see Figure 20.7), and release the mouse button. You can now use your Excel skills to create a worksheet within the Word document. Figure 20.7. To start an empty embedded Excel worksheet, use the Insert Microsoft Excel Worksheet button in the Standard toolbar. |


EAN: 2147483647
Pages: 315
- Chapter V Consumer Complaint Behavior in the Online Environment
- Chapter VI Web Site Quality and Usability in E-Commerce
- Chapter XI User Satisfaction with Web Portals: An Empirical Study
- Chapter XIII Shopping Agent Web Sites: A Comparative Shopping Environment
- Chapter XV Customer Trust in Online Commerce