| When you've got the text of your form roughed in, you are ready to insert your form fields. Word provides these three types of form fields: -
Text Use this form field if you want the user to enter text. You can use text form fields for data of the following types: Regular text Use this type if it's okay for the user to type any combination of text, numbers , symbols, and spaces. Number Use this type if you want to require the user to type a number. Date Use this type if you want to require the user to type a date. Current date Use this type if you want to display the current date in your form. The user cannot edit this field. Current time Use this type if you want to display the current time in your form. The user cannot edit this field. Calculation Use this type if you want to insert a formula in the form (using the syntax =(formula)) to calculate numbers. For example, you could use it to total a column of numbers, or to calculate the sales tax. The user cannot edit this field.  | If you want Word to check the values that the user enters more carefully than the rudimentary checking of dates and numbers described in the preceding list, you need to write VBA code for entry or exit macros (see "Where to Go from Here" later in this hour ) or to use with ActiveX controls. These tools would enable you to check whether a social security number was entered in the proper syntax, for example, or whether an employee ID number is indeed one that's found in your employee database. (You may be able to find VBA code that other people have written on the Web.) |
-
Drop-down list Use this form field to create a drop-down list from which the user can select one item. -
Check box Use this form field if you want to add one or more check boxes that the user can mark or clear. If you have multiple check boxes, the user will be able to mark more than one of them. To add form fields to your form, you use the Forms toolbar, shown in Figure 19.2. Figure 19.2. The Forms toolbar contains tools for inserting form fields and working with forms. 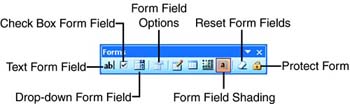 Follow the steps in the next three sections to add the different types of form fields to your form and tell Word how you want them to function. Adding a Text Form Field Follow these steps to insert a text form field: -
Move your insertion point to the location where you want the text form field to go. -
Choose View, Toolbars, Forms to display the Forms toolbar. -
Click the Text Form Field button. -
A blank text form field appears in your form. In Figure 19.3, the field is shaded to make it easy to see (the shading doesn't print). If you want to turn off field shading, click the Field Shading button in the Forms toolbar. Figure 19.3. You can shade your form fields to make them easy to see. 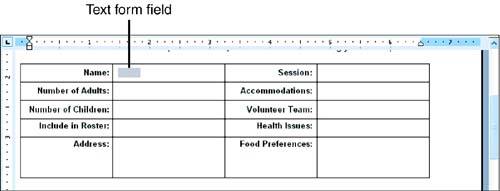 -
Double-click the text form field (or click it and then click the Form Field Options button in the Forms toolbar) to display the Text Form Field Options dialog box (see Figure 19.4). Figure 19.4. Use the Text Form Field Options dialog box to define how you want your text form field to behave. 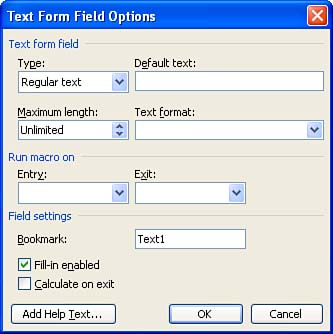 -
Use the Type drop-down list to specify the type of data that the user will enter in the text form field. -
If you chose the Regular Text, Number, or Date type in the previous step and want a default entry to appear in the text field, type it in the Default [type] text box. (The text box will be labeled Default Text, Default Number , or Default Date .) If you chose the Current Date or Current Time type, this field will be dim. If you chose the Calculation type, this field will be labeled Expression. Use it to enter your formula. -
Select an option from the [type] Format drop-down list. Depending on the type you selected in step 5, this field will be labeled Text Format, Number Format, Date Format , or Time Format . Use it to specify how you want the data to appear in the field. -
Use the Maximum Length field to specify the maximum number of characters that you want the user to be able to enter in the text field. For text form fields of the Regular Text type, users will be able to press Enter to move to a new line, so you can use it for address fields. -
You can, if you like, add help text text that assists the user in filling out the field. This text can either appear in the status bar when the user activates the field (see Figure 19.5), or it can appear in a Help dialog box when the user activates the field and presses F1. To add help text, click the Add Help Text button to display the Form Field Help Text dialog box (see Figure 19.6). Figure 19.5. The help text for the Include in Roster field appears in the status bar when the user tabs into the field. 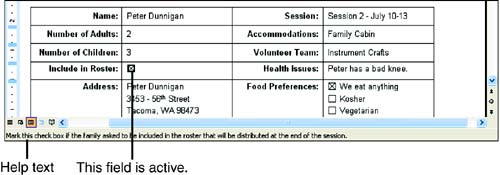 Figure 19.6. Use the Form Field Help Text dialog box to add text that will help the user fill in the field correctly.  -
Click the Status Bar or Help Key (F1) tab, depending on which type of help text you want to provide. The options in both tabs are identical. -
If you or someone else has already created an AutoText entry that contains the text you want to use, mark the AutoText Entry option button and select the entry from the drop-down list. Otherwise, mark the Type Your Own option button and type the help text in the text box below the option button. When you're done, click OK . -
See the "Automating Your Form" section later in this hour for information about the remaining fields in this dialog box. Then click OK to close the dialog box. You have now inserted the text form field and defined how it will behave. Note that if your fields are shaded, Word does not change the length of the shaded text form field based on the maximum number of allowable characters, but when the user fills in the field, the field will expand to accommodate the allowable amount of text. Adding a Check Box Form Field Adding a check box form field to your document is a simple process. Follow these steps: -
Move your insertion point to the location where you want the check box form field to go. -
Choose View, Toolbars, Forms to display the Forms toolbar. -
Click the Check Box Form Field button. -
A blank check box form field appears in your form. Double-click it (or click it and then click the Form Field Options button in the Forms toolbar) to display the Check Box Form Field Options dialog box (see Figure 19.7). Figure 19.7. Use the Check Box Form Field Options dialog box to define how you want your check box form field to behave. 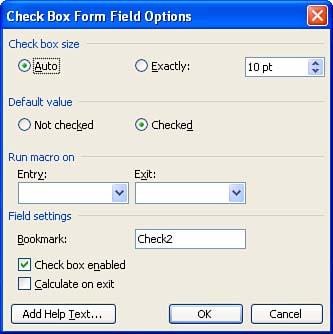 -
To set a specific point size for the check box, mark the Exactly option button and specify the point size in the drop-down list. Otherwise, leave the Auto button selected and Word will automatically size the check box. -
Under Default Value, mark the Checked option button if you want the check box to be marked by default. -
Optionally add help text (see steps 1012 in the previous section). -
Select from the remaining options (refer to the "Automating Your Form" section later in this hour). When you're done, click OK . You have now inserted the check box and defined how it will behave. Adding a Drop-Down List Form Field Follow these steps to create a drop-down list in your form: -
Move your insertion point to the location where you want the drop-down list form field to go. -
Choose View, Toolbars, Forms to display the Forms toolbar. -
Click the Drop-Down Form Field button. -
A blank drop-down form field appears in your form. Double-click it (or click it and then click the Form Field Options button in the Forms toolbar) to display the Drop-Down Form Field Options dialog box (see Figure 19.8). Figure 19.8. Use the Drop-Down Form Field Options dialog box to define how you want your drop-down form field to behave. 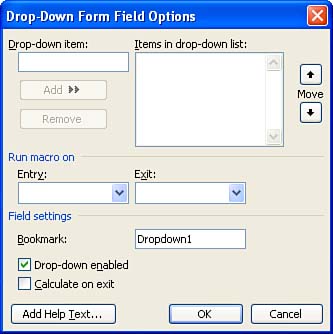 -
To add an item to your drop-down list, type it in the Drop-down Item text box and click the Add button to add it to the Items in Drop-down List box. Continue to add items until the list is complete. Use the Move arrows to change the order of the items in the list. If you have one entry that you want to use as the default, move it to the top of the list. -
To edit an item in the list, select it and then click the Remove button. It will appear in the Drop-down Item text box. Edit it there, and then click the Add button again to return it to the list. To remove an item, select it and click the Remove button. In Figure 19.9, the Items in Drop-down List box has been completed. Figure 19.9. The items you enter in the Items in Drop-down List field appear in the drop-down list in your form. 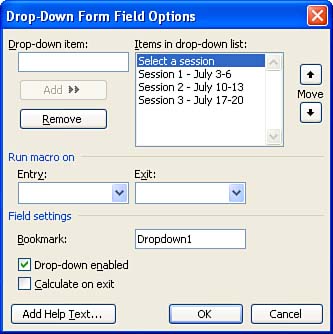 -
Optionally add help text (see steps 1012 in the "Adding a Text Form Field" section earlier in this hour). -
Select from the remaining options (see the next section, "Automating Your Form"). When you're done, click OK . You have now inserted a drop-down form field in your form and told Word what it should contain. Automating Your Form The Form Field Options dialog boxes shown in Figures 19.4, 19.7, and 19.8 all contain the same set of options under Run Macro On and Field Settings. These options are only useful if you want to automate certain parts of your form. Here is how you use them: -
Entry and Exit drop-down lists Use these drop-down lists to specify macros that run when the user activates the form field (Entry) or moves somewhere else in the form (Exit). (See "Where to Go from Here" at the end of this hour.) -
Bookmark text box Use this text box to assign a bookmark to the field (or accept the default bookmark name ). You can then use the bookmark in formulas and macros that refer to this field, or to retrieve the content of this field in another location in the form. -
Enabled check box This check box is labeled Fill-in Enabled, Check Box Enabled, and Drop-down Enabled in the three Form Field Options dialog boxes. Clear this check box if you don't want the user to be able to fill in the field. You might do this if you are using an entry macro to fill in the field automatically. -
Calculate on Exit check box Mark this check box if you want Word to update any other form fields in the document that are dependent on this field as soon as the user leaves the field. You have to mark this check box if the user will type a number in the field that you use in a formula somewhere else in the form. To see some of these features in action, refer to Figure 19.10. This revised reservation confirmation form contains three new fields in the lower-right corner: Total, Deposit, and Balance Due. Figure 19.10. The reservation confirmation form now contains Total, Deposit, and Balance Due fields. 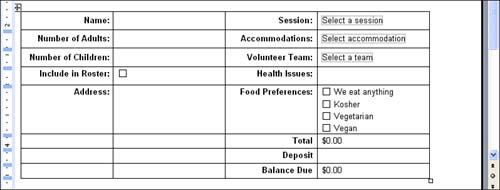 The Total field is a formula that refers to the numbers the user entered in the Number of Adults and Number of Children fields. It multiplies each of these numbers by the tuition for adults and children and adds them together to get the total tuition due. Figure 19.11 shows the Text Form Field Options dialog box for this field. Figure 19.11. Text Form Field Options dialog box for the Total field. 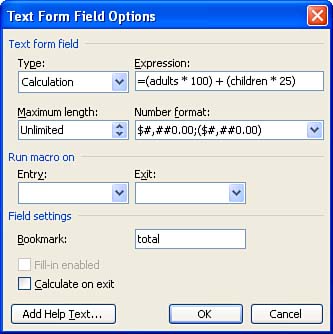 Note that this text field is defined as a Calculation type, and its formula is entered in the Expression text box. Because the bookmark names adults and children were assigned to the Number of Adults and Number of Children fields in their Text Form Field Options dialog boxes, they can be used in the formula here. Notice also that a currency format has been selected in the Number Format drop-down list. The Deposit field is a text form field of the Number type. The user fills in this field. The Balance Due field is also a Calculation type field. Its formula, =(total-deposit), uses the bookmarks assigned to the Total and Deposit fields to calculate the balance due amount. In order for the values entered by the user in the Number of Adults, Number of Children, and Deposit fields to be used in the Total and Balance Due formulas, their Calculate on Exit check boxes were marked.  |