Managing IIS Services
|
Each IIS server in the organization relies on a set of services for publishing pages, transferring files, and more. To manage IIS services, you’ll use the Services node in the Computer Management console, which you start by doing the following:
-
Click Start and choose All Programs, Administrative Tools, and then Computer Management. Or select Computer Management in the Administrative Tools folder in Control Panel.
-
Right-click the Computer Management entry in the console tree and select Connect To Another Computer on the shortcut menu. You can now choose the IIS server whose services you want to manage.
-
Expand the Services And Applications node by clicking the plus sign (+) next to it and then choose Services.
Figure 2-5 shows the Services view in the Computer Management console.
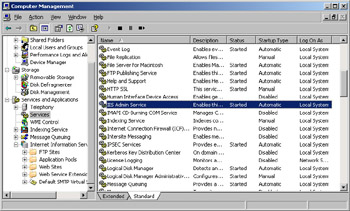
Figure 2-5: Use the Services node to manage IIS services.
The key fields of this dialog box are used as follows:
-
Name The name of the service.
-
Description A short description of the service and its purpose.
-
Status The status of the service as started, paused, or stopped. (Stopped is indicated by a blank entry.)
-
Startup Type The startup setting for the service.
Note Automatic services are started when the system boots up. Manual services are started by users or other services. Disabled services are turned off and can’t be started.
-
Log On As The account the service logs on as. The default in most cases is the local system account.
Key IIS Services
Table 2-4 provides a summary of key services that IIS uses or depends on. Note that the services available on a particular IIS server depend on its configuration. Still, this is the core set of services that you’ll find on most IIS servers.
| Name | Description |
|---|---|
| Event Log | Logs event informational, warning and error messages issued by IIS and other applications |
| FTP Publishing Service | Provides services for transferring files using FTP and also allows administration of an FTP server |
| IIS Admin Service | Allows administration of IIS through the IIS snap-in |
| Indexing Service | Indexes the contents and properties of files, providing quick access to files through a flexible query language |
| Network News Transport Protocol (NNTP) | Provides network news services and allows administration of NTTP servers through the IIS snap-in |
| Simple Mail Transport Protocol (SMTP) | Provides mail transfer services and allows administration of SMTP sites through the IIS snap-in |
| World Wide Web Publishing Service | Provides services for transferring files using HTTP and also allows administration of an HTTP server |
Starting, Stopping, and Pausing IIS Services
As an administrator, you’ll often have to start, stop, or pause IIS services. You manage IIS services through the Computer Management console or through the Services utility. When you manage IIS services at this level, you’re controlling all sites or virtual servers that use the service. For example, if a computer publishes three Web sites and you stop the World Wide Web Publishing Service, all three Web sites are stopped and are inaccessible.
To start, stop, or pause services in the Computer Management console, follow these steps:
-
In the left-hand pane, right-click the Computer Management entry in the console tree and select Connect to Another Computer on the shortcut menu. You can now choose the IIS server whose services you want to manage.
-
Expand the Services And Applications node by clicking the plus sign (+) next to it, and then choose Services.
-
In the right-hand pane, right-click the service you want to manipulate, and then select Start, Stop, or Pause as appropriate. You can also choose Restart to have Windows stop and then start the service after a brief pause. In addition, if you pause a service, you can use the Resume option to resume normal operation.
Tip When services that are set to start automatically fail, the status is listed as Blank and you’ll usually receive notification in a dialog box. Service failures can also be logged to the system’s event logs. In Windows Server 2003, you can configure actions to handle service failure automatically. For example, you could have Windows Server 2003 attempt to restart the service for you. For details, see the section of this chapter entitled “Configuring Service Recovery.”
Configuring Service Startup
Essential IIS services are configured to start automatically, and normally they shouldn’t be configured with another startup option. That said, if you’re troubleshooting a problem, you might want a service to start manually. You might also want to disable a service so that its related virtual servers don’t start. For example, if you move an SMTP virtual server to a new server, you might want to disable the SMTP service on the original IIS server. In this way the SMTP service isn’t used, but you could turn it on if you need to (without your having to reinstall SMTP support).
You configure service startup as follows:
-
In the left-hand pane of the Computer Management console, connect to the IIS server whose services you want to manage.
-
Expand the Services And Applications node by clicking the plus sign (+) next to it, and then choose Services.
-
In the right-hand pane, right-click the service you want to configure and then choose Properties.
-
On the General tab, use the Startup Type drop-down list to choose a startup option as shown in Figure 2-6. Select Automatic to start the service when the system boots up. Select Manual to allow the service to be started manually. Select Disabled to turn off the service.
-
Click OK.
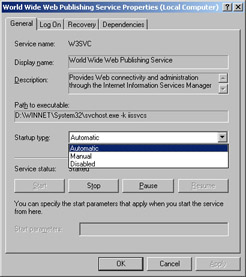
Figure 2-6: For troubleshooting, you might want to change the service startup option.
Configuring Service Recovery
You can configure Windows services to take specific actions when a service fails. For example, you could attempt to restart the service or reboot the server. To configure recovery options for a service, follow these steps:
-
In the left-hand pane of the Computer Management console, connect to the computer whose services you want to manage.
-
Expand the Services And Applications node by clicking the plus sign (+) next to it and then choose Services.
-
In the right-hand pane, right-click the service you want to configure and then choose Properties.
-
Select the Recovery tab, shown in Figure 2-7. You can now configure recovery options for the first, second, and subsequent recovery attempts. The available options are:
-
Take No Action
-
Restart The Service
-
Run A Program
-
Restart The Computer
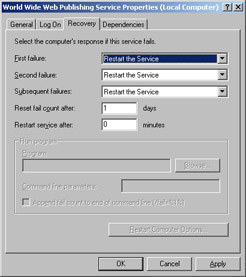
Figure 2-7: You can configure services to recover automatically in case of failure.
-
-
Configure other options based on your previously selected recovery options. If you elected to restart the service, you’ll need to specify the restart delay. After stopping the service, Windows Server 2003 waits for the specified delay before trying to start the service. In most cases a delay of 1–2 minutes should be sufficient.
-
Click OK.
When you configure recovery options for critical services, you might want Windows Server 2003 to try to restart the service on the first and second attempts and then reboot the server on the third attempt.
|