| Windows Server 2003 provides many ways to control user accounts and their access to the network. You can define logon hours, permitted workstations for logon, dial-in privileges, and more. Managing Logon Hours Windows Server 2003 allows you to control when users can log on to the network. You do this by setting their valid logon hours. You can use logon hour restrictions to tighten security and prevent system cracking or malicious conduct after normal business hours. During valid logon hours, users can work as they normally do. They can log on to the network and access network resources. During restricted logon hours, users can't work. They can't log on to the network or make connections to network resources. If users are logged on when their logon time expires , what follows depends on the account policy you've set for them. Generally, one of two things happens to the user: -
Forcibly disconnected You can set a policy that tells Windows Server 2003 to forcibly disconnect users when their logon hours expire. If this policy is set, remote users are disconnected from all network resources and logged off the system when their hours expire. -
Not disconnected Users aren't disconnected from the network when they enter the restricted hours. Instead, Windows Server 2003 simply doesn't allow them to make any new network connections. Configuring Logon Hours To configure the logon hours, follow these steps: -
Access the user's Properties dialog box in Active Directory Users And Computers, and then choose the Account tab. -
Click the Logon Hours button. You can now set the valid and invalid logon hours using the Logon Hours dialog box shown in Figure 10-5. In this dialog box each hour of the day or night is a field that you can turn on and off. -
To change the setting for an hour, click it. Then select either the Logon Permitted or Logon Denied option button. Figure 10-5. Configure logon hours for users using the fields provided. 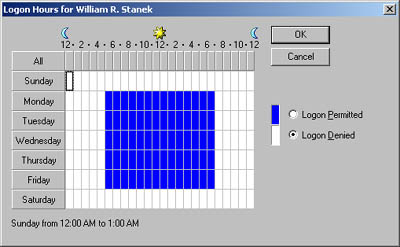 Logon Hours features are listed in Table 10-1. Table 10-1. Logon Hours Features | Feature | Function | | All | Allows you to select all the time periods | | Day of week buttons | Allow you to select all the hours in a particular day | | Hourly buttons | Allow you to select a particular hour for all the days of the week | | Logon Permitted | Sets the allowed logon hours | | Logon Denied | Sets the disallowed logon hours | Tip When you set logon hours, you'll save yourself a lot of work in the long run if you give users a moderately restricted time window. For example, rather than explicit 9 “5 hours, you might want to allow a few hours on either side of the normal work hours. This will let the early birds onto the system and allow the night owls to keep working until they finish for the day.
Enforcing Logon Hours If you want to forcibly disconnect users when their logon hours expire, complete the following steps: -
Access the group policy container you want to work with, as detailed in the section of Chapter 4 entitled "Managing Site, Domain, and Unit Policies." -
Access the Security Options node by working your way down through the console tree. Expand Computer Configuration, Windows Settings, and then Security Settings. In Security Settings, expand Local Policies and then select Security Options. -
Double-click Network Security: Force Logoff When Logon Hours Expire. This opens a Properties dialog box for the policy. -
Select the Define This Policy Setting check box and then click Enabled. This turns on the policy restriction and enforces the logon hours. Click OK. Setting Permitted Logon Workstations Windows Server 2003 has a formal policy that allows users to log on to systems locally. This policy controls whether or not a user can sit at the computer's keyboard and log on. By default, on workstations you can use any valid user account, including the guest account, to log on locally. As you might imagine, allowing users to log on to any workstation is a security risk. Unless you restrict workstation use, anyone who obtains a user name and password can use it to log on to any workstation in the domain. By defining a permitted workstation list, you close the opening in your domain and reduce the security risk. Now not only must hackers find a user name and password, they must also find the permitted workstations for the account. Note The permitted logon workstation restrictions affect only Microsoft Windows NT, Microsoft Windows 2000, and Microsoft Windows XP computers in the domain. If any Microsoft Windows 95 or Microsoft Windows 98 computers are in the domain, they aren't subject to the restrictions, which means you need only a valid user name and password to log on to these systems.
For domain users, you define permitted logon workstations by completing the following steps: -
Access the user's Properties dialog box in Active Directory Users And Computers and then choose the Account tab. -
Open the Logon Workstations dialog box by clicking the Log On To button. -
Select The Following Computers option button, shown in Figure 10-6. -
Type the name of a permitted workstation and then click Add. Repeat this procedure to specify additional workstations. -
If you make a mistake, select the erroneous entry and then click Edit or Remove, as appropriate. Figure 10-6. To restrict access to workstations, specify the permitted logon workstations. 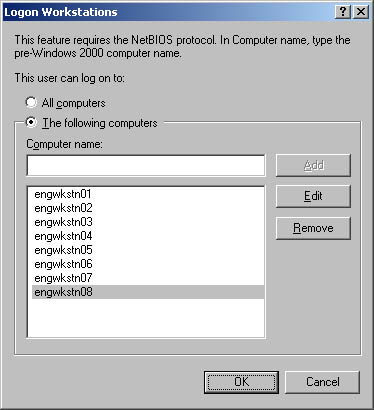 Setting Dial-In and VPN Privileges Windows Server 2003 lets you set remote access privileges for accounts using the Dial-In tab of the user's Properties dialog box. These settings control access for dial-in and virtual private network (VPN). As shown in Figure 10-7, remote access privileges are controlled through Remote Access Policy by default. This is the preferred method of controlling remote access. You can explicitly grant or deny dial-in privileges by selecting Allow Access or Deny Access. In any event, before users can remotely access the network, you'll need to complete the following steps: -
Install Remote Access Services using Configure Your Server. -
To enable remote access connections, configure the group policy for a site, domain, or organizational unit. You do this using the Network Connections node. Expand User Configuration, Administrative Templates, and then Network. Then select Network Connections. -
Configure remote access using Routing And Remote Access. In Computer Management, expand Services And Applications, and then select Routing And Remote Access. After you grant a user permission to access the network remotely, configure additional dial-in parameters using the Dial-In tab of the user's Properties dialog box, shown in Figure 10-7, by completing the following steps. Figure 10-7. Dial-in privileges control remote access to the network. 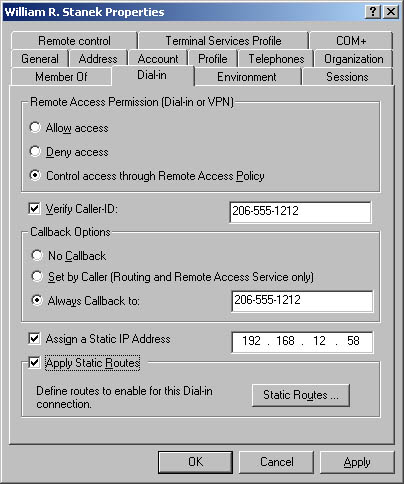 -
If the user must dial in from a specific phone number, select Verify Caller-ID and then type the telephone number from which this user is required to log on. Your telephone system must support Caller ID for this feature to work. -
Define callback parameters using the following options: -
No Callback Allows the user to dial in directly and remain connected. The user pays the long-distance telephone charges, if applicable . -
Set By Caller Allows the user to dial in directly, and then the server prompts the user for a callback number. Once the number is entered, the user is disconnected and the server dials the user back at the specified number to reestablish the connection. The company pays the long-distance telephone charges, if applicable. -
Always Callback To Allows you to set a predefined callback number for security purposes. When a user dials in, the server calls back the preset number. The company pays the long-distance telephone charges, if applicable, and reduces the risk of an unauthorized person accessing the network. Note You shouldn't assign callback for users who dial in through a switchboard. The switchboard might not allow the user to properly connect to the network.You also shouldn't use preset callback numbers with multilinked lines. The multilinked lines won't function properly.
-
If necessary, you can also assign static Internet Protocol (IP) addresses and static routes for dial-in connections using Assign A Static IP Address and Apply Static Routes, respectively. For more information on IP addresses and routing, see Chapter 16 , "Managing TCP/IP Networking." Setting Account Security Options The Account tab of the user's Properties dialog box has many options designed to help you maintain a secure network environment. Use these options to control how user accounts are used and what options are available. The options are: -
User Must Change Password At Next Logon Forces the user to change his or her password when the user logs on next. -
User Cannot Change Password Doesn't allow the user to change the account password. -
Password Never Expires Ensures the account password never expires, which overrides the normal password expiration period. Caution Selecting this option creates a security risk on the network. Although you might want to use Password Never Expires with administrator accounts, in most cases you shouldn't use this option with normal user accounts.
-
Store Password Using Reversible Encryption Saves the password as encrypted clear text. -
Account Is Disabled Disables the accounts, which prevents the user from accessing the network and logging on. -
Smart Card Is Required For Interactive Logon Requires the user to log on to a workstation using a smart card. The user can't log on to the workstation by typing a logon name and password at the keyboard. -
Account Is Trusted For Delegation Specifies that the user might need object management privileges in Active Directory and that the user is trusted to perform any permissible actions on objects that the user has been delegated the authority to work with. -
Account Is Sensitive And Cannot Be Delegated Specifies that the user account is sensitive and should be carefully controlled. The user might have limited access permissions or the user might not be trusted to perform certain actions. You might want to set this option for all normal user accounts to prevent these users from manipulating Active Directory objects unless specifically permitted to by you or other authorized administrators. -
Use DES Encryption Types For This Account Specifies that the user account will use Data Encryption Standard (DES) encryption. -
Do Not Require Kerberos Preauthentication Specifies that the user account doesn't need Kerberos preauthentication to access network resources. Preauthentication is a part of the Kerberos v5 security procedure. The option to log on without it is available in order to allow authentication from clients using a previous, or nonstandard, implementation of Kerberos. |