| Windows Server 2003 provides four key tools for managing hardware devices and drivers. These tools are -
Device Manager -
Add Hardware Wizard -
Hardware Update Wizard -
Hardware Troubleshooter You'll use these tools whenever you install, uninstall, or troubleshoot hardware devices and drivers. Before you work with device drivers, you should know the basics of signed and unsigned device drivers as well as the system settings that might prevent the use of unsigned drivers. Working with Signed and Unsigned Device Drivers Microsoft recommends that you use signed device drivers whenever possible. Signed device drivers have a digital signature that authenticates them as having passed rigorous testing by the Windows Hardware Quality Labs. The digital signature also means the device driver hasn't been tampered with. Now, there are situations when you might have to use an unsigned device driver. For example, you might find that a device installed on a server doesn't have a signed device driver. Your first response should be to check the manufacturer's Web site to see if a signed driver is available. A signed driver might be available but not distributed with the device or on the Windows Server 2003 distribution disks. However, if one isn't available, you might find that you have to use an unsigned driver. You have several options: -
Install an unsigned driver ”a driver that worked with Windows 2000 might work in this instance. However, the system might become unstable. The system might crash, lose data, or even fail to restart. -
Stop using the device or use a different device with supported drivers. Cost might be a factor in your decision, but it shouldn't be the only factor you consider. An unstable system costs time and money as well. By default, Windows Server 2003 warns you if you try to install an unsigned device driver. If you don't want to see this prompt, you can change the configuration so that this warning isn't displayed. You can also specify that unsigned drivers should never be installed. One way to configure device driver settings is to use the System utility in the Control Panel. -
Start the System utility. Click the Hardware tab and then click the Driver Signing button. -
Choose the action you want Windows to take when someone tries to install an unsigned device driver. The options are: -
Ignore Install the software anyway and don't ask for my approval. -
Warn Prompt me each time to choose an action. -
Block Never install unsigned driver software. -
If the settings are only for the current user , clear Make This Action The System Default. Otherwise, select this check box to make this the default for all users. -
Click OK twice. If you want to assign device driver settings for the enterprise, you can do this through Group Policy. In this case Group Policy specifies the least secure setting that is allowed and, if Group Policy is set to Block, unsigned device drivers can't be installed without overriding Group Policy. Code Signing For Device Drivers policy controls device driver signing settings. This policy is located in User Configuration\Administrative Templates\System. If enabled, you can specify the action to take: Ignore, Warn, or Block. Note If you're trying to install a device and find that you can't install an unsigned driver, you should first check the System utility settings for driver signing. If you find that the settings are set to block and you can't change the setting, Code Signing For Device Drivers has been enabled and set to Block in Group Policy. You will need to override Group Policy in order to install the unsigned device driver.
Viewing and Managing Hardware Devices You can view a detailed list of all the hardware devices installed on a system by completing the following steps: -
Choose Start, Programs or All Programs as appropriate, then Administrative Tools, and then Computer Management. -
In the Computer Management console, click the plus sign (+) next to the System Tools node. This expands the node to display its tools. -
Select Device Manager. You should now see a complete list of devices installed on the system. By default, this list is organized by device type. -
Click the plus sign (+) next to a device type to see a list of the specific instances of that device type. -
If you right-click the device entry, you can manage the device using the shortcut menu. Which options are available depends on the type of device, but they include -
Disable Disables the device but doesn't uninstall it -
Enable Enables a device if it's disabled -
Properties Displays the Properties dialog box for the device -
Uninstall Uninstalls the device and its drivers -
Update Driver Updates the driver file Tip The device list shows warning symbols if there are problems with a device. A yellow warning symbol with an exclamation point indicates a problem with a device. A red X indicates a device that's improperly installed or has been disabled by the user or administrator for some reason.
You can use the options on the View menu in the Computer Management console to change the defaults for what types of devices are displayed and how the devices are listed. The options are -
Devices By Type Displays devices by the type of device installed, such as Disk Drive or Printer. The connection name is listed below the type. This is the default view. -
Devices By Connection Displays devices by connection type, such as System Board or Logical Disk Manager. -
Resources By Type Displays the status of allocated resources by type of device using the resource. Resource types are direct memory access (DMA) channels, input/output (I/O) ports, interrupt request (IRQ), and memory addresses. -
Resources By Connection Displays the status of all allocated resources by connection type rather than device type. -
Show Hidden Devices Displays non “Plug and Play devices as well as devices that have been physically removed from the computer but haven't had their drivers uninstalled . Configuring Device Drivers Device drivers are required for devices, such as sound cards and display adapters, to work properly. Windows Server 2003 provides comprehensive management tools for maintaining and updating device drivers. These tools allow you to track driver information, install and update driver versions, roll back to a previously installed driver, and uninstall device drivers. Tracking Driver Information Each driver being used on a system has a driver file associated with it. You can view the location of the driver file and related details by completing the following steps: -
Start Computer Management. In the Computer Management console, click the plus sign (+) next to the System Tools node. This expands the node to display its tools. -
Select Device Manager. You should now see a complete list of devices installed on the system. By default, this list is organized by device type. -
Right-click the connection for the device you want to manage and then choose Properties from the shortcut menu. This opens the Properties dialog box for the device. Choose the Driver tab. -
Display the Driver File Details dialog box by clicking Driver Details. The information displayed includes -
Driver Files Displays a list of file locations where the driver exists within %SystemRoot% -
Provider The creator of the driver -
File Version The version of the file Installing and Updating Drivers To keep devices operating smoothly, it's essential that you keep the device drivers current. You can install and update device drivers by completing the following steps: -
Start Computer Management. In the Computer Management console, click the plus sign (+) next to the System Tools node. This expands the node to display its tools. -
Select Device Manager in the Computer Management console. You should now see a complete list of devices installed on the system. By default, this list is organized by device type. -
Right-click the connection for the device you want to manage, and then choose Update Driver from the shortcut menu. This starts the Hardware Update Wizard. Best Practices Updated drivers can add functionality to a device, improve performance, and resolve device problems. However, you should rarely install the latest drivers on a deployment server without first testing the drivers in a test environment. Test first, then install.
-
As shown in Figure 2-10, you can specify whether you want to install the drivers automatically or install manually by selecting the driver from a list or specific location. Figure 2-10. Specify whether to search for the necessary drivers or select the drivers from a list of known drivers. 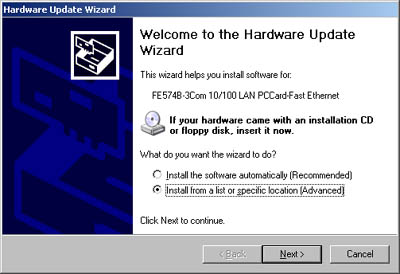 -
If you elect to automatically install the driver, Windows looks for a more recent version of the device driver and installs the driver if found. If a more recent version of the driver isn't found, Windows keeps the current driver. In either case, click Finish to complete the process and then skip the remaining steps. -
If you choose to install the driver manually, you'll have the opportunity to -
Search For The Best Driver In These Locations If you search for drivers, the wizard checks the driver database on the system for drivers and any of the optional locations you specify, such as a floppy disk or CD-ROM. Any matching drivers found are displayed, and you can select a driver. -
Don't Search. I Will Choose The Driver To Install If you decide to install drivers yourself, the next wizard window shows a list of compatible hardware and a recommended list of drivers for this hardware, as seen in Figure 2-11. If a correct driver is listed, all you need to do is to select it. If a correct driver isn't listed, clear the Show Compatible Hardware check box. You can now view a list of manufacturers to find the manufacturer of the device. Once you find the manufacturer, select the appropriate device driver in the Models pane. Figure 2-11. Select the device driver by manufacturer and type. 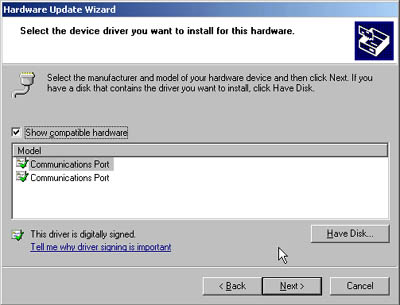 Rolling Back Drivers Sometimes you'll find that a device driver that you've installed causes device failure or other critical problems on a system. Don't worry, you can recover the system to the previously installed device driver. To do this, follow these steps: -
Start Computer Management. In the Computer Management console, click the plus sign (+) next to the System Tools node. This expands the node to display its tools. -
Select Device Manager in the Computer Management console. You should now see a complete list of devices installed on the system. By default, this list is organized by device type. -
Right-click the connection for the device you want to manage and then choose Properties from the shortcut menu. This opens the Properties dialog box for the device. -
Choose the Driver tab and then click Roll Back Driver. When prompted to confirm the action, click Yes. -
Click OK. Note If the driver file hasn't been updated, a backup driver file won't be available. Instead of being able to roll back the driver, you'll see a prompt telling you that no driver files have been backed up for this device. If you're having problems with the device, click Yes to start the Troubleshooter. Otherwise, click No to quit the operation.
Removing Device Drivers for Removed Devices Usually when you remove a device from a system, Windows Server 2003 detects this fact and removes the drivers for that device automatically. Sometimes, however, when you remove a device, Windows Server 2003 doesn't detect the change and you must remove the drivers manually. You can remove device drivers manually by completing the following steps: -
Start Computer Management. In the Computer Management console, click the plus sign (+) next to the System Tools node. This expands the node to display its tools. -
Select Device Manager in the Computer Management console. -
Right-click the connection for the device you want to remove and then select Uninstall from the shortcut menu. -
When prompted to confirm the action, click OK. Uninstalling Device Drivers Uninstalling a device driver uninstalls the related device. Sometimes when a device isn't working properly you can completely uninstall the device, restart the system, and then reinstall the device driver to restore normal operations. You can uninstall and then reinstall a device by completing the following steps: -
Start Computer Management. In the Computer Management console, click the plus sign (+) next to the System Tools node. This expands the node to display its tools. -
Select Device Manager in the Computer Management console. You should now see a complete list of devices installed on the system. By default, this list is organized by device type. -
Right-click the connection for the device you want to manage and then choose Uninstall from the shortcut menu. -
When prompted to confirm the action, click OK. -
Reboot the system. Windows should detect the presence of the device and then automatically reinstall the necessary device driver. If the device isn't automatically reinstalled, reinstall it manually as discussed in the section of this chapter entitled "Adding New Hardware." Note To prevent a device from being reinstalled automatically, disable the device instead of uninstalling it. You disable a device by right-clicking it in Device Manager and then selecting Disable.
Managing Hardware Windows Plug and Play technology does a good job of detecting and automatically configuring new hardware. However, if the hardware doesn't support Plug and Play or isn't automatically detected , you'll need to enter information about the new hardware into the Windows Server 2003 system. You do this by installing the hardware device and its related drivers on the system using the Add New Hardware Wizard. You can also use this wizard to troubleshoot problems with existing hardware. Adding New Hardware You can install new hardware using the Add Hardware Wizard by completing the following steps: -
Access the Control Panel and then double-click Add Hardware. This starts the Add Hardware Wizard. Click Next. -
At this point, you have two options: -
If you've already connected the new hardware, select Yes, I Have Already Connected the Hardware and click Next to continue. The Add Hardware Wizard screen shown in Figure 2-12 should be displayed. Go on to Step 3. -
If you haven't connected the hardware, click No, I Have Not Added the Hardware Yet and then click Next. The only option you have now is to click Finish. You'll need to connect the hardware (which might require shutting down the computer) and then restart the Add Hardware Wizard. Skip the remaining steps. Figure 2-12. Use the Add Hardware Wizard to install, uninstall, or troubleshoot hardware devices.  -
To add new hardware, select Add A New Hardware Device from the Installed Hardware list box and then click Next. This option is located at the very bottom of the Installed Hardware list. In the Find New Hardware dialog box determine whether the wizard should search for new hardware or whether you want to select the hardware from a list. -
If you choose the search option, the wizard searches for and automatically detects new hardware. The process takes a few minutes to go through all the device types and options. When the search is completed, any new devices found are displayed, and you can select a device. -
If you choose the manual option, or if no new devices are found in the automatic search, you'll have to select the hardware type yourself. Select the type of hardware, such as Modem or Network Adapter, and then click Next. Scroll through the list of manufacturers to find the device's manufacturer, and then choose the appropriate device in the Models pane. -
Once you complete the selection and installation process, click Next and then click Finish. The new hardware should now be available. Enabling and Disabling Hardware When a device isn't working properly, sometimes you'll want to uninstall or disable it. Uninstalling a device removes the driver association for the device so that it temporarily appears that the device has been removed from the system. The next time you restart the system, Windows Server 2003 might try to reinstall the device. Typically, Windows Server 2003 reinstalls Plug and Play devices automatically, but not non “Plug and Play devices. Disabling a device turns it off and prevents Windows Server 2003 from using it. Because a disabled device doesn't use system resources, you can be sure that it isn't causing a conflict on the system. You can uninstall or disable a device by completing the following steps: -
Start Computer Management. In the Computer Management console, click the plus sign (+) next to the System Tools node. This expands the node to display its tools. -
Select Device Manager in the Computer Management console. You should now see a complete list of devices installed on the system. By default, this list is organized by device type. -
Right-click the connection for the device you want to manage and then select one of the following options: -
Enable To enable the device -
Uninstall To uninstall the device -
Disable To disable the device -
If prompted to confirm the action, click Yes or OK as appropriate. Troubleshooting Hardware You can use the Add Hardware Wizard to troubleshoot hardware problems as well. The basic steps are as follows : -
Access the Control Panel and then double-click Add Hardware. This starts the Add Hardware Wizard. Click Next. -
At this point, you have two options: -
If you've already connected the hardware that you want to examine, select Yes, I Have Already Connected the Hardware and click Next to display the Installed Hardware list box. Go on to Step 3. -
If you haven't connected the hardware, click No, I Have Not Added the Hardware Yet and then click Next. The only option you have now is to click Finish. You'll need to connect the hardware (which might require shutting down the computer) and then restart the Add Hardware Wizard. Skip the remaining steps. -
From the Devices list, select the hardware device that you want to troubleshoot, and then click Next. The final wizard dialog box provides a device status. When you click Finish, the wizard does one of two things: -
If an error code is shown with the device status, the wizard accesses the error code in the online help documentation ”if it's available and installed. The help documentation should include a proposed technique to resolve the issue. -
The wizard starts the Hardware Troubleshooter, which attempts to solve the hardware problem using your responses to the questions it asks. Follow the advice of the Hardware Troubleshooter to resolve the hardware problem. You can also access the Hardware Troubleshooter directly. To do that, complete the following steps: -
In the Computer Management console, access Device Manager. -
Right-click the connection for the device you want to troubleshoot and then select Properties on the shortcut menu. -
In the General tab, click Troubleshoot. Managing Dynamic-Link Libraries As an administrator, you might be asked to install or uninstall dynamic-link libraries (DLLs), particularly if you work with IT (information technology) development teams . The utility you use to work with DLLs is Regsvr32. This utility is run at the command line. Once you start a command window, you install or register a DLL by typing regsvr32 name .dll , such as: regsvr32 mylibs.dll If necessary, you can uninstall or unregister a DLL by typing regsvr32 /u name .dll , such as: regsvr32 /u mylibs.dll Note Windows File Protection prevents replacement of protected system files. You'll be able to replace only DLLs installed by the Windows Server 2003 operating system as part of a hot fix, service pack update, Windows update, or Windows upgrade. Windows File Protection is an important part of the Windows Server 2003 security architecture.
 |