Configuring TCP/IP Networking Computers use IP addresses to communicate over TCP/IP. Windows Server 2003 provides several ways to configure IP addressing: -
Manually IP addresses that are assigned manually are called static IP addresses. Static IP addresses are fixed and don't change unless you change them. You'll usually assign static IP addresses to servers running Windows Server 2003, and when you do this, you'll need to configure additional information to help the server navigate the network. -
Dynamically A Dynamic Host Configuration Protocol (DHCP) server (if one is installed on the network) assigns dynamic IP addresses at startup, and the addresses might change over time. Dynamic IP addressing is the default configuration and is set up automatically in most cases on Windows workstations. -
Alternatively When a computer is configured to use DHCP and no DHCP server is available, Windows Server 2003 assigns an alternate private IP address automatically. By default, this address is in the range from 169.254.0.1 to 169.254.255.254 with a subnet mask of 255.255.0.0. You can also specify a user -configured alternate IP address, which is particularly useful for laptop users. Configuring Static IP Addresses When you assign a static IP address, you need to tell the computer the IP address you want to use, the subnet mask for this IP address, and, if necessary, the default gateway to use for internetwork communications. An IP address is a numeric identifier for a computer. IP addressing schemes vary according to how your network is configured, but they're normally assigned from a range of addresses for a particular network segment. For example, if you're working with a computer on the network segment 192.168.10.0, the address range you have available for computers is usually from 192.168.10.1 to 192.168.10.254. The address 192.168.10.255 normally is reserved for network broadcasts. If the network is connected directly to the Internet and you've reserved a range of IP addresses, you can use the IP addresses you've been assigned. If you're on a private network that's indirectly connected to the Internet, you should use private IP addresses. Private network addresses are summarized in Table 16-1. Table 16-1. Private Network Addresses | Private Network ID | Subnet Mask | IP Address Range | | 10.0.0.0 | 255.0.0.0 | 10.0.0.1 “ 10.255.255.254 | | 172.16.0.0 | 255.240.0.0 | 172.16.0.1 “ 172.31.255.254 | | 192.168.0.0 | 255.255.0.0 | 192.168.0.1 “ 192.168.255.254 | All other network addresses are public and must be leased or purchased. Using Ping to Check an Address Before you assign a static IP address, you should make sure that the address isn't already in use or reserved for use with DHCP. You can check to see if an address is in use with the Ping utility. Open a command prompt and type ping , followed by the IP address you want to check. To test the IP address 192.168.10.12, you would use the following command: ping 192.168.10.12 If you receive a successful reply from the ping test, the IP address is in use and you should try another IP address. If the request times out for all ping attempts, the IP address isn't active on the network at this time and probably isn't in use. Your company's network administrator would be able to confirm this for you as well. Assigning a Static IP Address You assign a static IP address by doing the following: -
Access Network Connections in Control Panel. -
Select or double-click the connection you want to work with. -
Click Properties and then open the Internet Protocol (TCP/IP) Properties dialog box shown in Figure 16-2 by double-clicking Internet Protocol (TCP/IP). Or select Internet Protocol (TCP/IP) and then click Properties. Note LAN connections are created automatically when you start a computer that's attached to a network; you don't need to create a connection. One LAN connection is shown for each network adapter installed. If you use a dial-up or other type of connection, you must create the connection as described in the "Managing Network Connections" section of this chapter.
Figure 16-2. Use the Internet Protocol (TCP/IP) Properties dialog box to configure dynamic and static IP addressing. 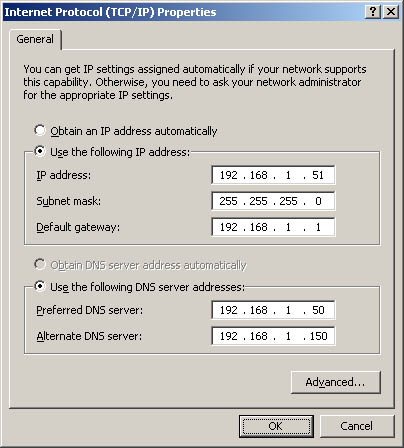 -
Select the Use The Following IP Address button, and then type the IP address in the IP Address field. The IP address you assign to the computer must not be used anywhere else on the network. -
The Subnet Mask field ensures that the computer communicates over the network properly. Windows Server 2003 should insert a default value for the subnet mask into the Subnet Mask field. If the network doesn't use subnets, the default value should suffice. But if it does use subnets, you'll need to change this value as appropriate for your network. -
If the computer needs to access other TCP/IP networks, the Internet, or other subnets, you must specify a default gateway. Type the IP address of the network's default router in the Default Gateway field. -
Domain name services are needed for domain name resolution. Type a preferred and alternate DNS server address in the fields provided. -
When you're finished, click OK. Repeat this process for other network adapters you want to configure. Keep in mind that each network adapter must have a unique IP address. -
Configure Windows Internet Name Service (WINS) as necessary. Configuring Dynamic IP Addresses DHCP gives you centralized control over IP addressing and TCP/IP default settings. If the network has a DHCP server, you can assign a dynamic IP address to any of the network adapter cards on a computer. Afterward, you rely on the DHCP server to supply the basic information necessary for TCP/IP networking. Because the dynamic IP address can change, you shouldn't use a dynamic IP address for servers running Windows Server 2003. You configure dynamic IP addressing by completing the following steps: -
Access Network Connections in Control Panel, and then select or double-click the connection you want to work with. Note One LAN connection is shown for each network adapter installed. These connections are created automatically.
-
Click Properties and then open the Internet Protocol (TCP/IP) Properties dialog box by double-clicking Internet Protocol (TCP/IP). Or you could select Internet Protocol (TCP/IP) and then click Properties. -
Select Obtain An IP Address Automatically. If desired, select Obtain DNS Server Address Automatically. Or select Use The Following DNS Server Addresses and then type a preferred and alternate DNS server address in the fields provided. -
When you're finished, click OK. Afterward, configure alternate private IP addresses, DNS, and WINS as necessary. Configuring Alternate Private IP Addresses When you use DHCP, don't forget that an alternate IP address is assigned automatically when the DHCP server can't be reached during startup or when the current IP address lease expires . By default, the alternate IP address is in the range from 169.254.0.1 to 169.254.255.254 with a subnet mask of 255.255.0.0. Because the automatic private IP address configuration doesn't include default gateway, DNS, or WINS server settings, a computer using the alternate IP addressing is essentially isolated on its own network segment. If you want to ensure that a computer uses a specific IP address when no DHCP server is available, you need to specify an alternate configuration manually. One of the key reasons for setting an alternate configuration is to accommodate portable computer users who take their computers home. In this way the user's portable computer could be configured to use a dynamically assigned IP address at work and an alternate IP address configuration at home. You can specify an alternate private IP address by completing the following steps: -
Access Network Connections in Control Panel and then select or double-click the connection you want to work with. -
Click Properties and then open the Internet Protocol (TCP/IP) Properties dialog box by double-clicking Internet Protocol (TCP/IP). Or you could select Internet Protocol (TCP/IP) and then click Properties. -
Provided that you've already configured the adapter to obtain an IP address automatically, you should be able to select the Alternate Configuration tab shown in Figure 16-3. Figure 16-3. Use the Alternate Configuration tab to configure a private IP address for the computer. 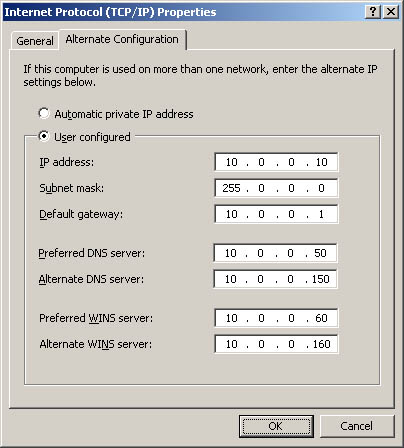 -
Select the User Configured option in the Alternate Configuration tab and then type the IP address you want to use in the IP Address field. The IP address you assign to the computer should be a private IP address as shown in Table 16-1, and it must not be in use anywhere else at the time the settings are applied. -
The Subnet Mask field ensures that the computer communicates over the network properly. Windows Server 2003 should insert a default value for the subnet mask into the Subnet Mask field. If the network doesn't use subnets, the default value should suffice. But if it does use subnets, you'll need to change this value as appropriate for your network. -
If the computer needs to access other TCP/IP networks, the Internet, or other subnets, you must specify a default gateway. Type the IP address of the network's default router in the Default Gateway field. -
Domain name services are needed for domain name resolution. Type a preferred and alternate DNS server address in the fields provided. -
If WINS is used on the network for backward compatibility with previous versions of Windows, configure a preferred and alternate WINS server using the fields provided. -
When you're finished, click OK. Configuring Multiple IP Addresses and Gateways Computers running Windows Server 2003 can have multiple IP addresses ”even if the computers only have a single network adapter card. Multiple IP addresses are useful in several situations: -
You want a single computer to appear to be several computers. For example, if you're installing an intranet server, you might also want the server to provide Web, File Transfer Protocol (FTP), and Simple Mail Transfer Protocol (SMTP) services. You can use a different IP address for each service, and you can use different IP addresses for the intranet and the FTP services. -
If your network is divided into multiple logical IP networks (subnets), and the computer needs access to these subnets to route information or provide other internetworking services, you might want a single network adapter card to have multiple IP addresses. For example, the address 192.168.10.8 could be used for workstations accessing a server from the 192.168.10.0 subnet, and the address 192.168.11.8 could be used for workstations accessing a server from the 192.168.11.0 subnet. When you use a single network adapter, IP addresses must be assigned to the same network segment or segments that are part of a single logical network. If your network is divided into multiple physical networks, you must use multiple network adapters, with each network adapter being assigned an IP address in a different physical network segment. Real World If you're looking for a simple cost-effective solution for connecting multiple networks, you might want to take advantage of the IP routing or network bridging features of Windows Server 2003. With IP routing, you configure a server with two adapters (one configured for one network and another configured for another network) to route traffic between the networks. With IP routing, you use Routing And Remote Access services to configure routing using an appropriate routing protocol, such as Routing Information Protocol (RIP) Version 2 for Internet Protocol. IP routing is designed for medium and large enterprises and is fairly complex to configure. With network bridging, you create a logical bridge between two networks that's managed by Windows. Bridges are designed for small enterprises and are available only on Windows Server 2003. You won't find this feature on Advanced Server or Datacenter Server. | Assigning Addresses and Gateways Each network adapter installed on a computer can have one or more IP addresses. These addresses can also be associated with one or more default gateways. You assign multiple IP addresses and gateways to a single network adapter card by doing the following: -
Access Network Connections in Control Panel and then select or double-click the connection you want to work with. -
Click Properties and then open the Internet Protocol (TCP/IP) Properties dialog box by double-clicking Internet Protocol (TCP/IP). Or you could select Internet Protocol (TCP/IP) and then click Properties. -
Click Advanced to open the dialog box shown in Figure 16-4. Figure 16-4. Use the Advanced TCP/IP Settings dialog box to configure multiple IP addresses and gateways. 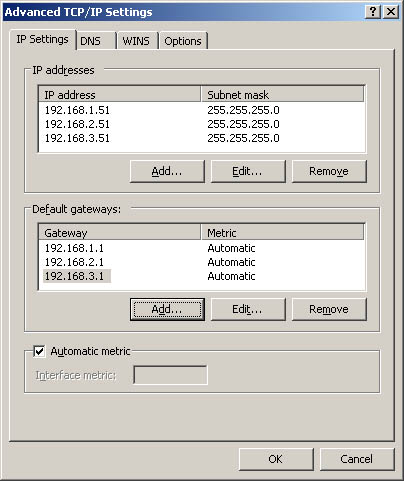 -
In the IP Settings tab, click Add in the IP Addresses area, and then type the IP address in the IP Address field and the subnet mask in the Subnet Mask field. Repeat this step for each IP address you want to add to the network adapter card. -
You can enter additional default gateways, as necessary. Click Add and then type the gateway address in the Gateway field. -
The gateway metric indicates the relative cost of using a gateway. If multiple default routes are available for a particular IP address, the gateway with the lowest cost is used first. If the computer can't communicate with the initial gateway, Windows Server 2003 tries to use the gateway with the next lowest metric. By default, Windows Server 2003 automatically assigns a metric to the gateway. You can assign the metric manually, however. To do this, clear the Automatic Metric check box and then enter a metric in the field provided. -
Click Add and then repeat Steps 5 “6 for each gateway you want to add. Configuring DNS Resolution DNS is a host name resolution service. You use DNS to determine a computer's IP address from its host name. This allows users to work with host names , such as http://www.msn.com or http://www.microsoft.com, rather than an IP address, such as 192.168.5.102 or 192.168.12.68. DNS is the primary name service for Windows Server 2003 and the Internet. Tip A DNS server must be installed on the network (or be available to the network) for DNS to function properly. Managing DNS servers is covered in Chapter 20 , "Optimizing DNS."
Basic DNS Settings You can configure basic DNS settings by completing the following steps: -
Access Network Connections in Control Panel. Afterward, select or double-click the connection you want to work with. -
Click Properties and then open the Internet Protocol (TCP/IP) Properties dialog box by double-clicking Internet Protocol (TCP/IP). Or you could select Internet Protocol (TCP/IP) and then click Properties. -
If the computer is using DHCP and you want DHCP to specify the DNS server address, select Obtain DNS Server Address Automatically. Otherwise , select Use The Following DNS Server Addresses and then type a primary and alternate DNS server address in the fields provided. Advanced DNS Settings You configure advanced DNS settings by using the DNS tab in the Advanced TCP/IP Settings dialog box shown in Figure 16-5. You use the fields of the DNS tab as follows : -
DNS Server Addresses, In Order Of Use Use this area to specify the IP address of the DNS servers that are used for domain name resolution. Use the Add button to add a server IP address to the list. Use the Remove button to remove a server from the list. Use the Edit button to edit the selected entry. You can specify multiple servers to use for DNS resolution. These servers are used in priority order. If the first server isn't available to respond to a host name resolution request, the next DNS server on the list is accessed, and so on. It's important to note that TCP/IP doesn't go to the next server if the first server can't resolve the name, only if the first server doesn't respond. To change the position of a server in the list box, click it and then use the Up or Down arrow button. -
Append Primary And Connection Specific DNS Suffixes Select this option to resolve unqualified computer names in the primary domain. For example, if the computer name "Rage" were used and the parent domain were microsoft.com , the computer name would resolve to rage.microsoft.com . If the fully qualified computer name doesn't exist in the parent domain, the query fails. The parent domain used is the one set in the Network Identification tab of the System Properties dialog box. Normally, this option is selected by default. -
Append Parent Suffixes Of The Primary DNS Suffix Select this option to resolve unqualified computer names using the parent-child domain hierarchy. If a query fails in the immediate parent domain, the suffix for the parent of the parent domain is used to try to resolve the query. This process continues until the top of the DNS domain hierarchy is reached. For example, if the computer name "Rage" were used in the dev.microsoft.com domain, DNS would attempt to resolve the computer name to rage.dev.microsoft.com . If this didn't work, DNS would attempt to resolve the computer name to rage.microsoft.com . Normally, this option is selected by default. -
Append These DNS Suffixes (In Order) Select this option to set specific DNS suffixes to use rather than resolving through the parent domain. Use the Add button to add a domain suffix to the list. Use the Remove button to remove a domain suffix from the list. Use the Edit button to edit the selected entry. You can specify multiple domain suffixes. These suffixes are used in priority order. If the first suffix doesn't resolve properly, DNS attempts to use the next suffix in the list. If this fails, the next suffix is used, and so on. To change the order of the domain suffixes, select the suffix, and then use the Up or Down arrow buttons to change its position. -
DNS Suffix For This Connection Sets a specific DNS suffix for the connection that overrides DNS names already configured for use on this connection. You'll usually want to set the DNS domain name through the Network Identification tab in the System Properties dialog box instead. -
Register This Connection's Addresses In DNS Select this option if you want all IP addresses for this connection to be registered in DNS under the computer's fully qualified domain name. This option is selected by default. -
Use This Connection's DNS Suffix In DNS Registration Select this option if you want all IP addresses for this connection to be registered in DNS under the parent domain. Figure 16-5. Use the DNS tab of the Advanced TCP/IP Settings dialog box to configure advanced DNS settings.  Configuring WINS Resolution You use WINS to resolve NetBIOS computer names to IP addresses. You can use WINS to help computers on a network determine the address of other computers on the network. If a WINS server is installed on the network, you can use the server to resolve computer names. Although WINS is supported on all versions of Windows, Windows Server 2003 primarily uses WINS for backward compatibility. You can also configure computers running Windows Server 2003 to use the local file LMHOSTS to resolve NetBIOS computer names. However, LMHOSTS is consulted only if normal name resolution methods fail. In a properly configured network these files are rarely used. Thus, the preferred method of NetBIOS computer name resolution is WINS in conjunction with a WINS server. You can configure WINS by completing the following steps: -
Access the Advanced TCP/IP Settings dialog box, and then select the WINS tab. This displays the window shown in Figure 16-6. Figure 16-6. Use the WINS tab of the Advanced TCP/IP Settings dialog box to configure WINS resolution for NetBIOS computer names.  -
The box named WINS Addresses, In Order Of Use allows you to specify the IP address of the WINS servers that are used for NetBIOS name resolution. Use the Add button to add a server IP address to the list. Use the Remove button to remove a server from the list. Use the Edit button to edit the selected entry. -
You can specify multiple servers to use for WINS resolution. These servers are used in priority order. If the first server isn't available to respond to a NetBIOS name resolution request, the next WINS server on the list is accessed, and so on. It's important to note that TCP/IP doesn't go to the next server if the first server can't resolve the name, only if the first server doesn't respond. To change the position of a server in the list box, click it and then use the Up or Down arrow button. -
To enable LMHOSTS lookups, select the Enable LMHOSTS Lookup check box. If you want the computer to use an existing LMHOSTS file defined somewhere on the network, retrieve this file with the Import LMHOSTS button. You generally use LMHOSTS only when other name resolution methods fail. Best Practices LMHOSTS files are maintained locally on a computer-by-computer basis, which can eventually make them unreliable. Rather than relying on LMHOSTS, ensure that your DNS and WINS servers are configured properly and are accessible to the network. This way, you can ensure centralized administration of name resolution services.
-
NetBIOS Over TCP/IP services are required for WINS name resolution. Choose one of the following options to configure WINS name resolution using NetBIOS: -
If you use DHCP and dynamic addressing, you can get the NetBIOS setting from the DHCP server. Select Default, Use NetBIOS Setting From The DHCP Server. -
If you use static IP addressing or the DHCP server doesn't provide NetBIOS settings, select Enable NetBIOS Over TCP/IP. -
If WINS and NetBIOS aren't used on the network, select Disable NetBIOS Over TCP/IP. This eliminates the NetBIOS broadcasts that would otherwise be sent by the computer. -
Repeat this process for other network adapters, as necessary.  |