Causes and Cures of Power Supply Overheating
| < Day Day Up > |
Causes and Cures of Power Supply OverheatingGot an overheated power supply? Not sure? If you touch the power supply case and it's too hot to touch, it's overheated. Power supplies can overheat, causing system failure and possible component damage, due to any of the following causes:
Use the following sections to figure out why in any given situation: OverloadingAn overloaded power supply is caused by connecting devices that draw more power (in watts) than the power supply is designed to handle. As you add more card-based devices to expansion slots and install more internal drives in a system, the odds of having an overloaded power supply increase, especially if your current power supply is 300 watts or less. If a power supply fails or overheats, check the causes listed in the following sections before determining whether you should replace the power supply. If you determine that you should replace the power supply, purchase a unit that has a higher wattage rating. Use the following methods to determine the wattage rating needed for a replacement power supply:
tip
Fan FailureThe fan inside the power supply cools it and is partly responsible for cooling the rest of the computer. If the fan fails, the power supply and the entire computer are at risk of damage. The fan also might stop turning as a symptom of other power problems. If the fan stops immediately after the power comes on, this usually indicates incorrect input voltage or a short circuit. If you turn off the system and turn it back on again under these conditions, the fan will stop each time.
To determine whether the fan has failed, listen to the unit; it should make less noise if the fan has failed. You can also see the fan blades spinning rapidly on a power supply fan that is working correctly. If the blades aren't turning, the fan has failed. If the system starts normally but the fan stops turning later, this indicates a true fan failure instead of a power problem. Inadequate Air Flow Outside the SystemThe power supply's capability to cool the system depends in part on free airflow space outside the system. If the computer is kept in a confined area (such as a closet or security cabinet) without adequate ventilation , power supply failures due to overheating are likely. Even systems in ordinary office environments can have airflow problems; make sure that several inches of free air space exist behind the fan output for any computer. Inadequate Air Flow Inside the SystemAs you have seen in previous chapters, the interior of the typical computer is a messy place. Wide ribbon cables used for hard and floppy drives, drive power cables, and expansion cards create small air dams that block air flow between the heat sources, such as the motherboard, CPU, drives, and memory modules, and the fan in the power supply. caution
You can do the following to improve air flow inside the computer:
Dirt and DustMost power supplies, except for a few of the early ATX power supplies , use a cooling technique called negative pressure ; in other words, the power supply fan works like a weak vacuum cleaner, pulling air through vents in the case, past the components , and out through the fan. Vacuum cleaners are used to remove dust, dirt, cat hairs, and so on from living rooms and offices, and even the power supply's weak impression of a vacuum cleaner works the same way. When you open a system for any kind of maintenance, look for the following:
Yuck! You never know what you'll find inside of a PC that hasn't been cleaned out for a year or two. So how can you get rid of the dust and gunk? You can use either a vacuum cleaner especially designed for computer use or compressed air to remove dirt and dust from inside the system. If you use compressed air, be sure to spread newspapers around the system to catch the dirt and dust. See Chapter 13, "Safety and Recycling," for more information. Auxiliary FansMost systems today rely on more than the power supply fan to cool the system's interior. Auxiliary fans can be attached to the following:
caution
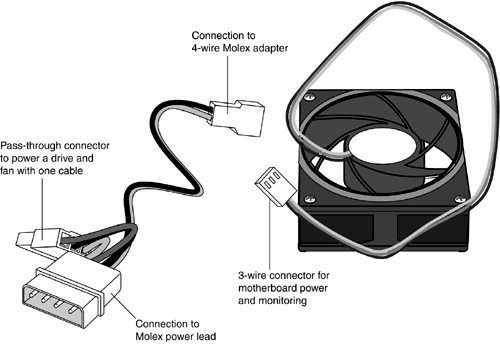
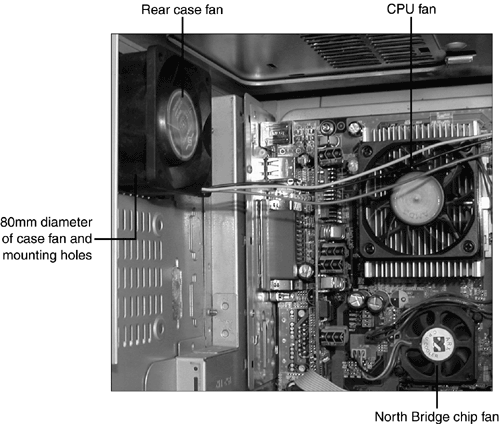
Although most systems include an active heatsink (heatsink with fan) for the CPU (processor) and a front-mounted case fan, you can add other fans to help cool the system and reduce the possibility of power supply failure. Existing fans and additional fans you add should be checked for proper working order and cleaned regularly. Figure 5.3 shows a typical rear case fan. You can plug fans like this into the three-prong chassis fan connection found on many recent motherboards or into the 4-pin Molex drive power connector used by hard drives. If the motherboard power connector is used, the PC Health or hardware monitor function found in many recent system BIOS setup programs can monitor fan speed. See Chapter 6, "BIOS and CMOS Configuration," for a typical example. Figure 5.3. A rear case fan that can be plugged into the motherboard or into a Molex power connector. Rear case fans are available in various sizes up to 120mm. The fan shown in Figure 5.3 is an 80mm model; measure the opening at the rear of the case (see Figure 5.4) to determine which fan size to purchase. Figure 5.4. A system with a rear case fan, North Bridge chip fan, and CPU fan. An additional rear case fan could be installed later. Figure 5.4 shows the rear case fan, North Bridge fan, and CPU fan after installation in a typical system. This system has two 80mm openings for case fans; a fan is already installed in one opening, and there's room for another. |
| < Day Day Up > |
EAN: N/A
Pages: 310

