6.1. Automating Pivot Tables
| < Day Day Up > |
| In Chapter 5, you learned how to connect to an Access database from Excel and pull in data. Once the data is in Excel, spreadsheet users can produce a pivot table on that data. However, there will be times when users need to produce more pivot table reports than are practical to produce manually. One of the most efficient ways to do this is to push the data from Access into Excel and produce the pivot table using VBA from Access. For example, you want to summarize headcount by position for each department in a company with multiple departments. In many cases, Human Resources won't want department managers to see the raw data about other departments. If you use Access to pull the data, you can populate an Excel workbook with each department's data and have Excel produce a pivot table. The database could then email the report to the department managers. There are two ways to use VBA to build a pivot table. The first method is to simply use the PivotTableWizard of the worksheet object. By using this method in conjunction with a variable with the object type of PivotTable, you can produce a pivot table rather quickly. The second method, which you see if you use the macro recorder in Microsoft Excel 2003, is to use the PivotCaches object in the ActiveWorkbook. For this chapter, I focus on using the PivotTableWizard method of the worksheet object, as it is more direct. You do not necessarily have to bring the data into Excel before creating your pivot table. Both methods of producing the pivot table allow you to connect to an external data source. I like to push the data into Excel, so that when users double-click on a number in the report, they can get the detail behind it. Using an external data source, however, can add to the complexity, particularly if the recipients do not have the same type of access to the source data, so it is a good idea in the beginning to reduce the variables.
Example 6-1 shows a simple example of automating the production of a pivot table. For this example, you use the same table and query structure that you saw in Chapter 5. To refresh your memory, with that data we have tables for Cost Centers, products, and sales. Let's say that you are responsible for providing a weekly production report to management on how each type of store performed by product category, and you use a query called qry_BaseQuery, as shown in Figure 6-1. Example 6-1. PivotTable example Public Sub PivotTableExportData( ) Dim xlApp As Excel.Application Dim xlwb As Excel.Workbook Dim xlws As Excel.Worksheet Dim xlrng As Excel.Range Dim xlPivot As Excel.PivotTable Dim adors As ADODB.Recordset Dim adofld As ADODB.Field Dim x, y, z As Integer Set xlApp = New Excel.Application xlApp.Visible = True Set xlwb = xlApp.Workbooks.Add Set xlws = xlwb.ActiveSheet xlws.Name = "BaseData" Set adors = New ADODB.Recordset adors.Open "qry_BaseQuery", CurrentProject.Connection, adOpenStatic, adLockReadOnly x = 1 For Each adofld In adors.Fields xlws.Cells(1, x).Value = adofld.Name x = x + 1 Next adofld Set xlrng = xlws.Cells(2, 1) xlrng.CopyFromRecordset adors y = adors.RecordCount + 1 adors.Close Set xlws = xlwb.Worksheets.Add xlws.Name = "SalesPivot" Set xlrng = xlws.Range("A3") xlws.PivotTableWizard Excel.xlDatabase, "BaseData!R1C1:R" & y & "C" & x - 1, _ xlrng, "SalesPivotTable", True, True, True, True Set xlPivot = xlws.PivotTables("SalesPivotTable") xlPivot.AddFields "LineofBusiness2", "ProductCategory" With xlPivot.PivotFields("TotalCost") .Orientation = Excel.xlDataField .NumberFormat = "$#,##0.00" End With Set xlPivot = Nothing Set xlrng = Nothing Set xlws = Nothing Set xlwb = Nothing Set xlApp = Nothing Set adofld = Nothing Set adors = Nothing End SubYou can see the resulting PivotTable in Figure 6-2. There are a few items of note. First, to define the range for the pivot table, I chose to use the R1C1 notation discussed in Chapter 5 because by cycling through the fields, I already have the number of columns and after pasting the data with the CopyFromRecordset method, I can store the number of rows of data in a variable. Since there is a header row, I need to add 1 to the row count and subtract 1 from the variable used to cycle through the fields Figure 6-1. The query layout of qry_BaseQuery in Access, joining together three tables to provide the information needed for the pivot table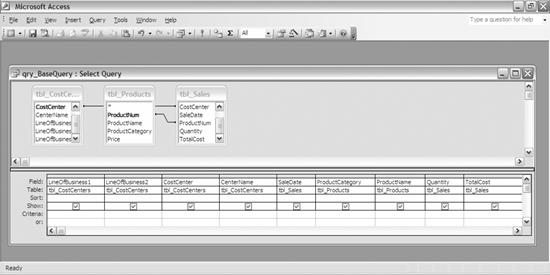 because the code will add 1 when it gets to the last field. The second item of note is that if you need to add multiple row or column fields, use the Array function in VBA. Beyond that, we are simply using the same techniques used earlier in the book to move data into Excel.
Another way to tackle this would be to use an external data connection and just use the query. This has the effect of not having a table of data in Excel while still showing the results. Be careful using this method if your users do not have the same access to the data as you have. This is very important if they are used to double-clicking on a number to see the detail behind it. In any case, it is useful to learn this method if your data changes regularly. Once it is built this way, you would need only to refresh the pivot table to bring in the most current data. One could argue that using this method makes it unnecessary to automate with VBA because you would reuse the Excel workbook. However, I have often found that even though people use databases and can store data in a manner that allows them to see when records change; they make a copy for each month or do something else that results in the name of the database changing throughout the life of the database. I use the Add method of the PivotCaches object of the Excel Workbook object, as shown in Example 6-2. Note that the values for the variables dblocation and dbdir, which hold the path and file names, will be different for you. Example 6-2. External data PivotTable example Public Sub PivotTableExternalData( ) Dim xlApp As Excel.Application Dim xlwb As Excel.Workbook Dim xlws As Excel.Worksheet Dim xlrng As Excel.Range Dim xlPivot As Excel.PivotTable Dim dblocation As String Dim dbdir As String dblocation = "C:\BookInformation\Chapter6\Chapter6DB.mdb" dbdir = "C:\BookInformation\Chapter6" Set xlApp = New Excel.Application xlApp.Visible = True Set xlwb = xlApp.Workbooks.Add With xlwb.PivotCaches.Add(SourceType:=Excel.xlExternal) .Connection = Array(Array( _ "ODBC;DSN=MS Access Database;DBQ=" & dblocation & _ ";DefaultDir=" & dbdir & ";DriverId=25;FIL=MS"), _ Array(" Access;MaxBufferSize=2048;PageTimeout=5;")) .CommandType = Excel.xlCmdSql .CommandText = Array("SELECT qry_BaseQuery.* from qry_BaseQuery") .CreatePivotTable TableDestination:="", TableName:="SalesPivotTable" End With Set xlws = xlwb.ActiveSheet xlws.Name = "SalesPivot" Set xlPivot = xlws.PivotTables("SalesPivotTable") xlPivot.AddFields "LineofBusiness2", "ProductCategory" With xlPivot.PivotFields("TotalCost") .Orientation = Excel.xlDataField .NumberFormat = "$#,##0.00" End With Set xlPivot = Nothing Set xlrng = Nothing Set xlws = Nothing Set xlwb = Nothing Set xlApp = Nothing End SubA couple of things need to be emphasized here. First, you cannot run this module from the same database where your data resides because when you run the module, the database will not allow database access from Excel. If you try it, Excel prompts you for login information, but you will not be able to connect. Second, the connection string looks difficult, but it is very easy to build by using the macro recorder from Excel. To make it easier to read, I create variables to hold the path of the database and the database directory. The other item that you may notice, if you use the macro recorder, is that when I reference Excel constants from Access, I always precede them with Excel.. While this step is not necessary, I do this to make it more clear. Also, if there are any other issues with references, you may receive an error if you are not explicit about which application the constant comes from. To create a chart with either of these examples, right-click on the pivot table and select PivotChart from the menu. Doing the same thing with code requires only three extra lines. Example 6-3 modifies Example 6-2 and emphasized the code that changes. Example 6-3. PivotTable and PivotChart example Public Sub PivotTableChartExportData( ) Dim xlApp As Excel.Application Dim xlwb As Excel.Workbook Dim xlws As Excel.Worksheet Dim xlrng As Excel.Range Dim xlPivot As Excel.PivotTable Dim adors As ADODB.Recordset Dim adofld As ADODB.Field Dim x, y, z As Integer Set xlApp = New Excel.Application xlApp.Visible = True Set xlwb = xlApp.Workbooks.Add Set xlws = xlwb.ActiveSheet xlws.Name = "BaseData" Set adors = New ADODB.Recordset adors.Open "qry_BaseQuery", CurrentProject.Connection, adOpenStatic, adLockReadOnly x = 1 For Each adofld In adors.Fields xlws.Cells(1, x).Value = adofld.Name x = x + 1 Next adofld Set xlrng = xlws.Cells(2, 1) xlrng.CopyFromRecordset adors y = adors.RecordCount + 1 adors.Close Set xlws = xlwb.Worksheets.Add xlws.Name = "SalesPivot" Set xlrng = xlws.Range("A3") xlws.PivotTableWizard Excel.xlDatabase, "BaseData!R1C1:R" & y & "C" & x - 1, _ xlrng, "SalesPivotTable", True, True, True, True Set xlPivot = xlws.PivotTables("SalesPivotTable") xlPivot.AddFields "LineofBusiness2", "ProductCategory" With xlPivot.PivotFields("TotalCost") .Orientation = Excel.xlDataField .NumberFormat = "$#,##0.00" End With xlwb.Charts.Add ActiveChart.SetSourceData xlrng ActiveChart.Location Where:=Excel.xlLocationAsNewSheet Set xlPivot = Nothing Set xlrng = Nothing Set xlws = Nothing Set xlwb = Nothing Set xlApp = Nothing Set adofld = Nothing Set adors = Nothing End SubThis example was easy because I already had a range object that referred to a cell in the pivot table. If I didn't have that, I would have either had to create one or write a range reference in the code after SetSourceData. Other than that, it is a very simple addition. Because most of the code to do pivot tables and pivot charts is the same regardless of data, I suggest keeping a text file of generic information and simply copying it into your module and changing the necessary parts. Figure 6-2 and Figure Figure 6-3 show the results of the pivot table and chart using this code. As with all Excel pivot charts, you can drag additional fields onto the charts or use the drop-down boxes to narrow the data. Figure 6-2. The resulting PivotTable produced by any of the three examples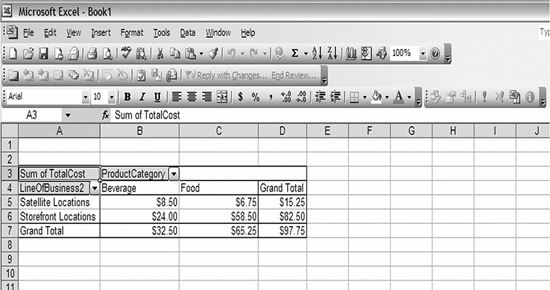 Figure 6-3. The resulting PivotChart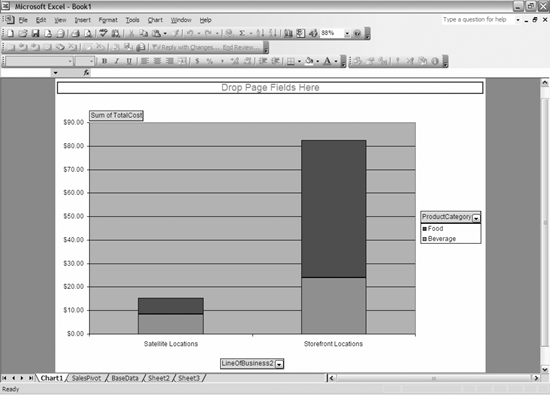 |

| < Day Day Up > |
EAN: 2147483647
Pages: 132