Introducing the .NET SQL Server Data Provider
| | ||
| | ||
| | ||
The .NET Framework data provider for SQL Server 2005 includes all of the classes required to access SQL Server datatabases from applications written in .NET languages, such as VB.NET and C#. The namespace includes the following classes: SqlConnection , SqlCommand, SqlDataReader , and SqlDataAdapter .
Using the SqlConnection Class
The SqlConnection class represents the link to the database. Its main property is the connection string, which sets the parameters to establish a connection with a SQL Server database. Two important methods of the SqlConnection class are Open and Close , which are responsible for starting and ending the connection with the server.
The following code (accessed as \Ch06\Sample04.vb in the sample files) uses Windows security to test a connection with the local server.
Sub ConnectIntegrated() Dim con As New SqlClient.SqlConnection("Data Source=(local);Initial Catalog=Adven tureWorks;Integrated Security=True") Try con.Open() MsgBox("Connection Successful") con.Close() Catch ex As Exception MsgBox("Connection Failed") End Try End Sub The following code (also accessed from \Ch06\Sample04.vb in the sample files) uses SQL Server security to test the connection.
Sub ConnectSQLSecurity() Dim con As New SqlClient.SqlConnection("Data Source=(local);" + _ "Initial Catalog=AdventureWorks;User ID=sa;Password=P@assword") Try con.Open() MsgBox("Connection Successful") con.Close() Catch ex As Exception MsgBox("Connection Failed") End Try End Sub Connection strings in ADO.NET are similar to ADO connections. However, in a SqlConnection , it is not necessary to set the database driver because the object model already knows that it is going to access a SQL Server database.
Using the SqlCommand Class
The SqlCommand class is used to represent Transact-SQL (T-SQL) statements to execute in the database. A SqlCommand can be used to execute stored procedures or T-SQL statements, or it can be used to access a table directly. Use the CommandType property to specify which type of statement the object represents.
The SqlCommand class provides three main methods:
-
ExecuteNonQuery Executes the command and returns the number of rows affected by the statement.
-
ExecuteScalar Executes the command and returns a single value.
-
ExecuteReader Builds a SqlDataReader that can be used to read a set of records. (This method is discussed in the next section.)
Note SqlCommand also provides the ExecuteXmlReader method (which returns an XmlReader object) that should be used when including the FOR XML clause in the SELECT statement.
The following code (accessed as \Ch06\Sample05.VB in the sample files) reads the name of the department with ID=3 in the database by using the ExecuteScalar method.
Sub DoExecuteScalar() Dim con As New SqlClient.SqlConnection( _ "Server=(local);Database=AdventureWorks;Trusted_Connection=yes") Dim Com As New SqlClient.SqlCommand( _ "SELECT Name FROM HumanResources.Department WHERE DepartmentID=3", con) Dim Name As String = "" Try con.Open() Name = Com.ExecuteScalar.ToString MsgBox(String.Format("The name is {0}", Name)) con.Close() Catch ex As Exception MsgBox("Connection Failed") End Try End Sub Using the SqlDataReader Class
The SqlDataReader class provides reading access to a forward-only set of streamed rows. This class is used to read rows from a command into the application. The SqlDataReader object is created through the SqlCommand.ExecuteReader method. The SqlDataReader class contains the Read method to obtain the next record, as well as many Get methods to read different types of columns in the row. The Read method can be run multiple times and will return false after the last row has been read. All of the Get methods support an integer parameter to specify the column number in the record.
| More Info | SqlDataReader also supports multiple GetSql methods, which can be used to read the different datatypes of columns by using sql datatypes instead of standard .NET datatypes. |
The following code (accessed as \Ch06\Sample06.vb in the sample files) reads departments from the AdventureWorks database by using a SqlDataReader .
Sub DoExecuteReader() Dim con As New SqlClient.SqlConnection( _ "Server=(local);Database=AdventureWorks;Trusted_Connection=yes") Dim Com As New SqlClient.SqlCommand( _ "SELECT DepartmentID, Name FROM HumanResources.Department", con) Dim Name As String = "" Dim DepartmentId As Integer = 0 Dim dr As SqlClient.SqlDataReader Try con.Open() dr = Com.ExecuteReader Do While dr.Read DepartmentId = CInt(dr(0)) Name = dr(1).ToString MsgBox(String.Format("{0}:{1}", DepartmentId, Name)) Loop dr.Close() con.Close() Catch ex As Exception MsgBox("Connection Failed") End Try End Sub Using the SqlDataAdapter Class
The SqlDataAdapter class is used to fill a dataset and includes a set of data commands with which to select and update the database. SqlDataAdapter has four commands responsible for each of the operations in the database: SELECT, INSERT, DELETE, and UPDATE. The SqlDataAdapter class hides the complexity of SqlDataReaders and offers a simpler object model with which to create data-centric applications.
To create a SqlDataAdapter graphically by using the SqlDataAdapter control in Visual Studio 2005, complete the following steps.
Creating a SqlDataAdapter Graphically
-
From the Start menu, choose All Programs Microsoft Visual Studio 2005 Microsoft Visual Studio 2005 to open Visual Studio 2005.
-
From the File menu, choose New Project.
-
In the Project Types section, select Visual Basic and then choose the Windows Application template.
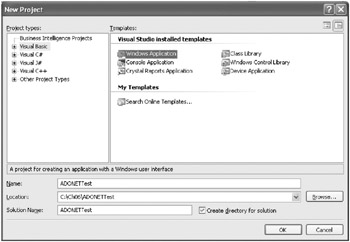
-
Name the project ADONETTest and click OK to create the project.
-
If the Toolbox is not visible, select Toolbox from the View menu.
-
Right-click the Toolbox and select Choose Items from the context menu.
-
On the .NET Framework Components tab of the Choose Toolbox Items window, select the following components : SqlCommand , SqlConnection , and SqlDataAdapter . The SqlDataReader class does not have a graphical designer. Click OK to add the components.
-
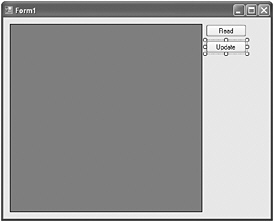
From the Toolbox, drag a DataGridView control onto the form. Right-click it and select Properties from the context menu.
-
In the Properties window, locate the (Name) property and change it to dgDepartments . Locate the Dock property and select Left (by clicking the left bar in the selector window when you expand the property value).
-
From the Toolbox, drag a button onto the form, and then drag a second button onto the form.
-
As you did previously with the grid, locate the (Name) property for one of the buttons . Change the name to btnRead and then change the other buttons name to btnUpdate .
-
Change the Text property of each button to Read and Update to match their names .
-
Add a SqlDataAdapter control (from the DataSet group of the Toolbox) to the window. The Data Adapter Configuration Wizard is displayed.
-
Select the connection to use. If this is the first time that you have accessed SQL Server 2005 from Visual Studio, click the New Connection button. Configure the server name, authentication method, and database in the Add Connection window.
-
Click Next to continue.
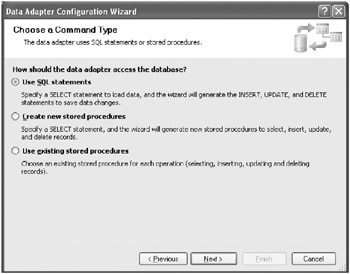
-
In the Choose A Command Type screen of the Data Adapter Configuration Wizard, make sure that the Use SQL Statements option is selected. In Chapter 9, Retrieving Data Using Programmable Objects, you will learn about stored procedures.
-
In the Generate The SQL Statements screen of the wizard, type the following command. You can access this code from \Ch06\Sample07.sql in the sample files.
SELECT DepartmentID, Name, GroupName FROM HumanResources.Department
-
Click Next to continue. Review how the SqlDataAdapter will be configured, including the four commands: SELECT, INSERT, UPDATE, and DELETE. Click Finish to configure the SqlDataAdapter .
-
Double-click the Read button and write the following code (included in the sample files as \Ch06\Sample08.vb).
. Private Sub btnRead_Click(ByVal sender As System.Object, _ ByVal e As System.EventArgs) Handles btnRead.Click Dim ds As New DataSet SqlDataAdapter1.Fill(ds) With dgDepartments .DataSource = ds .DataMember = "Department" End With End Sub
-
Select the Form1.cs [Design] tab or click the Form1.cs node in Solution Explorer to return to the Form1 design window. Double-click the btnUpdate button.
-
Write the following code (included in the sample files as \Ch06\Sample09.vb).
Private Sub btnUpdate_Click(ByVal sender As System.Object, _ ByVal e As System.EventArgs) Handles btnUpdate.Click Dim ds As DataSet = CType(dgDepartments.DataSource, DataSet) SqlDataAdapter1.Update(ds) End Sub
-
Press F5 to save and run the application. Click the Read button to fill the DataGridView. Make modifications, and then click the Update button to save the information in the database.
Important Do not delete the first rows from the Departments table (DepartmentID 1 to 16) because they are referenced by the Employee table. If you want to test how the DELETE command works, add a row, update the database, and then delete the row later.
Using the TableAdapter Class
ADO.NET 2.0 introduces a new class called TableAdapter . TableAdapter substitutes the functionality of SqlDataAdapter by providing built-in communications between the application and the database. TableAdapters may contain any number of T-SQL statements or stored procedures that return filled data tables or update data from the data table back to the database.
Creating a TableAdapter
-
From the Start menu, choose All Programs Microsoft Visual Studio 2005 Microsoft Visual Studio 2005.
-
From the File menu, select New Project.
-
In the Project Types section, select Visual Basic and choose the Windows Application template.
-
Name the project ADONETTest2 and click OK to create the project.
-
If the Toolbox is not visible, choose Toolbox from the View menu.
-
Add a DataGridView and one button to the form. Name the DataGridView dgDepartments , and name the button btnUpdate . Change the text of btnUpdate to Update.
-
Select the dgDepartments data grid view, and click the DataGridView Tasks button (small right-arrow button in the upper-right corner of the data grid view).
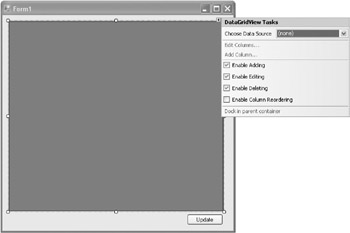
-
Click the down arrow on the Choose Data Source drop-down listbox and select Add Project Data Source at the bottom.
-
In the Datasource Configuration Wizard, select the Database icon and click Next to continue.
-
Select the AdventureWorks connection that you created in the previous procedure and click Next to continue.
-
In the Save The Connection String To The Application Configuration File screen of the wizard, click Next to continue.
-
In the Choose Your Database Objects screen of the wizard, expand the Tables node. Expand the Department table, and select the DepartmentID, Name, and GroupName columns by putting a check in the checkboxes.
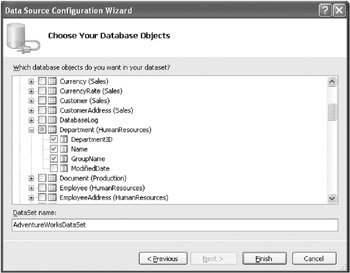
-
Click Finish to configure the data source.
-
Notice that the wizard created a dataset in the project (visible in Solution Explorer) and three database objects in the tray below the form: AdventureWorksDataset, departmentBindingSource, and departmentTableAdapter.
-
Double-click the Update button and write the following code:
private void btnUpdate_Click(object sender, EventArgs e) { this.departmentTableAdapter.Update(this.adventureWorksDataSet.Department); } -
Save and run the application. The data grid is automatically filled with data when the window is displayed. Make modifications, and then click the Update button to save the information back to the database.
| | ||
| | ||
| | ||
EAN: N/A
Pages: 130