The Ice Cream Shop Application
| |
Once we have completed the design phase of our project, we should be in a position to answer the two following questions:
-
What data items (or entities) and application objects will we need?
-
How should these entities and objects fit together?
This book is not about how to design the data items and other application objects that make up the application. We are assuming that you know enough about tables, forms, reports , and queries from your previous exploration of Access. This book is about how you use VBA (Visual Basic for Applications) to control the way that these objects interoperate as part of a larger system. In one sense, VBA can be thought of as the 'glue' that holds the whole application together.
The best way to understand how VBA fits in is, of course, not through theory but through practice. In the rest of this chapter, we will run through the process of starting to create an application - the Ice Cream Shop database that accompanies this book. At a certain point we will hit a brick wall, when we try to automate our application and get it to display some intelligence. We'll then look at the two options available to us for solving the problem: VBA or macros. We will see why VBA is often the best and sometimes the only satisfactory choice.
You may find that this section covers a lot of familiar territory. However, if you do take the time to read it, it will acquaint you with the structure of the Ice Cream Shop database so that, when the crunch comes, and we have to use VBA, we will have a familiar database structure to work with.
Designing the Ice Cream Shop Database
As its name suggests, the Ice Cream Shop database is an application that has been designed to track stock and sales for an ice cream wholesaler called Dave and Rob's Ice Cream Shop. The requirements analysis we conducted indicated to us that the primary purpose of the database is to store information about the following things:
-
Stock carried by the Ice Cream Shop
-
Orders placed by companies
-
Customer and supplier details
Our analysis has also indicated that ease of data entry and maintenance is a key requirement for the application, and that the forms used by the staff at the shop must be intuitive and simple to use. The fact that there will a fair amount of data to handle is enough for us to decide to use Access to build the application with (which is just as well or we wouldn't have an example to write about).
We have also conducted the appropriate technical analysis, which indicates that Access 2002 is an appropriate application development tool for the delivery of this database solution ( otherwise this would be a very short book!).
Our data analysis has indicated that there are five primary objects or entities . We decided on these particular entities by dividing up the data requirements into self-contained " lumps ". For a complex application there may be several different possible entity models (or ways of arranging your data) and at the end of the day the choice of which model to use will come down to your judgement, your experience and the type of requirements to be met. In this case the basic model is fairly obvious:
-
Suppliers
-
Customer Companies
-
Ice Creams
-
Ingredients
-
Sales
The four key processes that indicate the relationships between the entities are as follows :
-
Ice Creams are sold to Customer Companies
-
Each Ice Cream is composed of one or more Ingredients
-
Each Ingredient can be used in one or more Ice Creams
-
Ingredients are purchased from Suppliers
A more detailed analysis has revealed the attributes of the five entities that we need to record and our preliminary entity relationship diagram (ERD, or more simply, database design) looks like this:
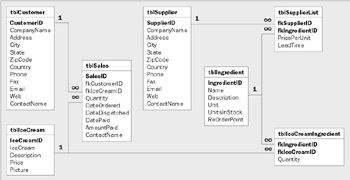
As you can see from the database diagram above, five tables have been created to represent the five basic entities identified in the data analysis:
| tblSupplier | represents | the Suppliers entity |
| tblCustomer | represents | the Customers entity |
| tblIceCream | represents | the Ice Creams entity |
| tblIngredient | represents | the Ingredients entity |
| tblSales | represents | the Sales entity |
One-to-many relationships between the entities have been denoted by creating straightforward one-to-many relationships between the tables:
| tblCustomer | (1) | ( | (n) | tblSales |
| A sale can only involve one customer, but a customer can have more than one sale | ||||
| tblIceCream | (1) | ( | (n) | tblSales |
| Only one type of ice cream can be sold in a particular sale, but an ice cream can be sold more than once | ||||
Many-to-many relationships have been handled by creating two intermediate tables ( tblIceCreamIngredient and tblSupplierList ) and placing one-to-many relationships on either side of the intermediate table:
| tblIceCream | (1) | ( | (n) | tblIceCreamIngredient | (n) | ( | (1) | tblIngredient |
| An ice cream is composed of many ingredients and the same Ingredient can be used in many ice creams | ||||||||
| tblSupplier | (1) | ( | (n) | tblSupplierList | (n) | ( | (1) | tblIngredient |
| A supplier can provide many ingredients and the same ingredient could be provided by many suppliers | ||||||||
This use of intermediate tables is the standard way in which we join two tables together when the two tables have a many-to-many relationship. It is part of a process called normalization, which is a series of steps you go through to make sure your database is designed correctly. This process is really beyond the scope of this book, but there are plenty of books specializing in it. One such book is (as we've mentioned earlier) 'Database Design for Mere Mortals', Michael J. Hernandez, Addison-Wesley, ISBN 0-201-69471-9.
Typical Dilemmas Regarding Data Storage
A few features of this database structure are worthy of note. Firstly, note the duplication of the ContactName attribute in the tblSupplier , tblCustomer, and tblSales tables. This is deliberate and caters for the fact that although there is one primary contact for each supplier and for each customer, the Ice Cream Shop also wants to be able to assign separate contacts to individual sales.
Secondly, note the fact that the tblSupplier and tblCustomer tables have identical structures. Whenever we see this in a database structure it should alert us to the fact that what we have represented as two discrete entities might instead be represented as a single entity. So what is it that differentiates a supplier from a customer? Obviously, we buy from suppliers and customers buy from us. But is that sufficient reason for treating them as separate entities? After all, what happens if a supplier is also a customer? If this was to occur, and we were maintaining separate tblSupplier and tblCustomer tables, then changes to, say, the address of the company involved would necessitate a change to both the tblSupplier and tblCustomer tables.
A better alternative might be to combine the two tables into a generic tblCompany table:

This is actually the database design that has been employed in the Ice Cream Shop database that accompanies this book. The tblCompany table now holds details of both suppliers and customers. In order to distinguish between those companies that appear in the tblCompany table (because they are either customers or suppliers) we have added a new Supplier field to the table. This field has a Yes/No data type and we will use to indicate whether the company should appear in supplier lists.
This is not the only way that we could have chosen to implement the physical design of the database. There is often no one correct database design. A fully normalized design might please the relational database theorists, but they are not the ones who will have to maintain the database or account for its performance in a production environment. Database design, as with most aspects of system design and development, is all about achieving the best compromise. There is nothing inherently wrong with denormalizing a database and it can be an excellent tool for increasing query performance. However, before you decide to denormalize a database, you should ensure that it doesn't introduce any significant data anomalies and that either:
-
It will allow you to achieve a measurable improvement in performance, with a minimal increase in administrative overhead, or
-
It will allow you to achieve a measurable reduction in administrative overhead, with a minimal degradation of performance
Another aspect of the tblCompany table that required careful consideration was the question of how to hold address information. Look at the structure of the table. The address information has been broken down into five fields ( Address , City , State , ZipCode , and Country ). Why do you think this has been done, instead of holding the address in a single field? The answer is that by breaking it into five fields, we make it easier for our users to analyze their orders by city, state, zip code and country individually. This would be difficult, if not impossible , if the address were stored in a single field.
Note, however, that only one field is used for the first part of the address (the lines that precede the city, state, zip code and country).
| Address: | 37 Walnut Grove |
| City: | Nutbush |
| State: | Tennessee |
| Postcode/Zip Code: | 38053 |
| Country: | USA |
Even though this first part of the address might contain more than one line ( especially if the address contains a building name) we can store it in a single field, because Access allows us to store and display multi-line values in one field. We store these in one field because they logically belong together and you shouldn't need to split them up at all. Sometimes you will see databases with tables that store this part of the address in multiple fields, because the database cannot easily handle carriage returns as part of the data in a field. That's not a problem with Access though.
The other advantage with storing the first part of the address in a single field is that it makes it a lot easier to amend the address. Just imagine if you had stored the above address with a separate field for every line of the address and then had to change it to:
| Address: | Unit 17 |
| 37 Walnut Grove | |
| City: | Nutbush |
| State: | Tennessee |
| Postcode/Zip Code: | 38053 |
| Country: | USA |
Choosing a Storage Engine
Another choice which developers of Access 2002 applications will now need to make is which database engine they will use to store the application's data in. Traditionally, Microsoft Access has always used JET as its native database engine. Additionally, however, Access developers are offered the choice of using a second desktop database engine, the Microsoft SQL Server 2000 Desktop Engine (henceforth MSDE).
To keep this chapter concise and to the point, we have placed the discussion of which storage engine to use in Chapter 20. It is also worth reiterating at this point that the purpose of this book is to teach how to use VBA in Access and for that reason all of the data access examples will be against JET databases.
Entering and Viewing Data
So far, we've considered the need for careful analysis and table design. But that's only the start. Now we have to consider how the users of our system are going to enter information into the tables. Of course, they could type information straight into the tables in datasheet mode, but that would be inelegant and inefficient, and would make it difficult to check data entry properly. There may also be security issues involved as it is unlikely that we will want all the users to be able to access sensitive data and this is impossible to achieve if the users have access to the "raw" data tables. We therefore need to put an acceptable face on our application and shield the users from the complexity of the table structure.
Designing a Form
The simplest way to create a quick-and-easy form is to use one of the Form Wizards. Using a wizard to produce a form will give you all the fields you require from one or more tables. This is great, but sometimes you'll need to add extra functionality to the form, in which case you'll have to make any additional modifications yourself. We're going to use a Form Wizard to create one of the key forms in the application - the form for maintaining company information.
Try It Out-Creating a Form Using the AutoForm Wizard
| Important | As we explained in the Introduction, your starting point for the Try It Out sections in this book is the IceCream.mdb database, found on the CD-ROM. We have also included on the CD partially completed databases that reflect each chapter's development, in case you lose your own copy, or want to jump in at a later chapter. The databases are numbered such that they correspond to the state at the end of a chapter - in other words, IceCream03 is the database you'd get when you'd worked through to the end of Chapter 3. We think it's better if you work through all of the Try It Out s, though, so you can really get a feel for how everything works and fits together. |
OK. Let's get started!
-
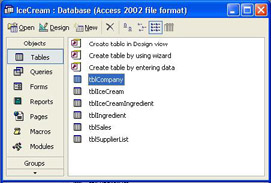
Load up the database file IceCream.mdb . In the Database window, select the Tables tab and then the tblCompany table:
-
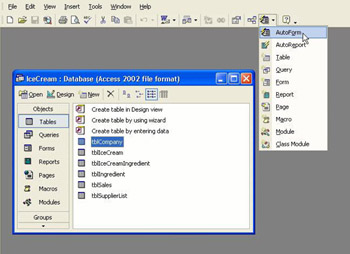
Select AutoForm from the Insert menu, or click the down arrow next to the New Object button on the toolbar and select AutoForm from the drop-down menu:
-
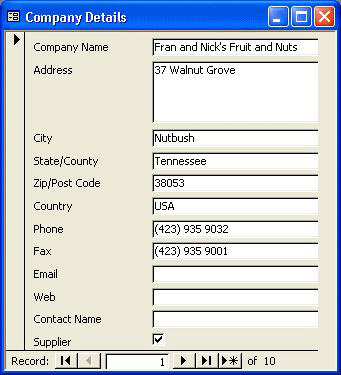
Access will now generate a form with all the fields from the tblCompany table and display the first record:
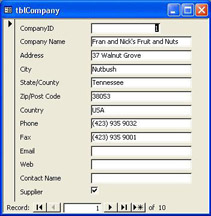
This is OK, but it's not perfect. There are several things that we can improve:
-
The form caption is tblCompany , which isn't very instructive to the user .
-
We will probably want to hide the CompanyID field, as it's of little relevance to the user.
-
Some of the fields are the wrong shape. For example, we will want to make the Address textbox taller, to accommodate larger addresses.
-
The navigation buttons at the bottom of the form are a bit small and fiddly - this is a key form and must be as easy to use as possible.
So let's change the form so that it looks a little more professional.
Try It Out-Changing a Form's Appearance in Design View
-
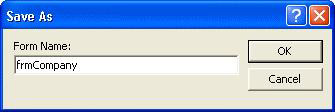
Save the form you've just created by choosing Save from the File menu or by hitting Ctrl + S . A dialog box will appear allowing you to type in a name for the form. Call it frmCompany :
-
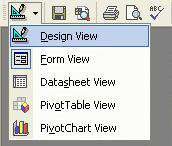
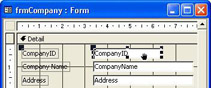
Now switch to Design view for the newly saved form by selecting Design View from the View menu or by clicking the Design View button:
-
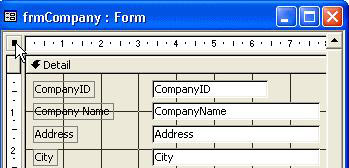
We can now attempt to make the changes that we highlighted earlier. To change the form's caption, you bring up the form's property sheet by double-clicking the Form Selector (the small gray box in the upper left corner of the form where the rulers meet), or by clicking the Properties button on the toolbar:
-
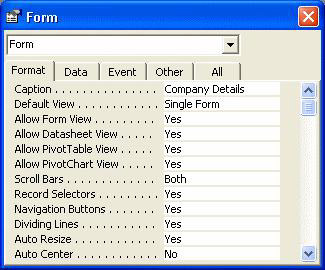
When the Properties window appears, make sure that the Format tab is selected, and then change the text of the Caption property to Company Details :
-
Next we must delete the CompanyID textbox and its label. To do this, we must select the textbox on the form by clicking it once, and then hitting the Delete key. The CompanyID textbox and its label will be deleted:
-
Next we'll change the size of the Address textbox. To do this, first select all of the controls on the form below the Address textbox. You can do this by dragging a rectangle around them with the primary mouse button held down or by clicking them in turn with the Shift key held down. Once the controls have been selected, place the mouse over one of the selected controls. The mouse pointer will turn into a small hand, indicating that the controls can be moved:
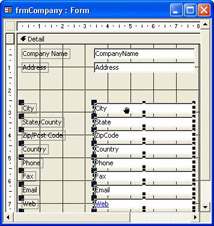
-
Hold down the primary mouse button and drag the controls down the form to leave some space for the Address text box, which we are going to resize.
You may have noticed that the wizard initially generated the form with just enough room for the controls. Don't worry about it, the form will automatically extend when you move the controls down.
There is an alternative method for moving controls around on a form once they are selected: Use the arrow keys on your keyboard whilst holding down the Ctrl key. This method is slower, but can be more precise.
-
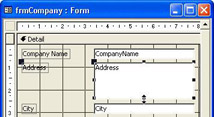
Once you have created some space, resize the Address textbox. To do this, we select the Address textbox by clicking it and then click the resizing handle (it looks like a black square) at the bottom center of the text box. Dragging the resizing handle down will give us a taller shape for the textbox:
You can also use a similar method to move, by using the arrow keys plus the Shift key, to more precisely resize all the controls selected.
-
Finally, change the form back to Form View to see the changes you've made. You can do this by selecting Form View from the View menu or by clicking the button that has replaced the Design View button:
We've now made the first three changes we decided on, and our form certainly looks a little more professional. But what about the other change? We still need to put more manageable navigation buttons on the screen. This is where things get a little more advanced!
Creating Navigation Buttons
To make the form easier to use, we can place some command buttons on the screen to replace the present navigation buttons. We can then use macros to move through the records behind the form. A macro is simply a stored collection of instructions that correspond to the actions that a user might carry out. So, in this case, our macro would contain the instructions to move to the next, previous, first or last records.
Of course, this book is about VBA, not macros. However, using them here will help show you their limitations.
Try It Out-Adding Simple Navigation Buttons to a Form
-
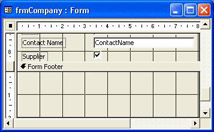
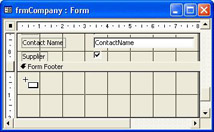
Switch back to Design View . We're going to use headers and footers, so go to the View menu and select the Form Header/Footer option. A header section and footer section will then appear on the form. We don't have to add the buttons to the footer of the form. We could add them onto the Detail section of the form instead. However, putting them on the footer keeps them in one place and we don't have to worry about them getting in the way if we decide to change around the other controls in the Detail section:
-
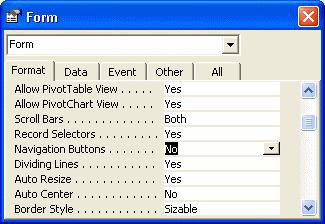
Next, we must remove the navigation buttons that Access supplies by default. So, click the Form Selector to bring up the form's property sheet, and on the property sheet's Format tab, change the value of the Navigation Buttons property from Yes to No . You can do this by double-clicking the property value or by clicking on the arrow and selecting No from the drop-down list that appears:
-
Once you have done this, you can also set the following form properties:
Scroll Bars
Neither
Record Selectors
No
Dividing Lines
No
-
Now you can add the first of your own navigation buttons. We'll start by creating a Next Record button.
-
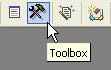
Check that the Toolbox is visible. If it isn't, then click the Toolbox button on the toolbar:
-
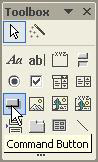
Then, make sure the Control Wizards button isn't depressed (that's the one in the toolbox with the magic wand on it), and select the Command Button tool from the toolbox. This will allow us to place a command button on the form:
-
Draw the button a suitable size on the footer:
-
Now go to the property sheet and change the Name property of the button (found under the Other tab) to cmdNext and its Caption property (found under the Format tab) to Next .
Note that when you name controls on a form it is a good idea to use a prefix that matches their type (like cmd for a command button). This makes the type obvious when you come to use the control in your VBA code, which makes your programs more readable and can help to reduce errors. Unfortunately there is no common standard for prefixes. Every company I've ever seen seems to use different ones (for example tb , txb , txtbx , textbox , for text boxes) and Microsoft have never published consistent guidelines. The best advice I can give is to find out what standards your company uses or, if none, use your own ( sensible ) prefixes and then be ready to change them at a later date!
-
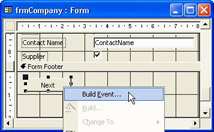
Now we must instruct the button to display the next record whenever it is clicked. To do this, you right-click on the button and select Build Event... from the pop-up menu which appears:
-
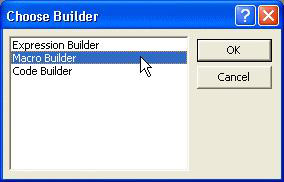
This will, in turn, bring up the Choose Builder dialog. For the moment, we want to use a macro, so select Macro Builder and hit the OK button:
-
We've said that we want a macro behind the button, so Access now helps us to build it. It displays the macro design window and prompts us for the name that we want to give the macro. We will call it macNextButton , so you should type in macNextButton and then press OK .
-
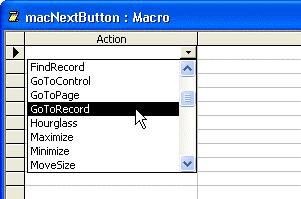
Now we get to specify the macro commands that will be carried out when we hit the command button. We want the button to make the form go to the next record. To get it to do this, you must click the down arrow in the Action column and select GoToRecord from the drop-down list that appears:
-
We then need to specify which record we want the command button to move us to. Click in the Record box in the lower pane of the screen, click the down arrow and select which record you want to go to from the drop-down list. We want to go to the next record, so make sure Next is selected. In fact, Next is the default selection in the drop-down list:

-
Now close the macro window and choose Yes when prompted to save the macro you have just created. Then change the frmCompany form to Form view and save the changes you made to it. When you open the form in form view, there should be a navigation button on it that allows you to move forward through the records in the form.
If you look at the button's properties, you will see that the name of the macro is listed in the On Click property on the Event tab. This is how Access knows to run the macro when the button is clicked. The macro name was inserted automatically into the event property because you right-clicked the button to select Build Event... and the Click event is the default event for buttons. If you had built the macro yourself, you could still make Access use it whenever you click the cmdNext button, but you would have to insert the macro's name manually into the On Click event property before it would work. We'll look at this whole area in a lot more detail in the next chapter.
-
Finally, complete the form by adding navigation buttons to enable you to move to the previous, first, last, and new records. You should be able to work out how to do this simply enough by referring to the steps described above.
The Finished Product
So there we have it! Your own handcrafted navigation buttons! You can customize these further if you wish - you may want to change the caption on the Next button to add a 'greater than' sign (>). You may even want to add a tooltip by modifying the ControlTipText property of each button.
You can also provide a hotkey for each of the buttons. This allows the user to activate the button from the keyboard by pressing Alt and a particular letter. To set this up, you simply type an ampersand (&) in the button's Caption property, before the letter that you want to activate the button. So, for example, if you typed & Next the user could select the button by pressing Alt-N . The hot key (in this case N ) will appear underlined on the button.
Once you have added the other buttons, your form should look something similar to the one shown overleaf:
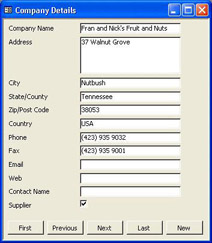
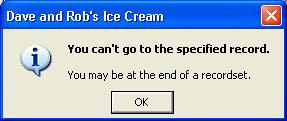
The form looks better, but it's still not perfect. If you haven't already done so, try clicking the First button to move to the first record. Now try clicking the Previous button to move to the previous record. Obviously, there's no record previous to the first record, so an error occurs and an error message box appears:
This is quickly followed by another error message which just gives you some additional information to try to help you debug (fix) the problem:
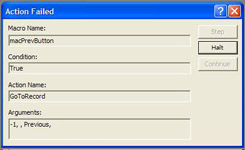
In this case of course, we know exactly what caused the problem: the user, right? Wrong. Ask the user: sloppy programming caused the problem!
Rule #1 of programming - the user is always right because they pay the bills.
While we cannot guard against absolutely every single incorrect action the user may take, we really ought to try to do something against a common possibility like this. One way to solve the problem would be to make the buttons intelligent so that they only allowed you to click them if they represented a valid choice? In other words, if you were already at the first record, the Previous button should appear grayed out or disabled .
Sure, you may say, but how? There doesn't appear to be any way to determine where you are in the table when you're using macros. So how is it done? You have just come across one of the shortcomings of macros. Macros are good at automating simple tasks , but they're less useful when the task (or the logic behind the task) becomes more complex. The only way to make these buttons intelligent is to use VBA, and we'll show you how to do this in the next chapter.
| |
EAN: 2147483647
Pages: 256