About Box
|
| < Free Open Study > |
|
Setting Up the Menus
I have shown you the code for creating the toolbar for the add-in, and for creating the respective tool buttons and their event handlers. Now you are going to create a set of menu forms that will be displayed when you click the respective tool button.
| Note | You might think that you could use context menus, or PopupMenus as they were known in VB 6.0, but you can't. A context menu must be placed relative to a control on aWindows form. The Microsoft Office CommandBarControl does not meet that criterion, and therefore context menus cannot be used. Also, it is not possible to cast a CommandBarControl to a Windows form control. |
Comment Menu
Add a small form to the project and name it frmComment. This form will be loaded when you click the Comment tool button. Figure 12-1 shows the Windows Forms Designer with this newly designed form. To the form, add five Label controls that will be the menu items. Also add a Panel control between the fourth and fifth labels to act as a separator. Finally, add a Timer control that will be used to automatically unload (Dispose) the form.
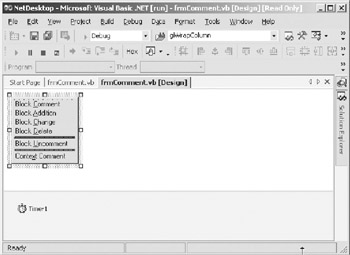
Figure 12-1: Comment menu form
Listing 12-6 shows the code for frmComment. I have deleted the Designergenerated code that creates the form and its components for the sake of space. You have seen this code before, and you can view it in the code for this chapter that is available for download from the Apress Web site (http://www.apress.com) if you want to see the details of how the components are being created.
Listing 12-6: Code for frmComment
Public Class frmComment Inherits System.Windows.Forms.Form Private miTimerStart As Integer Private miTimeToUnload As Short #Region " Windows Form Designer generated code " Public Sub New() MyBase.New() 'This call is required by the Windows Form Designer. InitializeComponent() 'Add any initialization after the InitializeComponent() call miTimeToUnload = 5 miTimerStart = Microsoft.VisualBasic.DateAndTime.Timer Me.Timer1.Interval = 500 Me.Timer1.Enabled = True End Sub ' Code intentionally deleted by author #End Region Private Sub lblComment_MouseLeave(ByVal sender As Object, _ ByVal e As System.EventArgs) _ Handles lblComment.MouseLeave, _ lblAddition.MouseLeave, _ lblDelete.MouseLeave, _ lblChange.MouseLeave, _ lblUncomment.MouseLeave, _ lblContextComment.MouseLeave Dim ofh As New CMenuHandler() ofh.HandleMouseLeave(sender, miTimerStart, miTimeToUnload) End Sub Private Sub lblComment_Click(ByVal sender As Object, _ ByVal e As System.EventArgs) _ Handles lblComment.Click, _ lblAddition.Click, _ lblDelete.Click, _ lblChange.Click, _ lblUncomment.Click, _ lblContextComment.Click Dim lbl As System.Windows.Forms.Label Dim oCM As New CodeManipulation(oVB) lbl = CType(sender, System.Windows.Forms.Label) Me.Dispose() DoEvents() Select Case lbl.Name Case "lblComment" oCM.BlockComment() Case "lblAddition" oCM.BlockAddition() Case "lblDelete" oCM.BlockDelete() Case "lblChange" oCM.BlockChange() Case "lblUncomment" oCM.BlockUnComment() Case "lblContextComment" oCM.EnterContextComments() End Select End Sub Private Sub lblComment_MouseMove(ByVal sender As Object, _ ByVal e As System.Windows.Forms.MouseEventArgs) _ Handles lblComment.MouseMove, _ lblAddition.MouseMove, _ lblDelete.MouseMove, _ lblChange.MouseMove, _ lblUncomment.MouseMove, _ lblContextComment.MouseMove Dim oMH As New CMenuHandler() oMH.HandleMouseMove(sender, miTimerStart, miTimeToUnload) End Sub Private Sub Timer1_Tick(ByVal sender As Object, _ ByVal e As System.EventArgs) Handles Timer1.Tick If Microsoft.VisualBasic.DateAndTime.Timer - miTimerStart > _ miTimeToUnload Then Me.Dispose() End If End Sub Private Sub frmComment_MouseMove(ByVal sender As Object, _ ByVal e As System.Windows.Forms.MouseEventArgs) _ Handles MyBase.MouseMove miTimerStart = Microsoft.VisualBasic.DateAndTime.Timer miTimeToUnload = 30 End Sub Private Sub frmComment_MouseLeave(ByVal sender As Object, _ ByVal e As System.EventArgs) _ Handles MyBase.MouseLeave miTimerStart = Microsoft.VisualBasic.DateAndTime.Timer miTimeToUnload = 0.5 End Sub Private Sub Panel1_MouseLeave(ByVal sender As Object, _ ByVal e As System.EventArgs) _ Handles Panel1.MouseLeave, _ Panel2.MouseLeave miTimerStart = Microsoft.VisualBasic.DateAndTime.Timer miTimeToUnload = 0.5 End Sub Private Sub Panel1_MouseMove(ByVal sender As Object, _ ByVal e As System.Windows.Forms.MouseEventArgs) _ Handles Panel1.MouseMove, _ Panel2.MouseMove miTimerStart = Microsoft.VisualBasic.DateAndTime.Timer miTimeToUnload = 30 End Sub End Class
I have left the code for the form constructor (New) in the listing because I needed to add some code to it. At the top of the class, I have added two modulelevel variables. They are highlighted in boldface font. The two variables are used to tell the Timer_Tick event when to unload the form in case the user does not click a menu item.
Basically, the way the form works is as follows. When the form loads, the timer is set to automatically unload in 5 seconds if the user does not move the mouse pointer over the form. This means that the user has 5 seconds to move the mouse over the Comment menu or it will be automatically unloaded. It is a logical assumption that the user will normally move fairly quickly down a menu once it drops down.
Once the mouse pointer moves over a Label control, the MouseMove event will fire. You can see by examining the MouseMove event that it instantiates an instance of the CMenuHandler class. It then calls the HandleMouseMove method of the class. This will cause the Label control (menu item) to be highlighted. It also causes the timer to be reset to allow the user another 30 seconds to click a menu item.
This CMenuHandler class basically handles highlighting and unhighlighting the menus as the user moves from one item to the next. The CMenuHandler class is shown in Listing 12-7. At that point I will describe its operation.
Listing 12-7: CMenuHandler Class
Imports System.Runtime.InteropServices Imports EnvDTE Imports System.Windows.Forms Public Class CMenuHandler Public Sub LoadMenuForm(ByRef oVB As EnvDTE.DTE, _ ByVal btn As Microsoft.Office.Core.CommandBarControl, ByVal oFrm As Form) Dim x As Integer Dim y As Integer x = btn.Left y = btn.Top + btn.Height oFrm.Visible = False oFrm.Show() oFrm.Left = x oFrm.Top = y oFrm.Visible = True oFrm.TopMost = True System.Windows.Forms.Application.DoEvents() End Sub Public Sub HandleMouseMove(ByVal Sender As Object, _ ByRef TimerStart As Integer, _ ByRef TimeToUnload As Short) Dim lbl As System.Windows.Forms.Label lbl = CType(Sender, System.Windows.Forms.Label) lbl.ForeColor = System.Drawing.SystemColors.Window lbl.BackColor = System.Drawing.SystemColors.ActiveCaption TimerStart = Microsoft.VisualBasic.DateAndTime.Timer TimeToUnload = 30 End Sub Public Sub HandleMouseLeave(ByVal Sender As Object, _ ByRef TimerStart As Integer, _ ByRef TimeToUnload As Short) Dim lbl As System.Windows.Forms.Label lbl = CType(Sender, System.Windows.Forms.Label) lbl.BackColor = System.Drawing.SystemColors.Control lbl.ForeColor = System.Drawing.SystemColors.WindowText TimerStart = Microsoft.VisualBasic.DateAndTime.Timer TimeToUnload = 1 End Sub End Class
As the user moves the pointer from one menu item to the next, the MouseLeave event will fire. This causes the Label control (menu item) to be unhighlighted. It also causes the timer to be set to unload the form in 1 second. In case the user moves the mouse off of the menu form completely, it will be unloaded almost immediately. However, if the user simply moves from one menu item to the next, the form will be displayed indefinitely or until the user clicks one of the menu items. At that point, the menu form is unloaded immediately and the desired feature is invoked to perform the functionality desired by the user.
You will notice that the MouseMove and MouseLeave events have Handles clauses that list all five Label names associated with their MouseMove and MouseLeave events. Visual Basic .NET does not allow control arrays, as did Visual Basic 6.0. Therefore, the event handler does not receive an Index to denote which control is forcing the event to fire. However, Visual Basic .NET provides the Handles keyword, which allows you to delegate the events of multiple controls to one event handler. This essentially replaces the control array for event handling.
You do the same thing in the Click event. You use the Handles keyword to list all of the menu item events so that the one handler event can process the event regardless of which control was clicked. You then cast the Sender object to a Label control so that you can retrieve the name of the label that was clicked. At this point, it is simple to use the name in a Select Case construct to determine which feature to invoke.
In the Click event, you instantiate an instance of the CodeManipulation class. You created this class in Chapter 10. It contains all of the methods for commenting and uncommenting code blocks. One of its methods will be called based on the outcome of the Select Case construct.
| Note | You can see the CodeManipulation class in the code for this chapter that is available for download from the Apress Web site (http://www.apress.com), but I do not show it in this chapter in order to save space. Also note that the Utilities class is instantiated by the CodeManipulation class. That class was also created in Chapter 10 and is included with the code for this chapter that is available for download from the Apress Web site. I do not show it in this chapter in order to save space. |
CMenuHandler Class
The code for the CMenuHandler class is shown in Listing 12-7. The event handlers of frmComment call the methods of this class. The other menu forms that will be created to display the menus for the remaining tool buttons will also call these methods.
The CMenuHandler class has three methods. The first one, LoadMenuForm, is called to load the specified form. Thus far, I have only shown you frmComment and its menu items. I list the other two forms and describe their respective menus, but in order to save space I do not show you the code for each individual form. They will all work essentially the same as frmComment. In LoadMenuForm you have to compute where to load the form to make it look like a menu that has dropped down from the selected tool button. It is a very simple computation based on the position of the specified button that was clicked. Notice that the TopMost property of the form is set to True. This will cause the menu form to stay on top of the IDE.
The MouseMove method is used to highlight the menu that the mouse is positioned over. It also sets the timer to allow another 30 seconds before automatically unloading the form. Consequently, each time the mouse is moved over a menu, you guarantee that you have at least 30 more seconds to make a decision about the option to select.
The MouseLeave method is used to return the unselected menu to its default colors and to tell the timer to unload the form in 1 second. Because the Label controls are set against each other, the MouseLeave method is followed immediately by the MouseMove event. If the user is moving the mouse pointer up or down on the menu form, the form will remain displayed indefinitely.
| Note | The form must have a timer on it because it will not go away if the user simply clicks somewhere else on the screen, as would a context menu. There is another way to cause the form to go away without the timer:You would have to use an API to capture mouse clicks. If the user clicked away the menu form, you could check the coordinates and upon finding that the mouse click was not within the form, you could unload the form and then use another API to release control of the mouse. I will leave you with that task if you desire to take it to that point. |
Using the Comment Menu
Before you create the other menu forms, run the add-in to show the new toolbar and the first drop-down menu form. If you have done your job well, the form will have the look and feel of a real drop-down menu. Figure 12-2 shows the first menu displayed after I clicked the Comment tool button. You will see that I have also selected a block of code to comment.
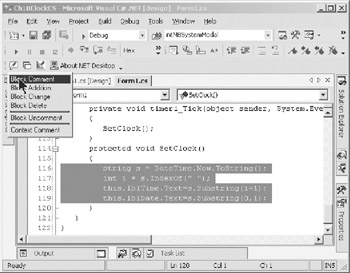
Figure 12-2: Displaying the Comment menu form
Next, I have clicked the Block Comment option to comment the selected block of code. Figure 12-3 shows that the menu form has been unloaded and the selected block of code has been commented.
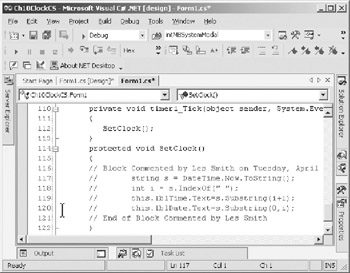
Figure 12-3: The selected block has been commented.
| Note | This add-in is sensitive to the type of language in which the user is developing. Remember that the add-in itself is written in Visual Basic, but the application that currently has the add-in connected is being developed in C#. Therefore, the commenting that is shown is done using the C# comment characters. |
In Chapters 3 and 5 you saw most of the commenting features, so I will not bore you with the code for them or with more figures showing those features being executed. You can view the code for the chapter and see all of the code for those features. You can find them all in the CodeManipulation class.
However, I have added a new commenting feature called Context Comment. You can see the menu item at the bottom of the Comment menu in Figure 12-2. I discuss that feature in the following section.
Context Comment Feature
Many times you encounter situations where you have comments in the code of a procedure and you find that you need to change the comments. It is always a hassle to change, delete, and insert words and lines into a block of comments and have them come out looking like they were originally composed in just one sitting. The Context Comment feature is designed to allow you to write a block of comments and insert them into the code. They will be word wrapped so that they are nicely formatted, and you can select the length of the comment lines. At a later time, when you need to change them, you can simply select them and bring them into a mini-editor. When you finish your changes and save the comments back to the code, they will look just like you entered them for the first time and you did it with a smart editor.
To create such a feature, two separate areas of code are involved. I have placed a new method in the CodeManipulation class named EnterContextComments. Listing 12-8 shows the code for this new method. This method uses several of the methods of the Utilities class, and there is no need to explain them again.
Listing 12-8: EnterContextComments Method
Public Sub EnterContextComments() Dim sCC As String Dim l As Long Dim sText As String Dim liCnt As Integer Dim lsLine As String Dim iNL As Integer Dim sOUT As String Dim i As Long Dim oUtil As New Utilities(oVB) Dim iFT As Integer iFT = oUtil.GetFileType(oVB.ActiveDocument) sOUT = "" sText = oUtil.GetCodeFromWindow() Dim oFrm As New frmGetComments(oVB) sText = oFrm.Display("Enter Context Comments", sText) If sText = "" Then Exit Sub iNL = oUtil.MLCount(sText, Connect.giWrapColumn) For i = 1 To iNL lsLine = oUtil.MemoLine(sText, Connect.giWrapColumn, i) If iFT = 8 Then ' vb If oUtil.LastLineWrapped Then sOUT.Append("'`" & " " & lsLine & vbCrLf) Else sOUT.Append(""" & " " & lsLine & vbCrLf) End If Else If oUtil.LastLineWrapped Then sOUT.Append("//`" & " " & lsLine & vbCrLf) Else sOUT.Append("//'" & " " & lsLine & vbCrLf) End If End If Next i oUtil.PutCodeBack(sOUT.ToString()) End Sub The EnterContextComments method calls the Display method of a new form, frmGetComments. This form is shown in use in Figure 12-4. You will also notice that the code is appending either ‘' or ‘' to the front of the lines as they are put into the output string. If the code editor contains C# or C++ code, then you see that I am appending //' or //' to the front of the lines. I explain this in more detail later, but suffice it to say that these varying character pairs tell frmGetComments whether or not the lines were word wrapped the next time they are picked up for editing.
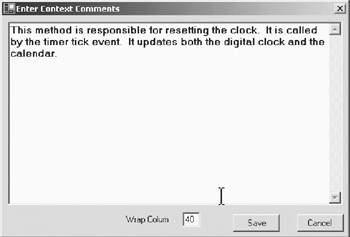
Figure 12-4: Entering context comments
You can see that the form allows you to enter any amount of comments. You can also set a new line length for word wrapping the lines. If you set a new length, it will be saved in the registry and will be the default the next time that you use the form.
Figure 12-5 shows the comments in the code editor after they have been saved. You should simply place the cursor in the left margin at the point where you want to insert the new comments when you are inserting comments. If you want to change a set of existing comments, you should select that block of comments and click the Context Comment menu item.
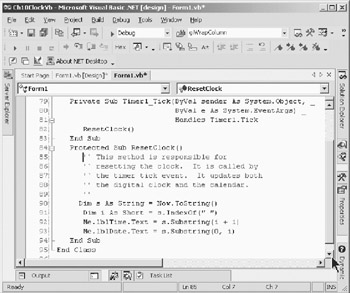
Figure 12-5: Inserted context comments
| Note | The Context Comment feature can also handle the Visual Basic, C#, and C++ languages. This comment is placed into a Visual Basic code editor. |
You will see that there are differing comment characters at the beginning of the comments. I have invented this sequence to tell me whether a line is word wrapped or not. If a line is preceded by ‘' (two single quotes), it denotes that the line is not word wrapped. In other words, it is terminated by a carriage return and line feed. If the line is preceded by ‘' (a single quote followed by a backward quote), it denotes that the line is word wrapped and the code will concatenate that line to the next line before placing it into the text box in frmGetComments. The two sets of comment characters look so much alike that they should not be ahindrance to reading in the code, and they provide the needed switch to tell the code whether the lines were originally word wrapped or not.
I will not show all of the code for frmGetComments. You can see that code in the code available for download from the Apress Web site (http://www.apress.com). However, I will show the code for the Display method of the form so that you can see how the varying comment characters are being used to "reverse engineer" the word wrapping. Listing 12-9 shows the code for the Display method.
Listing 12-9: Display Method of frmGetComments
Public Function Display(ByVal s As String, _ Optional ByVal sOldText As String = "") _ As String ' If old comments is populated, then if there are ' "'`" continuation marks at the start of a line, ' concatenate the next line to this one. Dim iNL As Long Dim i As Long Dim sLine As String Dim sLine2 As New System.Text.StringBuilder() Dim sIn As New System.Text.StringBuilder() Dim oUtil As New Utilities(oVB) Dim sCmtChars As String Try If sOldText <> "" Then sCmtChars = _ oUtil.GetCommentCharForDoc(oVB.ActiveDocument) iNL = oUtil.MLCount(sOldText, 0) For i = 1 To iNL sLine = Trim(oUtil.MemoLine(sOldText, 0, i)) If sLine.StartsWith("" ") Then ' we have a continuation line so concatenate ' the next line to this one sLine2.Append(Mid(sLine, 4) & " ") ElseIf sLine.StartsWith("//' ") Then ' we have a c type continued comment sLine2.Append(Mid(sLine, 5) & " ") ElseIf sLine.StartsWith("" ") Then sIn.Append(sLine2.ToString() & _ Mid(sLine, 4) & vbCrLf) sLine2.Remove(0, sLine2.Length) ElseIf sLine.StartsWith("//' ") Then sIn.Append(sLine2.ToString() & _ Mid(sLine, 5) & vbCrLf) sLine2.Remove(0, sLine2.Length) ElseIf sLine.StartsWith(""") Or _ sLine.StartsWith(""") Then sIn.Append(sLine2.ToString() & _ Mid(sLine, 3) & vbCrLf) ElseIf sLine.StartsWith("//'") Or _ sLine.StartsWith("//"') Then sIn.Append(sLine2.ToString() & _ Mid(sLine, 4) & vbCrLf) ElseIf sLine.StartsWith(sCmtChars & " ") Then sIn.Append(Replace(sLine, _ sCmtChars & " ", "") & vbCrLf) ElseIf sLine.StartsWith(sCmtChars) Then sIn.Append(Replace(sLine, _ sCmtChars, "") & vbCrLf) Else sIn.Append(sLine & vbCrLf) End If Next i sOldText = sIn.ToString() End If mbWait = True msComments = "" mbDirty = False Me.Text = s Me.txtEnterComments.Text = sOldText Me.Show() Do While mbWait System.Windows.Forms.Application.DoEvents() Loop Return msComments Catch e As System.Exception MsgBox(e.Message) End Try End Function
Summary of the Remaining Menus
Let's now move on to creating the other menu forms. Although I do not go into the details of creating all of the forms in the Windows Forms Designer, I do show you the code that is called by them to perform the selected functionality. Most of that code is new.
Because you have seen the frmComment form and its code, you now know how all of the menu forms will work. Only the number and names of the menu items (Label controls) will change, along with the classes and methods that will be called to perform the selected functionality. In other words, once you have seen one of the menu forms in the Windows Forms Designer and the code behind the form, you basically have seen them all.
You will create two more menu forms and the classes or forms that will support them. In this section, I describe the functionality that will be provided by these menus. Most of these menus do not have a large number of features, and one of them has only one feature. This add-in is not only meant to be demonstration of all of the functionality that you have learned, but you can also use it as a skeleton for adding many more features that you would like to see in the add-in.
Windows Menu
This menu will have five items on it that will manipulate windows in the IDE. This menu allows for manipulation of windows in the IDE that are not normally available to the developer. For example, it is not unusual-especially if you have a large monitor, say 19" or 21"-to have many windows open in the IDE. It is really helpful if you can close them all with one click of the mouse. This menu allows you to do that and other things. These five items should spark some creative nerves in your mind and cause you to want to add more features to this particular menu. Table 12-1 gives the names and description of these menu items.
| MENU ITEM | DESCRIPTION |
|---|---|
| Close And Save All | Closes all Designer and Editor windows. Saves any windows not currently saved. |
| Close All Saved | Closes all designer and editor windows that are currently saved. |
| Close And Save (Prompt) | Closes all windows and prompts the user to save if the window is not saved already. |
| Closes All But Current | Closes all but the currently active window. |
| Backup Current Window | Makes a backup copy of the active window with a name of fullname.ext.bak. |
These menu items will perform their respective functions through the methods of the CWindows class. Listing 12-10 shows this class. Figure 12-6 shows the design of the frmWindowsMenu form.
Listing 12-10: CWindows Class
' This class contains the methods for closing ' and saving windows in the IDE. ' Its methods are called from the frmWindowsMenus ' click event handlers. Imports Microsoft.Office.Core Imports Extensibility Imports System.Runtime.InteropServices Imports EnvDTE Public Class CWindows Public oVB As DTE Public Sub CloseAndSaveWindowsWithPrompt() ' Close all documents. Dim i As Integer With oVB For i = .Documents.Count To 1 Step -1 ' ignore any erors we may encounter in closing a window ' so that we continue to next window On Error Resume Next .Documents.Item(i).Close(vsSaveChanges.vsSaveChangesPrompt) Err.Clear() Next i End With End Sub Public Sub CloseAndSaveWindows() ' Close all documents. Dim i As Integer With oVB For i = .Documents.Count To 1 Step -1 ' ignore any erors we may encounter in closing a window ' so that we continue to next window On Error Resume Next .Documents.Item(i).Close(vsSaveChanges.
vsSaveChangesYes) Err.Clear() Next i End With End Sub Public Sub CloseAllButCurrentWindow() Dim i As Integer Dim sCurrWin As String = oVB.ActiveDocument.Name Debug.WriteLine(sCurrWin) With oVB On Error Resume Next For i = .Documents.Count To 1 Step -1 If .Documents.Item(i).Name <> sCurrWin Then If Not .Documents.Item(i).Saved Then .Documents.Item(i).Close(vsSaveChanges.
vsSaveChangesYes) Else .Documents.Item(i).Close(vsSaveChanges.
vsSaveChangesNo) End If End If Next End With End Sub Public Sub CloseAllSavedWindows() ' Close all saved documents. Dim i As Integer With oVB On Error Resume Next For i = .Documents.Count To 1 Step -1 If .Documents.Item(i).Saved Then .Documents.Item(i).Close(vsSaveChanges.
vsSaveChangesPrompt) End If Next i End With End Sub Public Sub New(ByVal roVB As DTE) oVB = roVB End Sub Sub BackupCurrentWindow() '` This method will make a backup copy of '` the active window. It will be saved as '` fullname.bak. For example a .vb file '` will be saved as name.vb.bak. The file '` will be saved and closed. It will not '` be added to the project. Dim Sel As TextSelection = oVB.ActiveDocument.Selection Dim sFileName As String = oVB.ActiveDocument.
FullName & ".bak" Dim epAnchor As EditPoint = Sel.AnchorPoint.CreateEditPoint Dim epActive As EditPoint = Sel.ActivePoint.CreateEditPoint Dim txtWin As TextWindow = oVB.ActiveWindow.Object Dim actPane As TextPane = txtWin.ActivePane Dim Corner As EditPoint = actPane.StartPoint.CreateEditPoint Dim Text As String Sel.SelectAll() Text = Sel.Text ' Create, save, and close the backup copy of ' the current window oVB.ItemOperations.NewFile("General\Text File") oVB.ActiveDocument.Object("TextDocument").
Selection.Insert(Text) oVB.ActiveDocument.Save(sFileName) oVB.ActiveDocument.Close(EnvDTE.
vsSaveChanges.vsSaveChangesNo) ' Restore the selection. Sel.MoveToPoint(epAnchor) Sel.MoveToPoint(epActive, True) actPane.TryToShow(Corner, vsPaneShowHow.vsPaneShowTop) End Sub End Class

Figure 12-6: The frmWindowsMenu form
The Click events of the frmWindowsMenu will call a method of the CWindows class to perform the desired functionality. Listing 12-10 shows the code for the CWindows class.
| Tip | The best way to develop code such as that shown in the CWindows class is to just experiment in the Macros IDE.You will be amazed at the things you can learn by looking through the sample macros and MSDN. Just copy the code from MSDN that you want to test and run it in the Macros IDE. If it doesn't seem to work, as is often the case with MSDN code, keep on playing with it until you figure it out. That will give you a sense of accomplishment when you get some code to work that did not work as it was shown in MSDN. I'm not being critical of MSDN-it is massive, and to expect every code example to work perfectly might be a little optimistic, to say the least. |
Designer Menu
I have only placed one menu item on the Designer menu form. I expect you to come up with others yourself. I certainly have several in mind, but for the sake of space (and to hopefully get you to look at the .NET version of VBCommander) I do not go any further.
Anyone can write a simple message box command. However, when you start to ask lengthy questions, use different icons, use two or more buttons, and then want to take action on the return from the message box, a designer would be nice. You have probably seen message box designers before. VBCommander has a nice one, even if I did write it. I have converted that feature from VB 6.0 to Visual Basic .NET. Additionally, I have added the capability to handle multiple languages in the generated code. To get the designer started, I needed to create a rather involved form, which is shown in Figure 12-7.
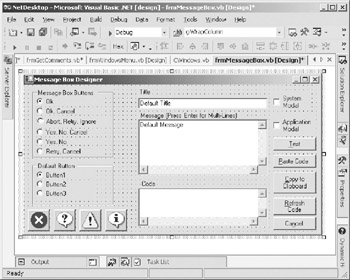
Figure 12-7: MessageBox Designer form
As you can see from the design of the form, the user enters a title and a message. The message can be as long as needed, within reason of course. This type of designer allows the user to place the text of the message box as he or she desires rather than counting on how wide Windows might want to make the message box. Remember that message boxes are an important part of the user interface also.
You can choose the number and type of buttons. If you select any choice other than the OK button, you will receive a return response from the message box. You can choose the icon that you want to display and you can even make the display application or system modal.
Once you have input your message and title and selected the desired options, you can test the message box, view the code that will be generated, copy the code to the Clipboard, or paste the code to the active code editor. I do not show all of the code for the creation of the form here-it is obviously quite lengthy. I do show you the code for the button Click event for pasting the code to the editor in Listing 12-11. You can see that the event code tests to see which type of code is to be generated based on the type of the currently active code window.
Listing 12-11: Button Paste Code Click Event
Private Sub btnPasteCode_Click(ByVal sender As System.Object, _ ByVal e As System.EventArgs) Handles btnPasteCode.Click Dim strMBPaintMsg As String Dim s As String Try If iLangType = 8 Then strMBPaintMsg = SetUpPaintProc() Else strMBPaintMsg = SetUpPaintProcForCLang() End If oUtil.PutCodeBack(strMBPaintMsg) Me.Dispose() Catch ee As System.Exception MsgBox(ee.Message) End Try End Sub
If the currently active code editor contains Visual Basic code, the button Click event calls the SetUpPaintProc method (see Listing 12-12) to generate the appropriate code and paste it back to the code editor.
| Note | You will see in this method and several others that I am making good use of the StringBuilder object. This object is new to Visual Basic .NET.You should use it for several reasons. It is faster than string concatenation because it does not have to create a new object each and every time you append more characters to the object. If you simply concatenate to aString object, as you had to do in earlier versions of Visual Basic, the old copy of the string is discarded and a new object is created to contain the newly appended characters.You will see the use of the Remove method of the StringBuilder object. Note that the object is zero based and that you must specify the character 0 as the beginning character when you want to remove all characters from the object. |
Listing 12-12: SetUpPaintProc Method
Private Function SetUpPaintProc() As String Dim intNL As Integer Dim i As Integer Dim strTemp As String Dim strTemp2 As String Dim iDefault As Integer Dim strM As New StringBuilder() Dim oUtil As New Utilities(oVB) If strMBType = "F" Then strM.Append("Dim sMsg as string" & vbCrLf) strM.Append("Dim iRV as integer" & vbCrLf) Else strM.Append("Dim sMsg as string" & vbCrLf) End If strTemp = CStr(txtMessage.Text) intNL = oUtil.MLCount(strTemp, 0) ' we have to build msg lines For i = 1 To intNL strTemp2 = oUtil.MemoLine(strTemp, 0, i) If i = 1 Then strM.Append("sMsg = " & Chr(34) & strTemp2 & Chr(34)) Else strM.Append("sMsg = sMsg & " & Chr(34) & _ strTemp2 & Chr(34)) End If ' If last line If intNL = 1 Then strM.Append(vbCrLf) ElseIf i < intNL Then strM.Append(" & Chr(10)" & vbCrLf) ElseIf i = intNL Then strM.Append(vbCrLf) End If Next i ' now build the options If rbButton1.Checked Then iDefault = CType(vbDefaultButton1, Integer) ElseIf rbButton2.Checked Then iDefault = CType(vbDefaultButton2, Integer) Else iDefault = CType(vbDefaultButton3, Integer) End If strTemp = Format$(intMBOptions + _ iDefault + _ intMBSystemModal + _ CType(IIf(intMBSystemModal = 0, intMBIcon, 0), _ Integer), "####") If Trim(strTemp) = "" Then strTemp = "0" End If ' now build the MsgBox call If strMBType = "S" Then ' build a statement strM.Append("MsgBox sMsg, " & strTemp & ", ") strM.Append(Chr(34) & Trim(CStr(txtTitle.Text)) &  Chr(34) & vbCrLf & vbCrLf) Else ' build a function call strM.Append("iRV = MsgBox(sMsg, " & strTemp & ", ") strM.Append(Chr(34) & Trim(CStr(txtTitle.Text)) &
  Chr(34) & ")" & vbCrLf) strM.Append(vbCrLf) ' now set up the analysis code Select Case intMBOptions Case 0 ' Ok button Case 1 ' OkCancel strM.Append("If iRV = 1 Then" & vbCrLf) strM.Append(" ' Ok Code goes here" & vbCrLf) strM.Append("Else" & vbCrLf) strM.Append(" ' Cancel code goes here" & vbCrLf) strM.Append("End If" & vbCrLf) Case 2 ' Abort, Retry, Ignore strM.Append("If iRV = 3 Then" & vbCrLf) strM.Append(" ' Abort Code goes here" & vbCrLf) strM.Append("ElseIf iRV = 4 Then" & vbCrLf) strM.Append(" ' Retry code goes here" & vbCrLf) strM.Append("Else" & vbCrLf) strM.Append(" ' Cancel code goes here" & vbCrLf) strM.Append("End If" & vbCrLf) Case 3 ' Yes, No, Cancel strM.Append("If iRV = 6 Then" & vbCrLf) strM.Append(" ' Yes Code goes here" & vbCrLf) strM.Append("ElseIf iRV = 7 Then" & vbCrLf) strM.Append(" ' No code goes here" & vbCrLf) strM.Append("Else" & vbCrLf) strM.Append(" ' Cancel code goes here" & vbCrLf) strM.Append("End If" & vbCrLf) Case 4 ' YesNo strM.Append("If iRV = 6 Then" & vbCrLf) strM.Append(" ' Yes Code goes here" & vbCrLf) strM.Append("Else" & vbCrLf) strM.Append(" ' No code goes here" & vbCrLf) strM.Append("End If" & vbCrLf) Case 5 ' RetryCancel strM.Append("If iRV = 4 Then" & vbCrLf) strM.Append(" ' Retry Code goes here" & vbCrLf) strM.Append("Else" & vbCrLf) strM.Append(" ' Cancel code goes here" & vbCrLf) strM.Append("End If" & vbCrLf) End Select End If Return strM.ToString End Function
 If you execute the MessageBox Designer, you will see it displayed as shown in Figure 12-8. There I have filled in a message and shown the code. It is ready to be pasted back to the form.
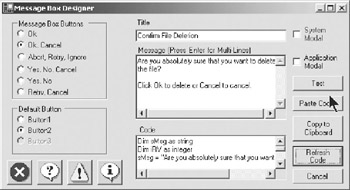
Figure 12-8: The MessageBox Designer in action
In Figure 12-9 you will see the Visual Basic code for displaying the message box pasted to the editor. You will see that the MessageBox Designer also generated code for taking action based on the return from the message box.
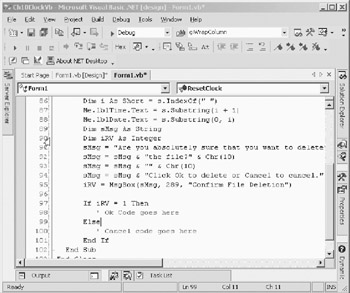
Figure 12-9: MessageBox Designer-generated Visual Basic code
One of the options of the MessageBox Designer is to allow you to test the MessageBox before you paste the generated code into the code editor. Figure 12-10 shows the Designer with the tentative message box displayed. If you do not like the appearance of the message box, you can change it and test it again and again until you get it exactly the way you want it. At that point, you can paste the code to the editor.
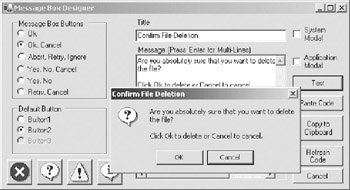
Figure 12-10: Testing the MessageBox Designer
If the Click event of the Paste button determines that the user is developing in C# or C++, it will call the SetUpPaintProcForCLang method, which is shown in Listing 12-13.
| Note | Because the code for C# and C++ are not exactly the same for all of the message box constants, it would take a different code generator for C++. I have not bothered to do that in this demonstration. If you try to use the Designer in C++ code, a message will be displayed when you attempt to load the MessageBox Designer telling you that the Designer will not work for C++. The Designer will not load in that case. |
Listing 12-13: SetUpPaintProcForCLang Method
Private Function SetUpPaintProcForCLang() As String Dim intNL As Integer Dim i As Integer Dim strTemp As String Dim strTemp2 As String Dim sDefaultBtn As String Dim strM As New StringBuilder() Dim oUtil As New Utilities(oVB) Dim sButtons As String Dim sIcon As String Dim sTitle As String = Chr(34) & Me.txtTitle.Text & Chr(34) Try If strMBType = "F" Then strM.Append("string sMsg;" & vbCrLf) Else strM.Append("string sMsg;" & vbCrLf) End If strTemp = CStr(txtMessage.Text) intNL = oUtil.MLCount(strTemp, 0) ' we have to build msg lines For i = 1 To intNL strTemp2 = oUtil.MemoLine(strTemp, 0, i) If i = 1 Then strM.Append("sMsg = " & Chr(34) & _ strTemp2 & "\n" & Chr(34) & ";" & vbCrLf) Else strM.Append("sMsg = sMsg + " & Chr(34) & _ strTemp2 & "\n" & Chr(34) & ";" & vbCrLf) End If Next i ' now build the options ' Create the default button string If rbButton1.Checked Then sDefaultBtn = "MessageBoxDefaultButton.Button1" ElseIf rbButton2.Checked Then sDefaultBtn = "MessageBoxDefaultButton.Button2" Else sDefaultBtn = "MessageBoxDefaultButton.Button3" End If ' create the buttons string Select Case True Case Me.rbOkCancel.Checked sButtons = "MessageBoxButtons.OKCancel" Case Me.rbOk.Checked sButtons = "MessageBoxButtons.OK" Case Me.rbAbortRetryCancel.Checked sButtons = "MessageBoxButtons.AbortRetryIgnore" Case Me.rbRetryCancel.Checked sButtons = "MessageBoxButtons.RetryCancel" Case Me.rbYesNo.Checked sButtons = "MessageBoxButtons.YesNo" Case Me.rbYesNoCancel.Checked sButtons = "MessageBoxButtons.YesNoCancel" End Select ' create the icon string Select Case intMBIcon Case vbQuestion sIcon = "MessageBoxIcon.Question" Case vbExclamation sIcon = "MessageBoxIcon.Exclamation" Case vbInformation sIcon = "MessageBoxIcon.Information" Case vbCritical sIcon = "MessageBoxIcon.Stop" Case Else sIcon = "MessageBoxIcon.Information" End Select ' now build the MsgBox call ' build a statement strM.Append("DialogResult iRV = _ MessageBox.Show(sMsg, " & _ sTitle & ", " & _ sButtons & ", " & _ sIcon & ", " & _ sDefaultBtn & ");" & vbCrLf) If strMBType = "F" Then ' now set up the analysis code Select Case intMBOptions Case 0 ' Ok button Case 1 ' OkCancel strM.Append("switch (iRV)" & vbCrLf & _ "{" & vbCrLf & _ " case DialogResult.OK:" & _ vbCrLf & _ " // Ok code goes here" & _ vbCrLf & _ " break;" & vbCrLf & _ " default:" & vbCrLf & _ " // cancel code goes here" _ & vbCrLf & _ " break;" & vbCrLf & _ "}" & vbCrLf) Case 2 ' Abort, Retry, Ignore strM.Append("switch (iRV)" & vbCrLf & _ "{" & vbCrLf & _ " case DialogResult.Abort:" _ & vbCrLf & _ " // Abort code goes here" _ & vbCrLf & _ " break;" & vbCrLf & _ " case DialogResult.Retry:" _ & vbCrLf & _ " // retry code goes here" _ & vbCrLf & _ " break;" & vbCrLf & _ " default:" & vbCrLf & _ " // Ignore code goes here" _ & vbCrLf & _ " break;" & vbCrLf & _ "}" & vbCrLf) Case 3 ' Yes, No, Cancel strM.Append("switch (iRV)" & vbCrLf & _ "{" & vbCrLf & _ " case DialogResult.Yes:" & _ vbCrLf & _ " // Yes code goes here" _ & vbCrLf & _ " break;" & vbCrLf & _ " case DialogResult.No:" & vbCrLf _ & _ " // No code goes here" & vbCrLf & " break;" & vbCrLf & _ " default:" & vbCrLf & _ " // Cancel code goes here" _ & vbCrLf & _ " break;" & vbCrLf & _ "}" & vbCrLf) Case 4 ' YesNo strM.Append("switch (iRV)" & vbCrLf & _ "{" & vbCrLf & _ " case DialogResult.Yes:" & _ vbCrLf & _ " // Yes code goes here" _ & vbCrLf & _ " break;" & vbcrlf & _ " default:" & vbCrLf & _ " // No code goes here" & _ vbCrLf & _ " break;" & vbCrLf & _ "}" & vbCrLf) Case 5 ' RetryCancel strM.Append("switch (iRV)" & vbCrLf & _ "{" & vbCrLf & _ " case DialogResult.Retry:" & _ vbCrLf & _ " // Retry code goes here" & _ vbCrLf & _ " break;" & vbCrLf & _ " default:" & vbCrLf & _ " // cancel code goes here" & _ vbCrLf & _ " break;" & vbCrLf & _ "}" & vbCrLf) End Select End If Return strM.ToString Catch e As System.Exception MsgBox("Error in SetupPaintforCLang: " & e.Message) End Try End Function Once the user designs and pastes the code for a message box to be used in a C# program, the code will appear as shown in Figure 12-11. Because this display is from a running application, the code is shown and the displayed message box is displayed also.
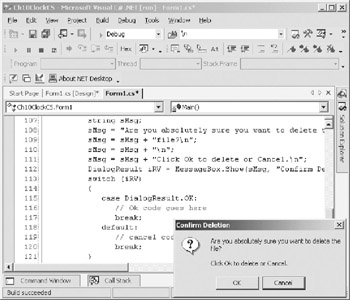
Figure 12-11: MessageBox Designer-generated C# code
|
| < Free Open Study > |
|
EAN: 2147483647
Pages: 172