THE BOOK FEATURE
| If you are creating a large document, it may be easier to work on it in smaller sections, especially if several designers are collaborating. But you'll still want to share styles, table of contents, index information, and color swatches across those documents. InDesign's Book feature gives you that option. By adding files to a book, you can synchronize items such as character and paragraph styles, the contents of the Swatches palette, and page numbering. The book appears like a palette on your workspace. To set up a book, select File, New, Book. Name your book document and choose its location. The book will be created with the extension .indb. Add documents to your book by clicking the + sign at the bottom of the Book palette (see Figure 25.9), or select Add Document from the palette menu. Add multiple documents by holding down the Shift key as you select and then click Open. Figure 25.9. The Book palette.
To open book documents, double-click the document name in the Book palette. To delete a document from the Book, select the file name and click the sign at the bottom of the palette, or select Remove Document from the palette menu.
If you have selected documents saved in previous versions of InDesign, they will automatically update to CS2 when you add them to the book. You will be given the option to save and rename these documents when they are added unless you select Automatic Document Conversion in the palette menu, at which point the previous versions will be overwritten. Icons designate the status of documents within the book:
If a document is missing and you want to replace it with another, click the document name and select Replace Document from the palette menu. Browse to the replacement document and click Open. For more detailed information, or to relink a missing document, select the document name and then choose Document Information from the palette menu. If necessary, you can rearrange the documents in the Book palette by dragging and dropping them. If you have styles or swatches you want to share between book documents, you should set up one document as your style source. The book will automatically use the first document added to the book as the style source, but you can choose any document at any time. Just click the box to the left of the document name to make that document the style source. If you have added new documents to your book that need to be synchronized with the style source, select Synchronize Book from the palette menu. If you want only to synchronize certain documents, first select the document(s) and then select Synchronize Selected Documents. To choose the items you want to synchronize, select Synchronization Options from the palette menu and use the check boxes to indicate the items you want to update.
If a document is selected and you want to synchronize the entire book, click the gray background below the document names to deselect all documents. The book will honor the numbering specifications you choose in the Numbering and Section Options dialog. If you choose Automatic Page Numbering, the documents will automatically number based on their location in the bookfor example, the first document will number starting with page 1. Finally, the book is a good way to output or check all included documents automatically. Select to Preflight, Package, Print, or Export either the selected document or the entire book from the palette menu (see Figure 25.10). The Preflight option checks the documents for common problems that might cause issues with printing; The Package option gathers all documents, linked files, and fonts and places them in a folder for easy submission to a printer; and the Export option enables you to gather the documents in the book and save them in the file format of your choice, such as PDF, or EPS. Figure 25.10. Print, preflight, or export all documents in your book from the palette menu.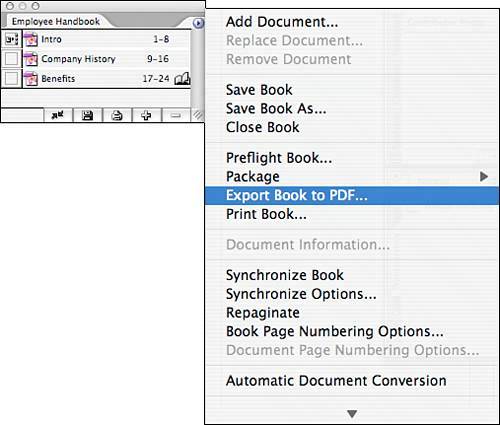 Now that you're familiar with setting up your InDesign documents, it's time to move on to the nuts and bolts of the programhow to create page elements and text, and how to take advantage of the great creative options InDesign has to offer. |
EAN: 2147483647
Pages: 426