Device Context Drawing Functions
|
|
| In this section, we'll take a closer look at how we draw on device contexts. The major functions are summarized in Table 5-5. We cover most of them in the following sections, and you can also find more details in the reference manual.
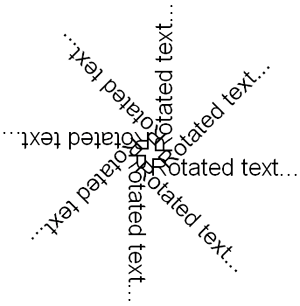
Drawing TextThe way text is drawn on a device context with DrawText is determined by the current font, the background mode (transparent or solid drawing), and the text foreground and background colors. If the background mode is wxSOLID, the area behind the text will be drawn in the current background color, and if wxTRANSPARENT, the text will be drawn without disturbing the background. Pass a string and either two integers or a wxPoint to DrawText. The text will be drawn with the given location at the very top-left of the string. Here's a simple example of drawing a text string: // Draw a text string on a window at the given point void DrawTextString(wxDC& dc, const wxString& text, const wxPoint& pt) { wxFont font(12, wxFONTFAMILY_SWISS, wxNORMAL, wxBOLD); dc.SetFont(font); dc.SetBackgroundMode(wxTRANSPARENT); dc.SetTextForeground(*wxBLACK); dc.SetTextBackground(*wxWHITE); dc.DrawText(text, pt); } You can also use the device context function DrawRotatedText to draw text at an angle by specifying the angle in degrees as the last parameter. The following code draws text at 45-degree increments, and the result is illustrated in Figure 5-2. wxFont font(20, wxFONTFAMILY_SWISS, wxNORMAL, wxNORMAL); dc.SetFont(font); dc.SetTextForeground(wxBLACK); dc.SetBackgroundMode(wxTRANSPARENT); for (int angle = 0; angle < 360; angle += 45) dc.DrawRotatedText(wxT("Rotated text..."), 300, 300, angle); Figure 5-2. Drawing rotated text
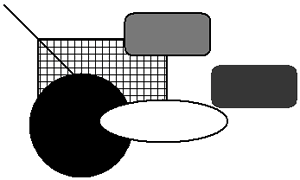
On Windows, only TrueType fonts can be drawn rotated. Be aware that the stock object wxNORMAL_FONT is not TrueType. Often, you'll need to find out how much space text will take on a device context, which you can do by passing wxCoord (integer) pointers to the function GetTextExtent. Its prototype is void GetTextExtent(const wxString& string, wxCoord* width, wxCoord* height, wxCoord* descent = NULL, wxCoord* externalLeading = NULL, wxFont* font = NULL); The default arguments mean that you can call it just to find the overall width and height the string occupies, or you can pass extra arguments to get further text dimensions. If you imagine the bottoms of the characters sitting on a baseline, the descent is how far below the baseline the characters extend. The letter "g," for example, extends below the baseline. External leading is the space between the descent of one line and the top of the line below. Finally, you can provide a font to be used in place of the current device context font. Here's code that uses GetTextExtent to center a string on a window: void CenterText(const wxString& text, wxDC& dc, wxWindow* win) { // Set font, background mode for drawing text, // and text color dc.SetFont(*wxNORMAL_FONT); dc.SetBackgroundMode(wxTRANSPARENT); dc.SetTextForeground(*wxRED); // Get window and text dimensions wxSize sz = win->GetClientSize(); wxCoord w, h; dc.GetTextExtent(text, & w, & h); // Center the text on the window, but never // draw at a negative position. int x = wxMax(0, (sz.x - w)/2); int y = wxMax(0, (sz.y - h)/2); dc.DrawText(msg, x, y); } You can also use GetPartialTextExtents to retrieve the width of each character, passing a wxString and a wxArrayInt reference to receive the character width values. If you need accurate information about individual character widths, this can be quicker on some platforms than calling GetTextExtent for each character. Drawing Lines and ShapesThe simpler drawing primitives include points, lines, rectangles, circles, and ellipses. The current pen determines the line or outline color, and the brush determines the fill color. For example: void DrawSimpleShapes(wxDC& dc) { // Set line color to black, fill color to green dc.SetPen(wxPen(*wxBLACK, 2, wxSOLID)); dc.SetBrush(wxBrush(*wxGREEN, wxSOLID)); // Draw a point dc.DrawPoint(5, 5); // Draw a line dc.DrawLine(10, 10, 100, 100); // Draw a rectangle at (50, 50) with size (150, 100) // and hatched brush dc.SetBrush(wxBrush(*wxBLACK, wxCROSS_HATCH)); dc.DrawRectangle(50, 50, 150, 100); // Set a red brush dc.SetBrush(*wxRED_BRUSH); // Draw a rounded rectangle at (150, 20) with size (100, 50) // and corner radius 10 dc.DrawRoundedRectangle(150, 20, 100, 50, 10); // Draw another rounded rectangle with no border dc.SetPen(*wxTRANSPARENT_PEN); dc.SetBrush(wxBrush(*wxBLUE)); dc.DrawRoundedRectangle(250, 80, 100, 50, 10); // Set a black pen and black brush dc.SetPen(wxPen(*wxBLACK, 2, wxSOLID)); dc.SetBrush(*wxBLACK); // Draw a circle at (100, 150) with radius 60 dc.DrawCircle(100, 150, 60); // Set a white brush dc.SetBrush(*wxWHITE); // Draw an ellipse that fills the given rectangle dc.DrawEllipse(wxRect(120, 120, 150, 50)); } This produces the graphic in Figure 5-3. Figure 5-3. Drawing simple shapes
Note that by convention, the last point of a line is not drawn. To draw a circular arc, use DrawArc, taking a starting point, end point, and center point. The arc is drawn counterclockwise from the starting point to the end. For example: // Draw a cup-shaped arc int x = 10, y = 200, radius = 20; dc.DrawArc(xradius, y, x + radius, y, x, y); This produces the arc shown in Figure 5-4. Figure 5-4. A circular arc
For an elliptic arc, DrawEllipticArc takes the position and size of a rectangle that contains the arc, plus the start and end of the arc in degrees specified from the three o'clock position from the center of the rectangle. If the start and end points are the same, a complete ellipse will be drawn. The following code draws the arc shown in Figure 5-5. // Draws an elliptical arc within a rectangle at (10, 100), // size 200x40. Arc extends from 270 to 420 degrees. dc.DrawEllipticArc(10, 100, 200, 40, 270, 420); Figure 5-5. An elliptical arc
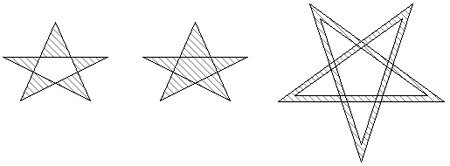
If you need to draw a lot of lines quickly, DrawLines can be more efficient than using DrawLine multiple times. The following example draws lines between ten points, at an offset of (100, 100). wxPoint points[10]; for (size_t i = 0; i < 10; i++) { pt.x = i*10; pt.y = i*20; } int offsetX = 100; int offsetY = 100; dc.DrawLines(10, points, offsetX, offsetY); DrawLines does not fill the area surrounded by the lines. You can draw a filled shape with an arbitrary number of sides using DrawPolygon, and several of them with DrawPolyPolygon. DrawPolygon takes a point count, an array of points, optional offsets to add to the points, and an optional fill style: wxODDEVEN_RULE, the default, or wxWINDING_RULE. DrawPolygonPolygon additionally takes an array of integers that specifies the number of points to be used for each polygon. The following code demonstrates how to draw polygons and poly- polygons, with the result shown in Figure 5-6. void DrawPolygons(wxDC& dc) { wxBrush brushHatch(*wxRED, wxFDIAGONAL_HATCH); dc.SetBrush(brushHatch); wxPoint star[5]; star[0] = wxPoint(100, 60); star[1] = wxPoint(60, 150); star[2] = wxPoint(160, 100); star[3] = wxPoint(40, 100); star[4] = wxPoint(140, 150); dc.DrawPolygon(WXSIZEOF(star), star, 0, 30); dc.DrawPolygon(WXSIZEOF(star), star, 160, 30, wxWINDING_RULE); wxPoint star2[10]; star2[0] = wxPoint(0, 100); star2[1] = wxPoint(-59, -81); star2[2] = wxPoint(95, 31); star2[3] = wxPoint(-95, 31); star2[4] = wxPoint(59, -81); star2[5] = wxPoint(0, 80); star2[6] = wxPoint(-47, -64); star2[7] = wxPoint(76, 24); star2[8] = wxPoint(-76, 24); star2[9] = wxPoint(47, -64); int count[2] = {5, 5}; dc.DrawPolyPolygon(WXSIZEOF(count), count, star2, 450, 150); } Figure 5-6. Drawing polygons
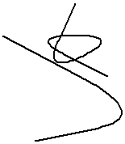
Drawing SplinesDrawSpline lets you draw a curve known as a "spline" between multiple points. There is a version for three points, and a version for an arbitrary number of points, both illustrated in this example code: // Draw 3-point sline dc.DrawSpline(10, 100, 200, 200, 50, 230); // Draw 5-point spline wxPoint star[5]; star[0] = wxPoint(100, 60); star[1] = wxPoint(60, 150); star[2] = wxPoint(160, 100); star[3] = wxPoint(40, 100); star[4] = wxPoint(140, 150); dc.DrawSpline(WXSIZEOF(star), star); This produces the two splines illustrated in Figure 5-7. Figure 5-7. Drawing splines
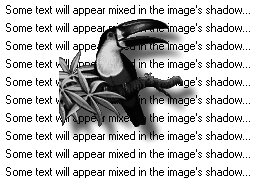
Drawing BitmapsThere are two main ways of drawing bitmaps on a device context: DrawBitmap and Blit. DrawBitmap is a simplified form of Blit, and it takes a bitmap, a position, and a boolean flag specifying transparent drawing. The transparency can be either a simple mask or an alpha channel (which offers translucency), depending on how the bitmap was loaded or created. The following code loads an image with an alpha channel and draws it over lines of text. wxString msg = wxT("Some text will appear mixed in the image's shadow..."); int y = 75; for (size_t i = 0; i < 10; i++) { y += dc.GetCharHeight() + 5; dc.DrawText(msg, 200, y); } wxBitmap bmp(wxT("toucan.png"), wxBITMAP_TYPE_PNG); dc.DrawBitmap(bmp, 250, 100, true); This produces the drawing in Figure 5-8, where the shadows in the bitmap appear to partially obscure the text underneath. Figure 5-8. Drawing with transparency
The Blit function is more flexible and enables you to copy a specific portion of a source device context onto a destination device context. This is its prototype: bool Blit(wxCoord destX, wxCoord destY, wxCoord width, wxCoord height, wxDC* dcSource, wxCoord srcX, wxCoord srcY, int logicalFunc = wxCOPY, bool useMask = false, wxCoord srcMaskX = -1, wxCoord srcMaskY = -1); This code copies an area from a source device context dcSource to the destination (the object that the function is operating on). An area of specified width and height is drawn starting at the position (destX, destY) on the destination surface, taken from the position (srcX, srcY) on the source. The logical function logicalFunc is usually wxCOPY, which means the bits are transferred from source to destination with no transformation. Not all platforms support a logical function other than wxCOPY. For more information, please see "Logical Functions" later in this chapter. The last three parameters are used only when the source device context is a wxMemoryDC with a transparent bitmap selected into it. useMask specifies whether transparent drawing is used, and srcMaskX and srcMaskY enable the bitmap's mask to start from a different position than the main bitmap start position. The following example loads a small pattern into a bitmap and uses Blit to fill a larger destination bitmap, with transparency if available. wxMemoryDC dcDest; wxMemoryDC dcSource; int destWidth = 200, destHeight = 200; // Create the destination bitmap wxBitmap bitmapDest(destWidth, destHeight); // Load the pattern bitmap wxBitmap bitmapSource(wxT("pattern.png"), wxBITMAP_TYPE_PNG); int sourceWidth = bitmapSource.GetWidth(); int sourceHeight = bitmapSource.GetHeight(); // Clear the destination background to white dcDest.SelectObject(bitmapDest); dcDest.SetBackground(*wxWHITE_BRUSH); dcDest.Clear(); dcSource.SelectObject(bitmapSource); // Tile the smaller bitmap onto the larger bitmap for (int i = 0; i < destWidth; i += sourceWidth) for (int j = 0; j < destHeight; j += sourceHeight) { dcDest.Blit(i, j, sourceWidth, sourceHeight, & dcSource, 0, 0, wxCOPY, true); } // Tidy up dcDest.SelectBitmap(wxNullBitmap); dcSource.SelectBitmap(wxNullBitmap); You can also draw icons directly, with DrawIcon. This operation always takes transparency into account. For example: #include "file.xpm" wxIcon icon(file_xpm); dc.DrawIcon(icon, 20, 30); Filling Arbitrary AreasFloodFill can be used to fill an arbitrary area of a device context up to a color boundary. Pass a starting point, a color for finding the flood area boundary, and a style to indicate how the color parameter should be used. The device context will be filled with the current brush color. The following example draws a green rectangle with a red border and fills it with black, followed by blue. // Draw a green rectangle outlines in red dc.SetPen(*wxRED_PEN); dc.SetBrush(*wxGREEN_BRUSH); dc.DrawRectangle(10, 10, 100, 100); dc.SetBrush(*wxBLACK_BRUSH); // Now fill the green area with black (while green is found) dc.FloodFill(50, 50, *wxGREEN, wxFLOOD_SURFACE); dc.SetBrush(*wxBLUE_BRUSH); // Then fill with blue (until red is encountered) dc.FloodFill(50, 50, *wxRED, wxFLOOD_BORDER); The function may fail if it cannot find the color specified, or the point is outside the clipping region. FloodFill won't work with printer device contexts, or with wxMetafileDC. Logical FunctionsThe current logical function determines how a source pixel (from a pen or brush color, or source device context if using Blit) combines with a destination pixel in the current device context. The default is wxCOPY, which simply draws with the current color. The others combine the current color and the background using a logical operation. wxINVERT is commonly used for drawing rubber bands or moving outlines because with this operation drawing a shape the second time erases the shape. The following example draws a dotted line using wxINVERT and then erases it before restoring the normal logical function. wxPen pen(*wxBLACK, 1, wxDOT); dc.SetPen(pen); // Invert pixels dc.SetLogicalFunction(wxINVERT); dc.DrawLine(10, 10, 100, 100); // Invert again, rubbing it out dc.DrawLine(10, 10, 100, 100); // Restore to normal drawing dc.SetLogicalFunction(wxCOPY); Another use for logical functions is to combine images to create new images. For example, here's one method for creating transparent jigsaw puzzle pieces out of an image. First, draw a black outline of each shape on a white bitmap, using a grid of standard (but randomized) puzzle edges. Then, for each piece, flood-fill the outline to create a black puzzle shape on a white background. Blit the corresponding area of the puzzle image onto this template bitmap with the wxAND_REVERSE function to mask out the unwanted parts of the puzzle, leaving the "stamped out" puzzle piece on a black background. This can be made into a transparent wxBitmap by converting to a wxImage, setting black as the image mask color, and converting back to a transparent wxBitmap, which can be drawn appropriately. (Note that this technique depends on there being no black in the puzzle image, or else holes will appear in the puzzle pieces.) Table 5-6 shows the logical function values and their meanings.
|

|
|
EAN: 2147483647
Pages: 262
- Integration Strategies and Tactics for Information Technology Governance
- Linking the IT Balanced Scorecard to the Business Objectives at a Major Canadian Financial Group
- Measuring and Managing E-Business Initiatives Through the Balanced Scorecard
- Governance in IT Outsourcing Partnerships
- Governance Structures for IT in the Health Care Industry