Setting Up an Example Firewall
|
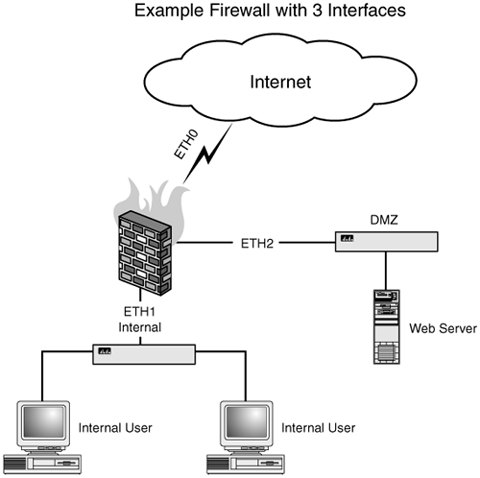
| Next, we are going to create an example firewall with three interfaces. One, eth0, will be our Internet reachable interface; eth1, our internal interface; and eth2 will be the DMZ. We will document the kernel settings you should implement for this example firewall and will make suggestions on how you can apply these examples to your firewall. After we have finished with the kernel settings, we will move onto specific rules for a simple example firewall. Figure 7.1. Example firewall with three interfaces. Kernel OptionsThe first task to undertake when configuring the firewall ruleset is to turn on all the options you would like the kernel to use when processing IP packets. The very first thing we recommend is that you turn ip_forwarding off. Don't worryit will be turned on after everything is done. Of course, we will show you where we think it should be re-enabled as well. The point with turning it off is to make sure that nothing is flowing through your firewall when you are changing, flushing, and otherwise mucking with your rules. For extremely complicated rulesets, it can take a few seconds to load all the rules. We've even seen systems with thousands of rules that may take a minute to load. During that time period it's possible that something might slip through your firewall that you would not otherwise allow. The simplest way to prevent this is to turn ip_forwarding off while you are loading your rules and to turn it back on only when you are finished. To turn ip_forwarding off, change the boolean value from 1 to 0: # Start Section 1 echo 0 > /proc/sys/net/ipv4/ip_forward This next option is dependent on how your firewall gets its IP addresses. If one or more of the firewall's interfaces uses bootp or dhcp to configure its interfaces, then you need to turn the ip_dynaddr option on by passing it the integer value of 1: echo 1 > /proc/sys/net/ipv4/ip_dynaddr Should you require more verbosity with this option, you can pass the value 2 into ip_dynaddr: echo 2 > /proc/sys/net/ipv4/ip_dynaddr If all of your firewall's interfaces are assigned static IP addresses, you will want to set this variable to 0: echo 0 > /proc/sys/net/ipv4/ip_dynaddr This following script disables source routing. What is source routing? Well amongst other things, in terms of security, it's badreally, really, bad. Most firewalls and routers ignore source routing requests these days, and your firewall should too. Source routing is basically a way of dictating what route the traffic will take from the origin of the packet as dictated by the client. This basically means that a client can dictate the specific route to a destination, subverting much of your firewall's purpose. To quote a line from the movie, Spies Like Us, "Guidance! Source programmable guidance!" if [ -e /proc/sys/net/ipv4/conf/all/accept_source_route ]; then for f in /proc/sys/net/ipv4/conf/*/accept_source_route do echo 0 > $f done fi This next script will set the firewall not to respond to ICMP redirect requests. If you have multiple routers, or know that you need ICMP redirects, then don't use this script. If you are in doubt, try the script to see if everything still works for you; if it does, then continue to use it. # Do not respond to 'redirected' ICMP packets from gateways if [ -e /proc/sys/net/ipv4/secure_redirects ]; then echo 1 > /proc/sys/net/ipv4/secure_redirects fi This instructs the kernel not to send ICMP redirect requestsalso a bad idea to set if your firewall is acting as a router. Unless your firewall has more than two NICs (Network Interface Card) in it, you are probably not acting as a router and can turn redirects off. # Do not reply to 'redirected' packets if requested if [ -e /proc/sys/net/ipv4/send_redirects ]; then echo 0 > /proc/sys/net/ipv4/send_redirects fi The other half of redirects is to accept them. That is, some resource on the network can send an ICMP redirect to your firewall telling it there is a new network route to some other device. If your routes are static and the devices handling the routing do not change, then you can safely turn accept_redirects off. #Even more ICMP redirect suppression # do not accept redirects if [ -e /proc/sys/net/ipv4/accept_redirects ]; then echo 0 > /proc/sys/net/ipv4/accept_redirects fi We also may not want to respond to proxy ARP requests. Unless you know what these are, you probably do not need them and can use the example script that follows without any problems. Briefly, proxyarps are when a particular machine, in this case your firewall, will respond to ARP requests for other machines. In theory, this can make a firewall appear to disappear from a network. It's also a clever way of getting around to some daunting routing problems with subnetting and protocols that may not work well through the firewall. For most causes, you will not need to proxy ARP requests. Should you wish to learn more about this topic, you can look on our website (www.gotroot.com), or you can read this document, which has more information about the topic, http://www.sjdjweis.com/Linux/proxyarp/. To turn proxyarp off, just use this script: #Do not respond to a proxy arp request. #do not reply to 'proxyarp' packets if [ -e /proc/sys/net/ipv4/proxy_arp ]; then echo 0 > /proc/sys/net/ipv4/proxy_arp fi Spoof protection is something near and dear to the hearts of many in the network security world, and fortunately Linux gives us the ability to limit spoofed packets to some extent. The kernel includes a neat little /proc setting that basically tells the kernel not to respond to a packet out of a different interface than the interface from which it was received. This is basically a system for helping to prevent spoofed packets by looking at where, from the firewall's perspective, it expects the packet to come from. With this turned on, the firewall should reject packets that come from outside your protected network that pretend to come from inside. This will help to prevent an attacker from spoofing trusted systems in an attempt to circumvent your firewall rules. echo 1 > /proc/sys/net/ipv4/conf/all/rp_filter if [ -e /proc/sys/net/ipv4/conf/all/rp_filter ]; then for f in /proc/sys/net/ipv4/conf/*/rp_filter do echo 1 > $f done fi In addition to detecting and stopping spoofed packets, the kernel can also detect what are known as "martian" addresses. Simply put, martian addresses are invalid IP addresses that the firewall should never see. If you tell the firewall to, it will log all those invalid addresses it sees. This can be very useful when tracking down an errant piece of network or equipment or some strange attack on your firewall or the devices it's protecting. As with many of the examples of /proc entries, this one is a simple boolean. 0 turns the logging off, while 1 turns it on. You can enable or disable it for each individual interface, or you can simply use the command that follows to turn it on for all your interfaces. We recommend you use the example here on your firewall. echo 1 > /proc/sys/net/ipv4/conf/all/log_martians The next setting allows you to set the system to not respond to ICMP echo messages set to a broadcast address, otherwise known as a "smurf" attack. Unless you need to be able to ping broadcast addresses on your firewall, which you probably do not, just use the setting that follows. Failure to do so may cause your firewall to be used by an attacker to "amplify" an ICMP flood on another host. echo 1 > /proc/sys/net/ipv4/icmp_echo_ignore_broadcasts If you want your firewall to be stealthy to ICMP pingsthat is, to ignore attempts to ping it, you could construct iptables rules to accomplish this, or you can use the /proc setting illustrated here to simply ignore all ICMP echo or ping requests. This can be somewhat handy if you don't want your firewall to be easy to find, but keep in mind there are other ways to detect a firewall besides ICMP echo requests. This may buy you some invisibility, if you will, from a less sophisticated attacker, but it's not going to make you completely invisible by any measure. Turning off the ability to respond to ICMP echo requests may also make some network diagnostics difficult and may also make your users more likely to call you with complaints that the firewall is "down" or not responding. Nevertheless, if you want to turn ICMP echo responses off, simply pass 0 into /proc/sys/net/ipv4/icmp_echo_ignore_all as detailed here: echo 0 > /proc/sys/net/ipv4/icmp_echo_ignore_all Sometimes devices like routers will send bogus responses to broadcast frames, which will be logged by the kernel. On a busy network this can quickly become annoyingor worse cause a DoS attack on your syslog daemon. Setting this to true (echo 1) will disable these messages from being logged. If you are experiencing a strange network problem, you may want to turn this back on, by passing 0 into /proc/sys/net/ipv4/icmp_ignore_bogus_error_responses. Again, to turn logging of these errors off, pass 1 into the same /proc enTRy: echo 1 > /proc/sys/net/ipv4/icmp_ignore_bogus_error_responses The final section to look at is the network performance settings in /proc. These are recommendations based on the firewalls we have built and should be adjusted, where needed, to fit your unique environment. As they say, your mileage may vary, and these settings are no exception. If you find yourself having trouble with any of these, please refer back to the descriptions in this chapter or, worst case, put these settings back to their default value and check the forums on our website to see what other users recommend (www.gotroot.com). The first network setting of interest is the TCP FIN timeout setting. This defines the amount of time to hold a socket in the FIN-WAIT-2 status, if the socket was closed by our side. This is part of the final tear down part of TCP session where we send out FIN packet and are awaiting a response from the other side via an ACK response. If the host on the side is broken, is slow, or does not respond, the socket will be held open for a certain period of time to wait regardless of what happens. The usual value is 60 seconds for 2.4 and 2.6 kernel, and was 180 seconds for 2.2. We recommend you set this at 45 seconds, which means the socket will be killed off if the remote host does not finish the tear down in 45 seconds. If you find that you have too many open sockets in the FIN-WAIT-2 state, then you can try lowering this number further. The format for this setting is to pass in an integer value, as in this example: echo 45 > /proc/sys/net/ipv4/tcp_fin_timeout A similar setting worth tinkering with is the UDP connection timeout value. This defines how long the connection tracking engine will consider a UDP connection to be alive. If nothing else comes back within this timeframe, the connection will be removed from the state engine. Again, you can set this value to any integer you like; we recommend it be set to 60 seconds. echo 60 > /proc/sys/net/ipv4/netfilter/ip_conntrack_udp_timeout To help prevent SYN flood attacks, the 2.4 and 2.6 kernels, if compiled with this option, have the ability to send out what are referred to as "SYN cookies." These are basically ACK packets that contain a little cryptographic hash, which the responding client will echo back with as part of its SYN-ACK packet. If the kernel does not see this "cookie" in the reply packet, it will assume the connection is bogus and drop it. The kernel will only send SYN cookies if the SYN socket buffer is backlogged. The intent is to help protect the system against SYN flood attacks. We recommend this be turned on by passing 1 into the /proc/sys/net/ipv4/tcp_syncookies proc entry: echo 1 > /proc/sys/net/ipv4/tcp_syncookies ECN, or Explicit Congestion Notification, is a nifty little extension to IP that is still in the RFC phase and is not an official extension to IP. It basically allows for, as its name implies, a system to explicitly notify a peer that its connection is temporarily congested, which should help with dynamically reconfiguring timeouts, windows, and other aspects of network behavior to compensate for this. However, not all IP stacks know how to deal with this, so if you turn this on you may notice that you cannot connect to certain sites. For this reason, we recommend you turn this off on your firewall. echo 0 > /proc/sys/net/ipv4/tcp_ecn There are many other settings for the kernelliterally hundreds of themthat are documented in greater detail on our website (www.gotroot.com) and many others. Please feel free to visit our website or some of the following for information about other tweaks you can implement in your kernel to change the behavior of your IP stack. iptables ModulesAfter the kernel is configured the way we would like, we can then start loading iptables modules we might want to use. There are two ways to do this: explicitly, which is the safer and more secure manner of doing this (we will have to decide for ourselves which modules we want the system to use), or we can simply load all the modules we have configured for this kernel. The latter can be just as safe and secure as the former if you know what modules you have loaded on your system. Here is a short little script to automatically load all the iptables modules on your system: MODULE_DIR="/lib/modules/'name -r'/kernel/net/ipv4/netfilter/" MODULES='(cd $MODULE_DIR; ls *_conntrack_* *_nat_* | sed 's/\.o.*$//')'' for module in $(echo $MODULES); do if $LSMOD | grep ${module} >/dev/null; then continue; fi if [ -e "${MODULE_DIR}/${module}.o" -o -e "${MODULE_DIR}/${module}.o.gz" ]; then echo loading module ${module} $MODPROBE ${module} || exit 1 fi done Otherwise, you will need to load each one explicitly that you want the system to use, for instance modprobe iptable_nat modprobe ipt_ROUTE modprobe ipt_REDIRECT modprobe ipt_stealth [...] modprobe ip_conntrack This can be quite a long list (dozens of modules are available), which is why the easier option is to know what is compiled into your kernel and use a script to handle loading everything for you. Another upside to using the script is that it can prevent you from missing an important kernel module; the downside, of course, is that it might load a module you do not want loaded, such as ip_conntrack_tftp for instance. The preferred method is to explicitly load your modules after you know which ones you need. Loading all the modules, either manually or via our script, can create numerous vulnerabilities for network by allowing certain types of traffic to flow through your firewall that otherwise may be too risky for you to allow. Firewall RulesAfter the kernel is properly configured and all the necessary firewall modules are loaded, you can start adding rules into the kernel. As with the order we defined at the beginning of this chapter, we will start with any special rules to affect the shape of packets for performance reasons. One example is to set up your MSS to PMTU clamp rules, as explained in later chapters in this book. We will only briefly touch on the problem they solve here, as it relates to an MTU problem typically encountered with PPPoE (PPP over Ethernet) connections, such as DSL. The symptom is that the connection will stall. We cover this in more detail in Chapter 12, "$xref linkend="ch12" remap="NAT (Network Address Translation) and IP Forwarding" endterm="ch12.title"/$." The point is that you want to put these kinds of special purpose packet manipulation rules at the beginning of your firewall rules so they will always be used. Here is an example set of rules to fix an MTU problem on an example firewall, were it to be using a DSL connection on its Internet interface (eth0). iptables -A OUTPUT -o eth0 -p tcp --tcp-flags \ SYN,RST SYN -j TCPMSS --clamp-mss-to-pmtu iptables -A FORWARD -o eth0 -p tcp --tcp-flags \ SYN,RST SYN -j TCPMSS --clamp-mss-to-pmtu This would "clamp" the Maximum Segment Size (MSS) to the path MTU. This would prevent unnecessary fragmentation in the connection that might cause it to stall. Quality of Service RulesNext, we will append our quality of service rules to establish the level of priority certain traffic will get for devices that honor what are referred to as Terms of Services (TOS) settings. These are just examples, but for our firewalls, we like to set telnet and the ftp command channel to Minimize-Delay, which should cause the telnet and ftp command sessions to be a little more responsive when dealing with a saturated network. iptables -A PREROUTING -t mangle -p tcp --sport \ telnet -j TOS --set-tos Minimize-Delay iptables -A PREROUTING -t mangle -p tcp --sport \ ftp -j TOS --set-tos Minimize-Delay Then we will set the actual FTP-data traffic in such a way that the firewall will try to maximize the throughput of the FTP traffic. Delays are not at issue here; we can live with caching and other tricks that might otherwise make telnet or ftp command channels annoyingly slow or hard to use. iptables -A PREROUTING -t mangle -p tcp --sport \ ftp-data -j TOS --set-tos Maximize-Throughput If your firewall calls for it, we also like to set up QOS rules for things such as VoIP protocols and any other specialty protocols from devices that need it. In this case, we return to the VoIP ATA. Our ATA uses a bunch of proprietary ports, along with TFTP, to carry out its function. We want everything but TFTP to have its TOS set to Minimize-Delay, except for TFTP. We don't mind if TFTP is slow, delayed, lagged, or otherwise adversely effected by other traffic, so we exclude it by using the "!" symbol. iptables -A INPUT -i eth0 -t mangle -p udp \ -s 10.10.10.15 ! --dport 69 -d any/0 -j TOS \ --set-tos Minimize-Delay For the other traffic, you will notice that we explicitly set the destination ports to further refine the use of the TOS settings for this device. iptables -A OUTPUT -o eth0 -t mangle -p tcp \ -d 10.10.10.15 --dport 10000: -j TOS \ --set-tos Minimize-Delay iptables -A OUTPUT -o eth0 -t mangle -p udp \ -d 10.10.10.15 --dport 5060 -j TOS \ --set-tos Minimize-Delay iptables -A OUTPUT -o eth0 -t mangle -p udp \ -d 10.10.10.15 --dport 5061 -j TOS \ --set-tos Minimize-Delay iptables -A INPUT -i eth0 -t mangle -p tcp \ -s 10.10.10.15 -d any/0 -j TOS \ --set-tos Minimize-Delay We also can set a rule based on the MAC address of a host. In the following example, we are setting a mark rule for the MAC address of a Voice-over IP ATA (Analog Telephone Adapter). We are setting this mark to be used later on in a QOS example, to allow the kernel to identify the VoIP traffic and other traffic from the ATA for traffic shaping purposes. iptables -t mangle -I PREROUTING -m mac \ --mac-source $VONAGE_MAC -j MARK --set-mark 1 Port Scan RulesSometimes you will want to detect what are referred to as port scans. These are either attempts to enumerate available services on your hosts or specially crafted packets to subvert your firewall rules to accomplish the same. The first set of rules will attempt to detect otherwise normal traffic that appears to be attempting to map out the services running on the hosts protected by your firewall. The following rules require the PSD (Port Scan Detection) module from patch-o-matic, as this module is not normally included in most Linux distributions. After you have this module loaded, these rules will give your firewall the ability to detect certain types of port scans and, optionally, to take action when those port scans are detected. iptables -N PSD2 iptables -A INPUT -i eth1 -m psd -m limit \ --limit 5/minute -j PSD2 iptables -A INPUT -i eth2 -m psd -m limit \ --limit 5/minute -j PSD2 iptables -A INPUT -i eth4 -m psd -m limit \ --limit 5/minute -j PSD2 iptables -A FORWARD -i eth1 -m psd -m limit \ --limit 5/minute -j PSD2 iptables -A FORWARD -i eth2 -m psd -m limit \ --limit 5/minute -j PSD2 iptables -A FORWARD -i eth4 -m psd -m limit \ --limit 5/minute -j PSD2 iptables -A PSD2 -m limit --limit 1/second -j LOG \ --log-level info --log-prefix "PSD2 -- DROP SHUN " \ --log-tcp-sequence --log-tcp-options \ --log-ip-options iptables -A PSD2 -m recent --set -j DROP There are also types of port scans that are always indicative of malicious intent, as these packets cannot "normally" be produced through standard TCP communication practices. In essence, these are packets that contain bogus or illegal TCP flag combinations, such as a packet with the SYN and FIN flags set and other illegal combinations. First, we create the new chain, PORTSCAN: iptables -N PORTSCAN Then we detect any packets with the FIN, URG and PSH flags set, which is illegal and never happens with normal traffic. Because of this, we want to detect it and then do something about it. iptables -A INPUT -i all -p tcp --tcp-flags ALL \ FIN,URG,PSH -m recent --set -j PORTSCAN iptables -A FORWARD -i all -p tcp --tcp-flags ALL \ FIN,URG,PSH -m recent --set -j PORTSCAN The same is true for other types of packets, such as SYN/RST, which is also bogus, along with SYN/FIN and FIN setting all the packet flags, setting none of the packet flags, and also the "xmas" tree packet flag combination or turning on the URG, ACK, PSH, RST, SYN, and FIN flags. All of these are illegal combinations we want to detect and correct. You also will notice that we are calling a new module, the -m recent module. This module, when used with the -set command, will record the IP address of the source (or destination if used with -destination-ip command) for use by the recent module. We will cover the recent module later on in this chapter, but briefly, it can allow us to temporarily block packets from those sources. If this is not something you want to try, just remove the -m recent -set from these lines. # SYN/RST iptables -A INPUT -i all -p tcp --tcp-flags SYN,RST \ SYN,RST -m recent --set -j PORTSCAN iptables -A FORWARD -i all -p tcp \ --tcp-flags SYN,RST SYN,RST -m recent --set \ -j PORTSCAN # SYN/FIN iptables -A INPUT -i all -p tcp --tcp-flags SYN,FIN \ SYN,FIN -m recent --set -j PORTSCAN iptables -A FORWARD -i all -p tcp --tcp-flags SYN,FIN \ SYN,FIN -m recent --set -j PORTSCAN # NMAP FIN Stealth Scan iptables -A INPUT -i all -p tcp --tcp-flags ALL FIN \ -m recent --set -j PORTSCAN iptables -A FORWARD -i all -p tcp --tcp-flags ALL FIN\ -m recent --set -j PORTSCAN # ALL/ALL Scan iptables -A INPUT -i all -p tcp --tcp-flags ALL ALL -m recent --set -j PORTSCAN iptables -A FORWARD -i all -p tcp --tcp-flags ALL ALL -m recent --set -j PORTSCAN # NMAP Null Scan iptables -A INPUT -i all -p tcp \ --tcp-flags ALL NONE -m recent --set -j PORTSCAN iptables -A FORWARD -i all -p tcp \ --tcp-flags ALL NONE -m recent --set -j PORTSCAN #XMAS Scan iptables -A INPUT -i all -p tcp --tcp-flags ALL \ URG,ACK,PSH,RST,SYN,FIN -m recent --set -j PORTSCAN iptables -A FORWARD -i all -p tcp --tcp-flags ALL \ URG,ACK,PSH,RST,SYN,FIN -m recent --set -j PORTSCAN Now that we have detected all these types of port scans, we will want to do something about it, so we append to the PORTSCAN chain first a logging rule to capture all the information we can about the packet via the -log-tcp-sequence, --log-tcp-options, and --log-ip-options switches, and finally we discard these bogus packets via a stealthy packet DROP rule. Additionally, this rule will be logged to syslog, with the log level of info at the rate of one message per second. iptables -A PORTSCAN -m limit --limit 1/second \ -j LOG --log-level info --log-prefix \ "PORTSCAN -- SHUN " --log-tcp-sequence \ --log-tcp-options --log-ip-options iptables -A PORTSCAN -j DROP Bad Flag RulesThese rules will drop packets with bad TCP flags, specifically any packets setting the TCP option 64 or 128 in the option field. The logging rule is identical to the rule here, with this being logged to syslog, with a log level of "info," and at a rate of no more than one message per second. iptables -N BAD_FLAGS iptables -A INPUT -p tcp --tcp-option 64 -m recent \ --set -j BAD_FLAGS iptables -A INPUT -p tcp --tcp-option 128 -m recent \ --set -j BAD_FLAGS iptables -A BAD_FLAGS -m limit --limit 1/second \ -j LOG --log-level info --log-prefix \ "BAD_FLAGS -- SHUN " --log-tcp-sequence \ --log-tcp-options --log-ip-options iptables -A BAD_FLAGS -j DROP Bad IP Options RulesThis next rule is similar to the one just listed; however, we're looking at the options field in Layer 3 IP packets. This ruleset will drop and log those packets to syslog at the rate of no more than one per second. What we are looking for here are packets with either unused flags set or flags that might expose information about your network to an attacker. As with the port scan detector module, PSD, this module also may require you to modify your kernel. iptables -N IPOPTS iptables -A INPUT -m ipv4options --ssrr -m recent \ --set -j IPOPTS iptables -A INPUT -m ipv4options --lsrr -m recent \ --set -j IPOPTS iptables -A INPUT -m ipv4options --rr -m recent \ --set -j IPOPTS iptables -A IPOPTS -j LOG --log-prefix \ "BAD IPOPTS SHUN " --log-tcp-sequence \ --log-tcp-options --log-ip-options -m limit \ --limit 1/second iptables -A IPOPTS -j DROP Small Packets and Rules to Deal with ThemThis ruleset looks at the length of UDP, TCP, and ICMP packets. Packets under the specified length will be dropped. This is OK to do here and won't cause any issues with defragmentation, because real IP defragmentation happens before we get to these rules. These are dropping intentionally broken packets used for a myriad of nefarious purposes (DoS attacks, and so on). iptables -N SMALL iptables -A INPUT -p udp -m length --length 0:27 \ -m recent --set -j SMALL iptables -A INPUT -p tcp -m length --length 0:39 \ -m recent --set -j SMALL iptables -A INPUT -p icmp -m length --length 0:27 \ -m recent --set -j SMALL iptables -A INPUT -p 30 -m length --length 0:31 \ -m recent --set -j SMALL iptables -A INPUT -p 47 -m length --length 0:39 \ -m recent --set -j SMALL iptables -A INPUT -p 50 -m length --length 0:49 \ -m recent --set -j SMALL iptables -A INPUT -p 51 -m length --length 0:35 \ -m recent --set -j SMALL iptables -A INPUT -m length --length 0:19 -m recent \ --set -j SMALL iptables -A SMALL -m limit --limit 1/second -j LOG \ --log-level info --log-prefix "SMALL -- SHUN " \ --log-tcp-sequence --log-tcp-options \ --log-ip-options iptables -A SMALL -j DROP Rules to Detect Data in Packets Using the String ModuleThis next rule set requires the string-matching module from patch-o-matic. This is specifically matching strings sent to the system containing known patterns of abuse. The first rule, for example, looks for connections on port 22 that send the string "Version_Mapper," which is a tool used to enumerate services. The second chain, STRINGS2, is applied against the OUTPUT chain. This prevents the firewall itself from sending packets that match these rules. Note that both rules also apply string matching against the FORWARD chains, which handle traffic forwarded through the firewall in a NAT configuration. String matching can be especially useful if you're dealing with some very specific patterns of abuse, such as Internet worms and viruses. iptables -N STRINGS iptables -A INPUT -p tcp --dport 22 -m string \ --string '"Version_Mapper"' -j STRINGS iptables -A FORWARD -p tcp --dport 22 -m string \ --string '"Version_Mapper"' -j STRINGS iptables -A INPUT -p tcp --dport 22 -m string \ --string '"/bin/sh"' -j STRINGS iptables -A INPUT -p tcp --dport 443 -m string \ --string "TERM=xterm" -j STRINGS iptables -A INPUT -p tcp --dport 53 -m string \ --string "«Í .a" -j LOG --log-prefix " SID303 " iptables -A FORWARD -p tcp --dport 53 -m string \ --string "«Í .a" -j LOG --log-prefix " SID303 " iptables -A STRINGS -m limit --limit 1/second \ -j LOG --log-level info log-prefix \ "STRINGS -- SHUN " --log-tcp-sequence \ --log-tcp-options --log-ip-options iptables -A STRINGS -m recent --set -j DROP And now the STRINGS2 chain, which is applied against the OUTPUT chain to look for responses from our firewall in case it's being broken into and an attack has succeeded. The intent here is to block the destination of these packets to prevent an exploit from succeeding. iptables -N STRINGS2 iptables -A OUTPUT -p tcp --sport 22 -m string \ --string '"*GOBBLE*"' -j STRINGS2 iptables -A OUTPUT -p tcp --sport 22 -m string \ --string '"uname"' -j STRINGS2 iptables -A FORWARD -p tcp --sport 22 -m string \ --string '"*GOBBLE*"' -j STRINGS2 iptables -A FORWARD -p tcp --sport 22 -m string \ --string '"uname"' -j STRINGS2 iptables -A STRINGS2 -m limit --limit 1/second \ -j LOG --log-level info --log-prefix "STRINGS2 \ -- SHUN " --log-tcp-sequence --log-tcp-options \ --log-ip-options iptables -A STRINGS2 -m recent --rdest --set -j DROP Again, note that we also set the IP address via the -m recent module, but this time we used the -rdest switch, which records not the source of these packets, as in the previous example, but the destination. Later on in these rules, we'll use the information recorded by the "recent" module to temporarily block packets from this suspicious host. These are just some simple examples of things you can do with string matching. The strings match is literal and, as of right now, does not understand the protocol it is working against. This means that for some protocols, the literal ASCII string will not work, or it may not even be possible to pull a string out of the communications stream for that protocol. Regardless, strings is a very useful tool for any firewall and because of this, some have even gone so far as to adapt snort signatures, an open source network intrusion detection platform (www.snort.org) to the iptables string format to give their Linux-based firewalls a true intrusion detection capability. One such site is http://www.cipherdyne.org/fwsnort. The author of fwsnort, Michael Rash, even has some nifty string rewrite patches for iptables that allow you to rewrite the content of some packets on the fly. For instance, imagine you wanted to change every instance of the word foo in an HTTP session to bar. With his patches, you can do that. Here is an example ruleset using his patch: iptables -A FORWARD -p tcp --dport 80 -m string \ --string "/usr/bin/id" \ --replace-string "/usr/ben/id" -j LOG \ --log-prefix "nullify SID 1332" In this case, this rule would rewrite traffic destined for a host on the other side of a firewall, notice the FORWARD rules, which would nullify a specific recon attack by changing the /usr/bin/id command to /usr/ben/id. As /usr/ben/id does not exist, the attack would do nothing, but might appear to otherwise work to the attacker. The attack would appear to complete successfully through the HTTP protocol, and there would be no source IP shunning or TCP resets which might otherwise give away the presence of an intrusion detection and response system, but the attack would still not work in a somewhat stealthy manner. The attack would essentially experience what is known as a "stealthy failure." The attacker or the attacker's program might conclude that the target is not vulnerable to this attack, regardless of what the attacker might infer from this action. The point is that this specific string would be rewritten by the firewall rendering this specific attack inert. As we mentioned, this is a clever and stealthy way of protecting a system without appearing to have done anything specifically to protect it or to have detected the attack. It's also good insurance against a range of known attack signatures. It's sort of a happy medium between just detecting an attack and doing nothing about it in realtime and blocking all the packets from the source of the attack for some period of time. The latter is difficult to implement for many organizations due to false positives, and the former is extremely ineffective when it comes to actually stopping an attack. As we mentioned with the basic string module, this method, string rewriting, also suffers from the fact that the strings used are limited to protocols that literal strings can be constructed for. Protocol helpers coupled with this technology could help greatly with the translation of the user defined strings to the actual data structure and format for that protocol. Invalid Packets and Rules to Drop ThemAs with the content of a packet, we might want to drop a packet because of its headers, because it doesn't match a known connection state, its checksum doesn't match, or something else is wrong with it. iptables gives us tools to help with this, the INVALID state and the unclean module. The INVALID state, described in earlier chapters, defines a packet that otherwise does not match the NEW, RELATED, or ESTABLISHED states. The unclean module, considered experimental and temporarily removed from the early 2.6 kernels, is supposed to detect packets with bad header options and other problems, such as bad ports. We don't recommend you use this module at this time. iptables -N BOGUS iptables -t filter -A INPUT -m conntrack \ --ctstate INVALID -j BOGUS iptables -t filter -A OUTPUT -m conntrack \ --ctstate INVALID -j BOGUS iptables -t filter -A FORWARD -m conntrack \ --ctstate INVALID -j BOGUS iptables -A BOGUS -m limit --limit 1/second -j LOG \ --log-level info --log-prefix "INVALID PACKET \ -- DROP " --log-tcp-sequence --log-tcp-options \ --log-ip-options iptables -A BOGUS -j DROP If you want to try the unclean module, here is a simple way to add it into your rulesets. Remember that iptables is linear, so if you want the unclean module to check all of your packets, you will need to place this chain ahead of any ACCEPT rules you may have. iptables -N DIRTY iptables -A INPUT -m unclean -j DIRTY iptables -A OUTPUT -m unclean -j DIRTY iptables -A FORWARD -m unclean -j DIRTY iptables -A DIRTY -m limit --limit 1/second -j LOG \ --log-level info --log-prefix "UNCLEAN PACKET \ -- DROP " --log-tcp-sequence --log-tcp-options \ --log-ip-options iptables -A DIRTY -j DROP A Quick Word on FragmentsWith 2.4 and 2.6 kernels, fragment reassembly is automatic whenever you use the connection tracking engine or are doing NAT. For that reason, it is not generally necessary to concern yourself with fragments passing through your firewall. However, we all make mistakes, and it's possible the firewall could be started without the connection tracking engine properly initialized, compiled in, or even loaded. Because of this, we like to include a fragment sanity check ruleset to drop any fragments that might try to pass through the firewall. As already stated, this rule shouldn't be triggered if you are using connection tracking, as the state engine will handle fragment reassembly automatically. The rules outlined as follows should never be triggered unless something has gone horribly wrong, which is why it might be useful to keep it in the rules in case you forget to load the conntrack modules or break your NAT rules. The bottom line is that it can't hurt you to add in these rules if you are doing NAT, connection tracking, or both; it can only help in the worst-case scenario. Remember, with security we are not interested in how a security technology works; we are interested in how it fails. We want to catch and stop the failures in a system, not assume that they won't occur. iptables -N NOFRAGS iptables -A OUTPUT -p ip -f -j NOFRAGS iptables -A INPUT -p ip -f -j NOFRAGS iptables -A FORWARD -p ip -f -j NOFRAGS iptables -A NOFRAGS -m limit --limit 1/second \ -j LOG --log-level info --log-prefix \ "Fragment -- DROP " --log-tcp-sequence \ --log-tcp-options --log-ip-options iptables -A NOFRAGS -j DROP SYN FloodsThankfully there are a number of ways to protect against SYN floods. One we already discussed, using SYN cookies, and the other is to use iptables to watch the rate at which SYN packets are flowing in or through the firewall and to throttle those SYNs accordingly. You also can use this method to control the flow of packets to host, to some extent, if your goal is to do more than just limit SYN floods. iptables -N syn-flood iptables -A INPUT -i eth+ -p tcp tcp-flags \ SYN,ACK,FIN,RST RST -j syn-flood iptables -A FORWARD -i eth+ -p tcp tcp-flags \ SYN,ACK,FIN,RST RST -j syn-flood iptables -A syn-flood -m limit --limit 75/s \ --limit-burst 100 -j RETURN iptables -A syn-flood -j LOG --log-prefix "SYN FLOOD "\ --log-tcp-sequence --log-tcp-options -\ -log-ip-options -m limit --limit 1/second iptables -A syn-flood -j DROP Let's break this chain down. The first part of this chain creates the new chain, syn-flood: iptables -N syn-flood The second and third statements define the specific packet circumstances under which this chain will be tripped. In both cases, the rules only apply to SYN, ACK, FIN and RST packets. And in each case, the chain is applied to both INPUT and FORWARD chains. You will also notice that the rules can only be applied to TCP, as there are no SYN, ACK, FIN or RST packets with UDP or ICMP traffic. iptables -A INPUT -i eth+ -p tcp tcp-flags \ SYN,ACK,FIN,RST RST -j syn-flood iptables -A FORWARD -i eth+ -p tcp tcp-flags \ SYN,ACK,FIN,RST RST -j syn-flood Additionally, the interface selected in this example is the eth+ interface, which is a special shorthand for "all eth interfaces." We do not recommend you assign these rules to -i all, which would apply it to all your interfaces, including loopback. That would limit the flow of traffic on your loopback or localhost interface, which could cause problems with your firewall's proper operation. If you need to, you can create specific flow rates for individual interfaces by explicitly defining the interface. iptables -A INPUT -i eth1 -p tcp tcp-flags \ SYN,ACK,FIN,RST RST -j syn-flood iptables -A FORWARD -i eth2 -p tcp tcp-flags \ SYN,ACK,FIN,RST RST -j syn-flood With this method, we are limiting the number of SYN packets to 75 per second. This is, admittedly, a very high flow rate, and we recommend you start with this flow rate and work backward until you reach a "low water" mark for your network. Then you can increase it until you are no longer getting any errors. To give yourself a little extra boost in case you underestimated the flow rate for your network, add in the --limit-burst <number> option, which gives you the ability to allow the network to burst above your flow limit. Polite RulesThis chain politely closes down the other half of a SYN scan and also SYN/ACK scans that might be directed against you. This is a trade-off because someone could portscan us with SYN/ACK scans and might gain some information on our firewall. So these rules incur some risk, and we leave it to the reader to decide if he or she wants to run them. We like to run these on our firewalls to help shut down spoofed connections from other hosts that might be using our IP as part of a SYN flood. It's not really specifically designed to help us, but rather, the victim of the SYN flood. This chain is all about being polite. iptables -A INPUT -p tcp --tcp-flags SYN,ACK SYN,ACK \ -m conntrack --ctstate NEW -j LOG log-prefix \ "reset spoof TWH" iptables -A INPUT -p tcp --tcp-flags SYN,ACK SYN,ACK \ -m conntrack --ctstate NEW -j REJECT \ --reject-with tcp-reset iptables -A FORWARD -p tcp --tcp-flags SYN,ACK SYN,ACK\ -m conntrack --ctstate NEW -j LOG log-prefix\ "reset spoof TWH" iptables -A FORWARD -p tcp --tcp-flags SYN,ACK SYN,ACK\ -m conntrack --ctstate NEW -j REJECT \ --reject-with tcp-reset Odd Port Detection and Rules to Deny Connections to ThemThis next chain requires that you apply the U32 patch from patch-o-matic to netfilter/iptables. It allows you to grab chunks of data from a packet and perform a comparison on it. This is similar to the strings module but focuses on the headers. iptables -N ODDPORTS As before, this simply creates the new chain ODDPORTS, which we can then set as a jump point or target for the iptables rule. iptables -A INPUT -p udp --sport 2:21 -m recent \ --set -j ODDPORTS iptables -A INPUT -p udp --dport 2:21 -m recent \ --set -j ODDPORTS iptables -A FORWARD -p udp --sport 2:21 -m recent \ --set -j ODDPORTS iptables -A FORWARD -p udp --dport 2:21 -m recent \ --set -j ODDPORTS In the rules just listed, iptables is being told to detect all connections to ports 221 that occur over UDP on the INPUT and FORWARD chains and to jump to the ODDPORTS chain. For our firewalls, we have found that we have to leave port 1 available because some NTP (Network Time Protocol) servers will respond to port 1 with their NTP response. iptables -A INPUT -p tcp --dport 0 -m recent --set \ -j ODDPORTS iptables -A INPUT -p tcp --sport 0 -m recent --set \ -j ODDPORTS iptables -A FORWARD -p tcp --dport 0 -m recent \ --set -j ODDPORTS iptables -A FORWARD -p tcp --sport 0 -m recent \ --set -j ODDPORTS This is the other half of the previous set of rules. These rules simply detect connections to port 0 and tell iptables to jump to the ODDPORTS chain when detection occurs. Finally, iptables is told to append the following rules to the ODDPORTS chain, which are to log the connections and finally to drop them. iptables -A ODDPORTS -m limit --limit 1/second \ -j LOG --log-level info log-prefix \ "ODDPORTS -- SHUN " --log-tcp-sequence \ --log-tcp-options --log-ip-options iptables -A ODDPORTS -j DROP Silently Drop Packets You Don't Care AboutWe do this after the sanity checking because it's the "normal" packets we don't care about. A vanilla SMB broadcast, for instance, from a host we normally expect to see this behavior from is something we can safely ignore, but SMB traffic with strange packet flags and other suspicious behavior is something we don't want to ignore. Keep that in mind with these rules, as they will drop packets without logging them. iptables -N SILENT iptables -A INPUT -i eth2 -p tcp -d <DMZ_IP> \ --destination-port 139 -j SILENT iptables -A INPUT -i eth0 -p udp -d <EXTERNAL IP> \ --destination-port 137 --source-port 137 -j SILENT iptables -A INPUT -i eth2 -p udp -d <DMZ IP> \ --destination-port 137 --source-port 137 -j SILENT iptables -A INPUT -i eth1 -p tcp \ -s <INTERNAL NETWORK> --dport 139 \ -d <INTERNAL NETWORK BROADCAST> \ -j SILENT iptables -A SILENT -j DROP This is just to illustrate that you can "silently" drop packets without logging themand where we think you should do this in your ruleset. Do it after you detect all the bad and suspicious traffic, or you could be missing something. Enforcement RulesRemember those rules to prevent the NEW state from forwarding packets that aren't technically new? Here are some rules to enforce that behavior: iptables -A INPUT -p tcp ! --syn -m conntrack \ --ctstate NEW -j LOG --log-prefix "New not syn:" iptables -A INPUT -p tcp ! --syn -m conntrack \ --ctstate NEW -j DROP iptables -A FORWARD -p tcp ! --syn -m conntrack \ --ctstate NEW -j LOG --log-prefix "New not syn:" iptables -A FORWARD -p tcp ! --syn -m conntrack \ --ctstate NEW -j DROP Remember, without these rules it's possible that some traffic could slip through the firewall that you might otherwise want to drop. It is a useful feature that allows the firewall to gracefully pick up connections after a reboot of the firewall or when used in conjunction with another firewall to allow them to act as failover firewalls for each other. This might not be an important feature for your firewall, in which case you should not use these rules. IP Spoofing RulesThis rule applies the limit match against packets hitting the eth1 interface with the source IP address of the interface itself. We will log these packets at a maximum rate of one per second to syslog as an informational message that says "Spoofing DENY:." Then these packets will be dropped by the final rule. echo prevent IP spoofing iptables -N ANTI_SPOOF # your IPs iptables -A INPUT -i eth1 -s <YOUR IP> \ -j ANTI_SPOOF iptables -A ANTI_SPOOF -m limit --limit 1/second \ -j LOG --log-level info --log-prefix \ "Spoofing DENY: " --log-tcp-sequence \ --log-tcp-options --log-ip-options iptables -A ANTI_SPOOF -j DROP Egress FilteringThis ruleset that IP addresses are allowed out using the RETURN setting acts as an exception. echo allow known IP packets out to enforce anti spoofing rules iptables -N ALLOWED_OUT iptables -A OUTPUT -o eth1 -j ALLOWED_OUT iptables -A FORWARD -o eth1 -j ALLOWED_OUT iptables -A OUTPUT -o eth2 -j ALLOWED_OUT iptables -A FORWARD -o eth2 -j ALLOWED_OUT iptables -A ALLOWED_OUT -o eth0 -s <EXTERNAL IP> \ -j RETURN iptables -A ALLOWED_OUT -o eth0 \ -s <INTERNAL NETWORK> -j RETURN iptables -A ALLOWED_OUT -o eth0 -s <DMZ NETWORK> \ -j RETURN Send TCP Reset for AUTH ConnectionsMany services out there will combine the inbound connection to the service with an outbound IDENTD/AUTH request. If we just drop this packet, the server on the other end will sit and wait for a response, thereby making your connections (FTP for example) appear to be slow. By returning a TCP RST/ACK response, you're telling the server making the auth request that you don't respond to AUTH. This should shut down the query on the other end and speed things up. iptables -I INPUT -p tcp -s any/0 --dport 113 \ -j REJECT --reject-with tcp-reset iptables -I FORWARD -p tcp -i eth1 -s any/0 \ --dport 113 -j REJECT --reject-with tcp-reset iptables -I FORWARD -p tcp -i eth2 -s any/0 \ --dport 113 -j REJECT --reject-with tcp-reset Playing Around with TTL ValuesThis next example requires the TTL patch from patch-o-matic, which you can find at www.netfilter.org. This patch allows you to manipulate the TTL response values of your packets. This can be useful in doing things such as hiding your firewall from traceroutes or hiding the fact that you have hosts behind your firewall. For instance, to confuse classic traceroute by adding 1 to any TTL on the standard traceroute ports 333434-33542, you would use this rule: iptables -t mangle -A PREROUTING -p UDP \ --dport 33434:33542 -j TTL --ttl-inc 1 To briefly digress on the topic of fooling traceroute, there is also a user space program called countertrace that can create elaborate responses to traceroutes based on user defined configurations. The author's website said, "countertrace is a userland, iptables QUEUE target handler for Linux 2.4 kernels running netfilter, which attempts to give the illusion that there are multiple, imaginary IP hops between itself and the rest of the world. The imaginary hops that countertrace projects also have the ability to introduce accumulative, imaginary latency." The URL for countertrace is http://michael.toren.net/code/countertrace/README. If you just want a simple means of tricking traceroute, just rely on the rules detailed here. They work like magic. State Tracking RulesNow you can add in your ESTABLISHED and RELATED rules. As most packets will fall into one of these categories, it makes sense to put these rules near the top of your firewall rulesets before your other ACCEPT rules. However, we prefer not to put these rules ahead of our sanity checking rules. Remember, iptables is linear. Rules are matched in the order from first added to last added, so if you have a rule to drop spoofed packets after your RELATED or ESTABLISHED rules, then spoof detection will not occur on ESTABLISHED or RELATED packets. To keep things simple, we prefer to set up our rules using a simple principle, DROP before ACCEPT. We do not set up any rules to ACCEPT packets until we are finished with all of our specifically defined DROP rules. Keep in mind, though, that we are not talking about your final DROP rulesthose come last. echo established and related iptables -A INPUT -m conntrack ctstate \ ESTABLISHED,RELATED -j ACCEPT iptables -A OUTPUT -m conntrack ctstate \ ESTABLISHED,RELATED -j ACCEPT iptables -A FORWARD -m conntrack ctstate \ ESTABLISHED,RELATED -j ACCEPT STEALTH RulesThis next ruleset uses the STEALTH module from http://www.grsecurity.net/download.php. From the STEALTH module documentation:
Based on that documentation, that is why we place these kinds of rules after our state tracking rules. The ESTABLISHED and RELATED rules here will catch all of the NAT packets for us. Everything after that is an unused port and anyone hitting those ports is either confused, running a broken app, or up to no good. iptables -A INPUT -p tcp -i eth+ -m stealth \ -j STEALTH iptables -A INPUT -p udp -i eth+ -m stealth \ -j STEALTH iptables -A STEALTH -m limit --limit 1/second \ -j LOG --log-level info \ --log-prefix "STEALTH -- DROP " --log-tcp-sequence\ --log-tcp-options --log-ip-options iptables -A STEALTH -j DROP Shunning Bad GuysRemember all those rules with the "recent" switches? Well, as we touched on before, that module allows the kernel to remember an address for a period of time and then do something with it. A source or destination address can be added to this special list, which you can reference later on in your firewall rules. One useful trick you can do with this is to temporarily drop, or shun, packets from particular sources and destinations that you detect in other rulesets, such as with the port scan rules or string matching. This might allow you to respond to an attack and block all the packets from source or destination until you can investigate furtheror simply for a small period of time, throw the attacker off. Here is an example of such a ruleset that blocks all packets from these recorded IPs for a period of 300 seconds: iptables -N OFFENDER iptables -A INPUT -m recent --rcheck --seconds 300 \ -j OFFENDER iptables -A FORWARD -m recent --rcheck --seconds 300\ -j OFFENDER iptables -A OFFENDER -m limit --limit 1/second -j LOG\ --log-level info \ --log-prefix "OFFENDER -- SHUN " \ --log-tcp-sequence --log-tcp-options \ --log-ip-options iptables -A OFFENDER -j DROP We recommend that until you are comfortable with shunning, you only add these rules after your ESTABLISHED and RELATED rules so that you don't accidentally shun yourself from your firewall or cut off already "trusted" traffic. With these rules added in after the ESTABLISHED and RELATED rules, only new traffic would be affected. In the previous example, as already explained, the shun period is set for 300 secondsor 5 minutes. You can change this to whatever value you think is appropriate, 10 seconds or even an entire day (86400 seconds) or higher if you like. Our recommendation is not to get too crazy with these numbers; shunning is helpful in the short term, but not so useful in the long term. People can change their IP addresses, so the idea isn't to block someone foreverthat would be impossible; they could just change their IP. The idea is to couple this with good signatures on your firewall and to shun the attacker long enough to fool their attack tools and to hopefully stop the attack. Human beings will never be faster than computers when it comes to responding to attacks; shunning buys you time to look into the attack and determine if further action is necessary or if a false alarm has occurred. We realize that for some organizations it might be difficult to trust a piece of technology, your firewall, to make these decisions for you. However, if you have a good response policy and some effective procedures in place so that you can review your shuns within a reasonable amount of time, it can become an extremely useful tool. |
|