Planning a Backup and Recovery Strategy
|
EXAM 70-293 OBJECTIVE , 4, 4.1, 4.5
Backups and documentation are usually of critical importance to the continuing operation of an organization. Organizations often account for the value of their computer and communications equipment, but they overlook their data, which can be difficult to valuate. Equipment can be replaced. Staff can be hired. But if data cannot be restored, it is lost forever.
You should consider good backups as a form of insurance. Hard drives fail. Cooling fan bearings wear out, and systems overheat. Lightning strikes buildings. Viruses contaminate or destroy data. Buildings get flooded. Bugs in applications do things no one intended. Burglars steal equipment. People enter the wrong information, delete the wrong files, or get emotional and destroy data. Untrained employees accidentally damage data and hardware. And since September 11, 2001, the threat of high-tech terrorism has become an important consideration. For our purposes, the cause of loss is irrelevant. The most important point is the ability to recover from any loss that occurs.
When considering the factors that make backups necessary, you should also consider the human side of the situation. The software won’t operate itself, and someone must change tapes. Do not forget to develop good procedures for the people (or person) responsible for your backups. It is important to ensure that there is more than one person who is capable of restoring data, which makes good written procedures essential.
When developing your backup and restore procedures, consider the following guidelines:
-
Develop a log This gives you a hardcopy record of your backup activities.
-
Test your procedures, devices, and media frequently A failure in any one of these areas can make data impossible to restore.
-
Keep multiple copies Media can and does go bad. Shelf life, manufacturing defects, and environmental or physical damage can render media impossible to read.
-
Rotate copies offsite Keep the backups in a different location. That way, a local disaster won’t destroy all of your backups.
-
Back up the system The operating system and your applications are a form of data, too, and should be protected accordingly.
-
Use the new Automated System Recovery (ASR) feature This feature saves time in the event of a disaster and can also act as a “last-ditch” effort before a complete rebuild. Perform an ASR backup after each major system change and also on a regular basis.
-
Secure your backups Secure your backup media in the same way that you would secure any other valuable item. Keep your media locked up in a safe, if possible.
-
Know your data Data that changes frequently may need more frequent backups. Databases require different strategies than documents and spreadsheets. Encrypted File System (EFS) files and folders should have the recovery agent’s EFS private key backed up as well; otherwise, recovering EFS files and folders may not be possible. The DHCP, WINS, DNS, and AD services have specific backup or restore requirements. It is important to understand these requirements when you plan your backup strategy.
Understanding Windows Backup
EXAM 70-293 OBJECTIVE 4.5.1
Windows Server 2003 includes the Backup Utility for performing backups, restores, and running the ASR Wizard. The utility can back up data to and restore data from almost any removable media device identified by the operating systems—tape drives, hard drives, and even file shares on the network. You cannot, however, back up to recordable CD or DVD drives.
In order to perform a backup or restore operation, you must have the appropriate user rights. The Administrators and Backup Operators groups are assigned the necessary rights to perform both functions, so using an account that is a member of either of these groups will suffice.
The specific user rights required to perform a backup or restore can be individually assigned by using the Local Security Policy utility, shown in Figure 8.33, or a GPO if the user is a member of an AD domain. The following are the user rights required to perform backup and restore operations:
-
Back up files and directories Allows a user to bypass (if necessary) established permissions on files, directories, and Registry keys and values. Be cautious when assigning this right, because this can be a security risk. A user with this right could easily back up all of your company’s most sensitive information and carry it out the door.
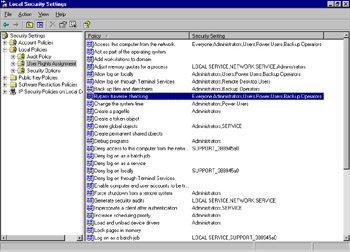
Figure 8.33: Detailed User Rights, Accessed from Local Security PolicyNote Any user with Read permission to a file can back it up, without needing the Back up files and directories right.
-
Bypass traverse checking Gives a user the ability to cross directories, whether or not that user has permissions to those directories.
-
Restore files and directories The corollary user right to Back up files and directories. Allows a user to bypass (if necessary) the established permissions on files, directories, and Registry keys and values. This effectively gives a user the ability to restore objects, regardless of the objects’ assigned permissions. You should be cautious with this right due to the potential security risk and possibility of destroying or corrupting data.
Note A user with the Restore files and directories right can strip objects of their permissions during the restore operation. This means that users with this right will be able to restore and access any file or Registry object they wish. To prevent this, consider using a form of encryption such as EFS. When a file is encrypted, it is backed up as encrypted. When restored, it is still encrypted, regardless of the permissions it has assigned to it.
Types of Backups
Most good backup strategies adopt a method of backing up different amounts of data at different times and for different purposes. The length of time required to back up data on a server increases as the amount of data on a server grows. On many systems, a large amount of data is static or changes infrequently. Finally, the costs associated with consumable media (such as tape cartridges) mean that economics force the issue of using the media in cycles. The basic backup cycle includes a complete or full backup and several incremental or differential backups. Each type of backup serves a specific need.
Full Backups
The Windows Backup Utility calls a full backup a normal backup. The full backup, as its name implies, backs up everything specified by the user performing the backup operation. A full backup can include the operating system, system state data, applications, and any other data. With a full backup, everything that is backed up has the file system archive bit reset (cleared). This allows the incremental and differential backup types to determine if the file needs to be backed up. If the bit is still clear, the other backup types know that the data has not changed. If the bit is set, the data has changed, and the file needs to be backed up.
| Note | There is a variation on the full backup type called a copy backup. This works exactly like the full backup type with one important exception: the archive bit on backed up files is not cleared. This means the subsequent full, incremental, or differential backups will not be aware that these files have been backed up. This is a useful feature if you want to perform an extra backup between other scheduled backups. Because the differential and incremental backups do not know this backup occurred, they are operationally unaffected by a copy backup. This feature is also useful when you need to get a backup of files but preserve the state of the file system. This is sometimes necessary when installing some software applications. Check the documentation for the application. |
The full backup is usually the first backup performed on a server. It takes the longest of all the backup types to complete, because it backs up all specified files regardless of the state of the archive attribute. A full backup consumes the largest amount of backup media of any backup type. Depending on the amount of information chosen to back up and the underlying backup technology involved, it may require multiple backup media to complete.
The main advantage of the full backup type is the ability to rapidly restore the data. All of the information is contained in a single backup set when this type of backup is used. The disadvantages of full backups are high media consumption and long backup times.
Figure 8.34 illustrates a series of full backups. The values listed are relative.

Figure 8.34: Full (Normal) Backup Pattern
Incremental Backups
During an incremental backup operation, all specified files have their archive bit examined. If the bit is set, the file is backed up, and then the bit is cleared. This backup type is used to back up data that has changed or been created since the last full (normal) or incremental backup. It can also be used after a copy or differential backup, but because these do not reset the archive attribute, there is no way for the incremental backup to tell which files have changed since one of those backups last ran. As a result, every file with the archive attribute set is backed up.
The incremental backup type is used between full backups. It is quick to perform, collects the least amount of data, and consumes the smallest amount of media. A complete restore, however, requires the last full backup and every incremental backup (in sequence) since the full backup was performed.
The primary benefits of using the full/incremental backup combination, as illustrated in Figure 8.35, are time and media savings. The main drawback of this combination is longer and more complex restore operations if there are long periods between full backups.
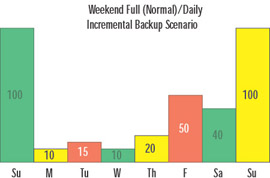
Figure 8.35: Full (Normal) Backup/Incremental Backup Pattern
Differential Backups
The differential backup type is sometimes used as a substitute for the incremental type. A differential backup collects data that has changed or been created since the last full (normal) or incremental backup, but it does not clear the archive bit on the file. It can also be used after a copy or differential backup, but as with an incremental backup, every file with the archive attribute set is backed up.
The differential backup is advantageous when you want to minimize the restoration time. A complete system restore with a full/differential backup combination, as illustrated in Figure 8.36, requires only the most recent full backup and the most recent differential backup. Differential backups start with small volumes of data after a recent full or incremental backup, but often grow in size each time, because the volume of changed data grows. This means that the time to perform a differential backup starts small but increases over time as well. In theory, if full or incremental backups are infrequent, a differential backup could end up taking as long and reaching the same volume as a full backup.
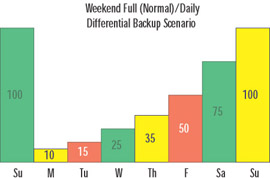
Figure 8.36: Full (Normal) Backup/Differential Backup Pattern
| Note | You may also want to use combinations of full (normal), incremental, and differential backups. For instance, if you begin with a full backup over the weekend, it might make sense to perform differential backups on Monday and Tuesday. By later in the week, the quantity of changes may be such that a differential backup cannot be performed overnight. An incremental backup on Wednesday will likely solve the problem, with differential backups continuing after that. Using this system, the restore times are still minimized, because the maximum restoration would involve tapes from the full, incremental, and one differential backup. If a failure occurred before Wednesday, it may take tapes from only the full and, possibly, a differential backup to restore the system. |
Volume Shadow Copy
EXAM 70-293 OBJECTIVE 4.5.2
More of a new feature than a backup type, Volume Shadow Copy allows you to back up all files on the system, including files that are open by applications or processes. In previous versions of Windows, the applications would need to be stopped or users logged out to allow these files to be closed and backed up using the Windows Backup Utility. With Volume Shadow Copy, these files can continue to remain in use without affecting the integrity of the backup.
This feature is enabled by default, but it may need to be disabled if data managed by some critical applications would be affected by the use of Volume Shadow Copy. The feature can be temporarily disabled by clicking the Advanced button in the Backup Utility’s Backup Job Information dialog box, as shown in Figure 8.37. Unless specified by vendor documentation, leave this feature turned on.
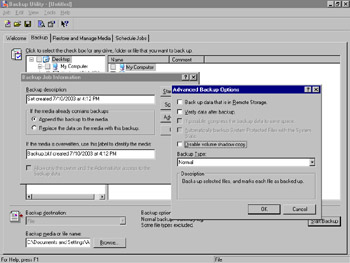
Figure 8.37: Disabling Volume Shadow Copy for a Backup
Determining What to Back Up
Because the data on your servers may be largely static, frequent backups of such data may be redundant. The corollary of this is that more dynamic data needs more frequent backups. Some types of data are structured as multiple files but must be backed up and restored as a single unit to maintain integrity. These factors and more combine to make the development of an efficient backup strategy challenging.
One of the basic techniques you can use to assist you in developing an effective backup and restore strategy is to place your data into basic categories and structure the system around them. For example, on a server that is used for file and print sharing as well as hosting a database, a good structure would be to have separate logical drives for the operating system, the shared files, the application software packages, and the databases. This allows you to easily treat each set of data differently for backup purposes, meeting the specific requirements of each type of data.
Data Backup
If you separate your data into categories, the time required to perform backups can be greatly reduced. For example, once a month, the static parts of the system (operating system and software volumes) could be backed up to tape. For the rest of the month, you can perform either incremental or differential backups. The shared file volume can follow a different schedule, depending on the rate and volume of change in the data. The volume that contains the database files may need full backups nightly in order to expedite restore procedures, and also due to the nature of the database application. It, too, can be easily backed up on a separate schedule from the rest of the system. Tailoring the behavior of backups to each type of data will speed backup and restore operations and minimize the ongoing costs associated with consumable media.
System State Data
The system state data is a special collection of key system and service information. The System State data is present on all Windows Server 2003 systems and includes the following:
-
The Registry
-
The COM+ Registration database
-
Critical boot and system files
-
Files protected by Windows File Protection
-
The AD database and logs, and the SYSVOL directory (on domain controllers)
-
The Certificate Services database (on Certificate Services servers)
-
The Cluster Services data (on cluster member servers)
-
The Internet Information Server (IIS) Metadirectory (when IIS is installed)
The System State components are designed to allow a system’s full identity to be restored, and therefore they are backed up as an entire unit. You can back up System State only locally (unless you’re using a third-party application) and restore it only to the system from which it originated.
The Restore to Alternate Location feature is available with a System State restore, but only the Registry, SYSVOL, cluster data, and boot files will be restored. The other components of System State cannot be put in an alternate location and will not be restored. The normal (and arguably best) practice is to back up the System State, boot, and system volumes together. Also, use the ASR feature, which is covered in the “Planning System Recovery with ASR” section later in this chapter.
DHCP, WINS, and DNS Databases
DHCP, WINS, and DNS are services that can be hosted by Windows Server 2003. However, each requires some amount of special treatment.
DHCP allows the automatic assignment of IP addresses to systems on the network. When installed, DHCP operates continuously and creates an automatic backup of the DHCP database in %systemroot%\System32\Dhcp\Backup. To manually back up the DHCP database, use the Action | Backup command in the DHCP utility. You should then use the Windows Backup Utility to copy this file to your backup media. To restore a DHCP database, first restore the database backup from your backup media, and then use the Action | Restore command in the DHCP utility. The DHCP service will be temporarily stopped during the restore operation.
WINS is a service that provides a method of mapping NetBIOS names to IP addresses. WINS is commonly (but not exclusively) used with older versions of Windows. WINS has a built-in backup function, but the function is not activated until you first specify a backup path for the database in the WINS administrative tool by selecting the WINS server and selecting Action | Properties, as shown in Figure 8.38.
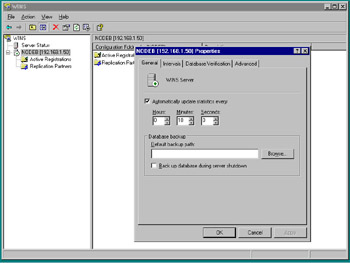
Figure 8.38: Configuring the WINS Backup Path
Once you have specified a backup directory path, WINS automatically performs a back up of the local WINS database every 24 hours. You should use the Windows Backup Utility to back up this directory to your backup media.
To restore the WINS database, you must first restore the WINS backup directory path from your backup media. Then stop the WINS service, remove all files from the WINS database path, start the WINS utility, select Action | Restore Database, and select the file from which to restore the database.
DNS is the name resolution protocol and service used to convert host names to IP addresses. AD is designed to use DNS, and Windows Server 2003 can be used as a DNS server. How DNS data is backed up and restored depends on how DNS is configured. If DNS is configured as an Active Directory-integrated zone, the DNS information is stored in the AD database. This means it is backed up and restored as part of the System State data.
If DNS is not configured as an Active Directory-integrated zone, the individual zone files are automatically backed up by the DNS service, and these files should be used for backup and restore operations. These files are stored in %systemroot%\DNS\Backup.
Cluster Disk Signatures and Partition Layouts
Some special care must be taken when backing up and restoring clustered computers. If a clustered server needs to be restored, the original disk signatures and partition structure must also be restored. This is best accomplished by using the ASR feature (covered in the “Planning System Recovery with ASR” section later in this chapter). All cluster nodes should have an ASR backup performed on them, making sure that one node has ownership of the cluster’s quorum resource when the ASR Wizard is running. In the event that clustered disks need recovery, you can use the ASR backup to restore the clustered disk partitions and disk signatures.
Using Backup Tools
The Windows Backup Utility is included in Windows Server 2003 for backing up and restoring your servers. The Backup Utility uses all of the new backup- and restore-related features of Windows Server 2003, including ASR and Volume Shadow Copy. If you are currently using a third-party backup and restore application, you may be surprised by all of the features that the Backup Utility offers in Windows Server 2003.
Using the Windows Backup Utility
The Windows Backup Utility supports three modes of operation: the Backup or Restore Wizard, Advanced Mode, and command-line operation. Each mode is meant to fit different circumstances. The Backup Utility is accessed from Start | All Programs | Accessories | System Tools | Backup. It can also be started from a command-line by typing NTBackup.exe.
Backup or Restore Wizard
The first time you start the Backup Utility, you are presented with the Backup or Restore Wizard, as shown in Figure 8.39. The purpose of the wizard is to simplify the backup or restore process by stepping you through the process, making the most common options available. The Wizard is best used for initial or manual backups on standardized hardware configurations.

Figure 8.39: The Backup or Restore Wizard
The Wizard does allow you to take advantage of some of the more advanced options, like scheduling, but these options are best configured and controlled by using Advanced Mode.
Advanced Mode
Advanced Mode is accessed by clicking the Advanced Mode link in the opening Backup or Restore Wizard window (see Figure 8.39). Advanced Mode gives you direct access to the ASR Wizard, customization options, and reporting and media management functions. If you click Advanced Mode, you are presented with the window shown in Figure 8.40.
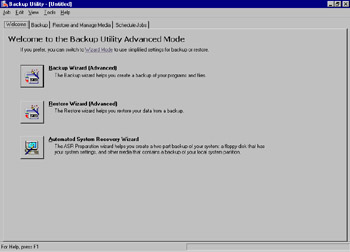
Figure 8.40: The Windows Backup Utility, Advanced Mode
Using Advanced Mode, you can predefine different backup jobs and save their settings. You can then set up schedules for these backup jobs to accommodate the needs of your organization and your data. You can also access the Report option (available from Tools | Report) to get detailed information on the backup and restore activity that has occurred on your system.
Using the Command-Line Tools
You can also run the Windows Backup Utility as part of a batch file or directly from a command prompt. Using this capability, you can integrate the Windows Backup Utility into sophisticated batch files or scripts. Most of the options available in Advanced Mode are available when using the command-line mode. However, you cannot do a restore from the command-line. Restores must be performed with the Wizard or Advanced Mode.
Selecting Backup Media
An important part of your backup and restore strategy is your choice of backup media. Many different types of media are usable by Windows Backup, and each has advantages and disadvantages. You must consider factors such as backup and restore speed, media capacity, media cost, device cost, media shelf life, and the reliability of the technology.
When analyzing these factors, take a long-term view. Technology changes rapidly, but data stays around for a long time. Examine the necessary life of your data. Accounting data usually needs to be recoverable for seven years. Data relating to legal proceedings may need to be retained for decades. Medical research data may need to be retained for centuries. No single media or technology will meet all of these requirements, but with proper planning, you can ensure that you and your successors can manage the retention of data.
Tape technology has been around for a long time. Tape lends itself very well to high-volume, long-term storage of data. Tape is the most common type of backup media used and is almost always the eventual endpoint of saved data.
The Windows Backup Utility can use any type of tape drive and tape technology supported by Windows Server 2003. When purchasing a tape drive, make sure that the operating system supports it. Choosing the type of tape drive and media can be difficult, since tape technology is widely varied and available in several different formats, capacities, and speeds. Extensive research may be required to choose a technology that matches your requirements for data volume, backup speed, and restore speed.
Scheduling Backups
You can use the Schedule Jobs tab in the Windows Backup Utility, shown in Figure 8.41, to create an automated schedule of backup jobs. You can define different types of jobs and different schedules. For example, you can define and schedule normal (full) backups every Friday starting at 6:00 p.m,. and differential backups every weeknight starting at 10:00 p.m. The jobs will automatically execute when their scheduled times occur.

Figure 8.41: Scheduling Backups with the Backup Utility
Restoring from Backup
Backing up data is important, but the objective of any backup and restore application is the successful restoration of data after it is lost or corrupted. A backup process without a restore process is useless. As with backups, knowing your data is important when attempting a restore operation. Some types of data must be restored as a unit, some data may require additional preparation or utilities for a successful restore (AD), and some data may require noting more than a place to put it (normal shared files).
As mentioned previously, you can restore files using either the Backup Utility’s Backup or Restore Wizard or Advanced Mode. The first step is to select the backup media to restore from. When using Advanced Mode, you can click the Restore and Manage Media tab to select the media, as shown in Figure 8.42. You can expand the media listing on this tab until you find the items you wish to restore, and then select those items by clicking the check box next to each item.
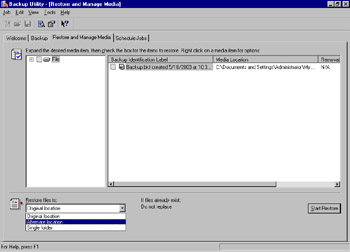
Figure 8.42: Choosing the Restore Source Media
By default, files restored from media will not overwrite existing files of the same name. You can alter this behavior by changing the restore options available on the Restore tab of the Options dialog box (accessed by selecting Tools | Options), as shown in Figure 8.43.
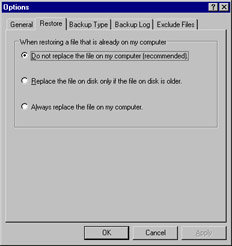
Figure 8.43: The Restore Options
When you have selected the items you wish to restore, you must determine if you want to restore them to their original locations or to an alternate location. This is determined by the setting you select in the Restore files to drop-down list on the Restore and Manage Media tab (see Figure 8.42). Once you have selected the restore options desired, click the Start Restore button to begin the restore process.
Exercise 8.02: Creating a Backup Schedule
-
Select Start | All Programs | Accessories | System Tools | Backup. In the Backup or Restore Wizard, click Next. Select Back up files and settings, as shown in Figure 8.44, and click Next.
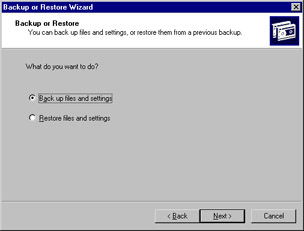
Figure 8.44: Select Backup Files and Settings -
Select Let me choose what to back up, as shown in Figure 8.45, and click Next.
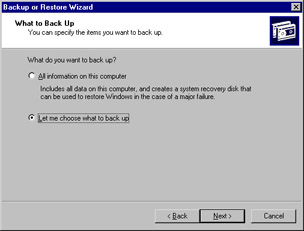
Figure 8.45: Select to Choose What to Back Up -
For this exercise, select My Documents in the Items to Back Up window, shown in Figure 8.46, and click Next.
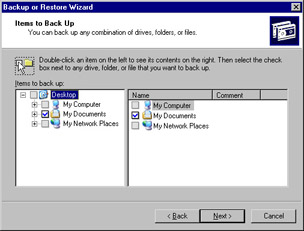
Figure 8.46: Choose Items to Back Up -
Select the destination, location, and name for your backup, and then click Next. Note that for this exercise, a file has been chosen for the destination, as shown in Figure 8.47.
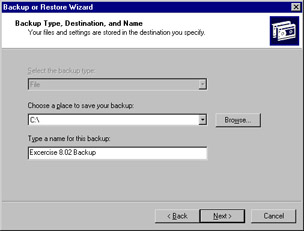
Figure 8.47: Selecting a Destination for the Backup -
In the Completing the Backup or Restore Wizard window, shown in Figure 8.48, click Advanced.
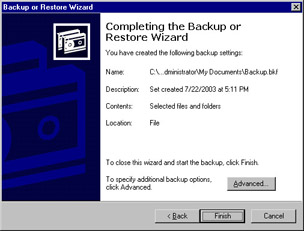
Figure 8.48: Choose Advanced to Specify Backup Options -
Select Normal as the backup type, as shown in Figure 8.49, and click Next.
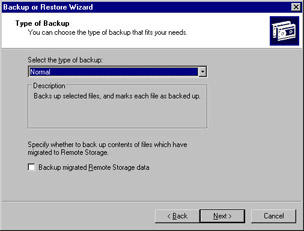
Figure 8.49: Select the Backup Type -
Make no changes in the How to Back Up window, shown in Figure 8.50, and click Next.
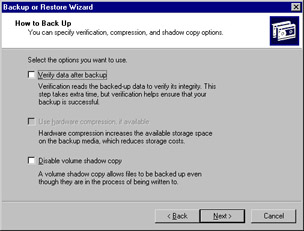
Figure 8.50: How to Back Up Options -
In the Backup Options window, select Replace the existing backups, as shown in Figure 8.51, and click Next.
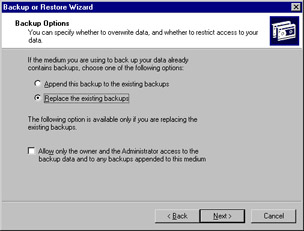
Figure 8.51: Select Backup Options -
In the When to Back Up window, select Later and enter Friday in the Job name text box, as shown in Figure 8.52. Then click the Set Schedule button.
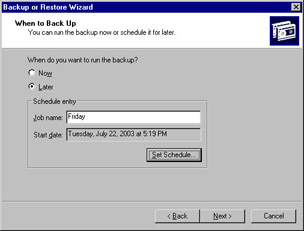
Figure 8.52: Specify When to Back Up -
In the Schedule Job dialog box, change the backup to run Weekly on Friday at 8:00PM, as shown in Figure 8.53, and click OK.
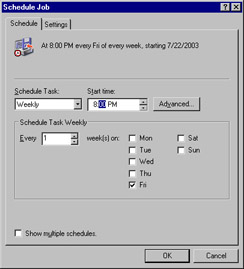
Figure 8.53: Schedule a Weekly Backup Job -
In the Set Account Information dialog box, shown in Figure 8.54, enter an account and password with sufficient permissions to perform the backup and click OK. You may be prompted for this information more than once.
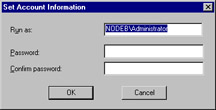
Figure 8.54: Set Account Information. -
Scheduling of the backup is now complete. Close and reopen the Backup Utility.
-
Click Advanced Mode and select the Schedule Jobs tab. You will see your scheduled backups ready to go, as shown in Figure 8.55.
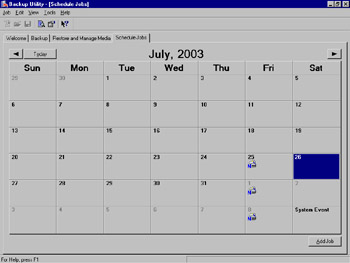
Figure 8.55: View Scheduled Backups in Advanced Mode
|
EAN: 2147483647
Pages: 173
- The Second Wave ERP Market: An Australian Viewpoint
- Distributed Data Warehouse for Geo-spatial Services
- Data Mining for Business Process Reengineering
- Intrinsic and Contextual Data Quality: The Effect of Media and Personal Involvement
- Relevance and Micro-Relevance for the Professional as Determinants of IT-Diffusion and IT-Use in Healthcare