Adding Rules
|
The Policy Editor is the main interface for all your firewall needs. This is where we have been working to add objects, but it is also the interface to define rules. In the next few sections, we'll show briefly how the Policy Editor can be used to put your network objects into play in the form of firewall rules.
Rules
FW-1, like most firewalls, is designed to enforce a set of rules, known as a rule base. This rule base defines the behavior of the firewall, and is configured by you, the firewall administrator. It is dreadfully important that you carefully consider the underlying needs, related to both security and functionality, and make a measured application of both. You'll probably never be able to strike a perfect balance, but the closer you come, the easier your life will be. Fundamentally, there are two models of firewall configuration. The first considers all traffic to be suspect, and only allows what is necessary (blocking all not explicitly allowed). The second model is far more permissive, allowing all traffic that has not proven to be risky (allowing everything except what is explicitly denied). Which model you subscribe to is a decision that must be made at the policy level. Your firewall will be a technical implementation of that policy.
A rule is made up by the combination of source, destination, action, tracking information, enforcement location, enforcement time, and an optional (but highly recommended) time fields. These fields are explained in the next few sections, along with the methods used to create them.
Adding rules in FW-1 is very straightforward. There are a few choices about rule placement you have to decide upon when adding a new rule. When you select Rules | Add Rule you'll see a submenu with the following choices.
-
Bottom After the last rule in the rulebase.
-
Top Before the first rule in the rulebase.
-
After After the currently selected rule.
-
Before Before the currently selected rule.
After you insert the new rule, it will resemble the one shown in Figure 13.30. You will need to configure the specifics of each rule. In each field of the new rule, right-click to enter the necessary information.
![]()
Figure 13.30: New Rule
Source
The source field defines the IP address or hostname that is initiating the data stream. For the sake of your rule base, the source can be any of the properly defined network objects, as well as users or groups of users. When adding a source, you have the choice of adding an object or adding user access. You are not restricted in the number of sources for a rule.
Destination
The destination can be any defined network object. When you right-click in the Destination field and select Add, you'll see a window similar to that shown in Figure 13.31. Note that a rule can support multiple destinations.
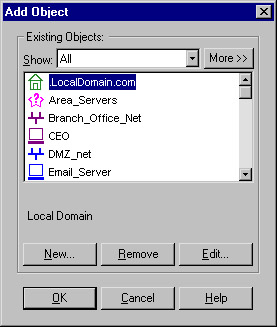
Figure 13.31: Add Object
Service
The service field defines the service that must be present in order to generate a match. To add a service, right-click in the Service field and select Add. You will have the choice of adding a service, or a service with a resource. You can define any number of services for a rule.
Action
The action is the way that FW-1 reacts when a rule is matched. You have a couple of choices when selecting an action, but only one selection is allowed. The available options are the following:
-
Accept Accept the packet; allow the connection.
-
Reject Reject the connection and notify the sender of the condition.
-
Drop Reject the connection, but do not notify the sender.
-
User Authentication Use User Authentication for this connection.
-
Client Authentication Use Client Authentication for this connection.
-
Session Authentication Use Session Authentication for this connection.
-
Encrypt Encrypt outgoing packets; decrypt incoming packets.
-
Client Encryption Accept only if this connection originates from a SecuRemote client.
Track
The Track column defines how information about this session will be recorded. There are several options in the menu when you right-click on this field.
-
Log Write a log entry regarding this connection.
-
Account Write an accounting log entry regarding this connection.
-
Alert Generate a pop-up alert regarding this connection.
-
Mail Send a mail regarding this connection.
-
SnmpTrap Generate an SNMP trap based on this connection.
-
User-Defined Execute the user-defined script as a result of this connection.
Install On
The Install On field defines which defined objects will have this policy installed on them. Although the entire policy is installed on each selected object, these objects only enforce the part of the policy that is relevant to them. If no rules are relevant, then no communication will be allowed.
-
Enforce on all network objects defined as gateways.
-
Enforce on the specified target object(s) only, in the inbound and outbound directions.
-
Enforce in the inbound direction on the firewalled network objects defined as Destination in this rule.
-
Enforce in the outbound direction on the firewalled network objects defined as Source in this rule.
-
Enforce on all OSE devices.
-
Enforce on all embedded devices.
Time
In this field, use a time object to restrict the connection to certain specified intervals, or leave the default of Any.
Comment
This field is used to describe the rule, its purpose, and its functionality. It is highly recommended that you do not leave this field blank!
|
EAN: 2147483647
Pages: 240
- Chapter III Two Models of Online Patronage: Why Do Consumers Shop on the Internet?
- Chapter VIII Personalization Systems and Their Deployment as Web Site Interface Design Decisions
- Chapter IX Extrinsic Plus Intrinsic Human Factors Influencing the Web Usage
- Chapter XII Web Design and E-Commerce
- Chapter XV Customer Trust in Online Commerce