Configuring Static Routes
|
Almost all administrators need to add static routes into their network, unless they happen to have a very simplified LAN configuration. Nokia makes it very easy to add routes through the Voyager Web interface. Start by clicking Config, and then click Static Routes under the Routing Configuration heading. Here you have two options for adding routes:
-
You can add routes one by one.
-
You can compile a list of routes and aggregates to add one per line.
You should already have a default route in your Static Routes configuration if you set this up earlier. To add a single route to the system, fill in the destination network in the New static route text box. Also enter the Mask length, Next Hop Type, and Gateway Type fields. Click Apply and then fill in the Gateway Address (the next-hop router address), click Apply, and then click Save.
To add a list of routes at one time, enter routes in the large text box labeled Quick-add static routes. The syntax of the routes added here is to have one route per line with a new line at the end of each statement. The statement should include the destination network, mask length, and next-hop router. After you fill in the networks you want to add, click Apply and then click Save. The routes will be added as shown in Figure 20.13:
Example:<destination network>/<mask> <gateway> 172.16.0.0/16 10.10.10.1 172.18.0.0/16 10.10.10.1 192.168.100.0/23 10.10.10.1 192.168.103.0/24 10.10.10.1 10.0.0.0/8 10.10.10.1
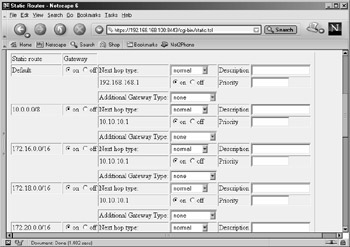
Figure 20.13: Static Routes Display
| Note | You can add and view routes in CLISH as follows: To delete the route, use the same command, but change the last word to off instead of on. |
Once the routes are configured, you can perform maintenance on them through this same configuration screen. You can delete a route by clicking off next to the network address and then clicking Apply and Save. You can change a gateway address for a route by clicking off next to the gateway address, clicking Apply, then selecting address for the Gateway Type, then clicking Apply again. Finally, fill in the gateway IP address and click Apply and then Save. You also have the option of writing in a description and/or a priority for each route. To verify that the routing table on the system matches what you see in Voyager, log in and use one of the following options:
-
Type netstat –rn.
-
Type iclid, then type show route and press Enter.
-
Type clish, then type show route all and press Enter.
|
EAN: 2147483647
Pages: 240