System Backup and Restore
|
As a systems administrator, you already know the importance of having a good system backup procedure and disaster recovery plan in place should you need to restore important data for your organization. Your Nokias will most likely be some of the most important machines in your network since they are usually placed at key points, so you will want to ensure that you are getting backups regularly and that you know how to restore the system if you need to. In this chapter we show you the utilities available to back up and restore your NSP.
Configuration Sets
Using the Configuration Set Management tool in Voyager, you can make changes to the files that store your current Voyager configuration parameters. The default configuration database is stored in the file /config/db/initial, and a symbolic link file, /config/active, points to this database. Voyager always loads whichever file the /config/active link is associated with. You can use this tool to change that association or to simply make a backup of the current configuration. You also have the option of deleting past configuration sets from this screen.
Follow these steps to make a backup configuration database:
-
Log in to Voyager and click Config.
-
Click Manage Configuration Sets under the System Configuration heading.
-
In the Save current state to new configuration database field, type a new name for the current configuration set. In our example, we use the date so we can remember when we made this backup—config09082002 (see Figure 20.14).

Figure 20.14: Managing Configuration Sets -
Click Apply.
-
Now your current config will be listed as config09082002, and the active file will now have a symbolic link to this new configuration file. If you only want to make a backup of your existing configuration and do not want it to be the active config, you need to change it back to initial. Do this by selecting the option button next to the initial database name.
-
Click Apply.
Making Backups
Using the option described in the preceding section, you can save the Voyager settings, but what about backing up the system? The Voyager configuration doesn't include anything from our /var/admin directory or package configuration, such as Check Point FireWall-1. Is there an option for making a full backup?
Yes, the Nokia has a Backup and Restore utility, which allows you to make a default system backup (system files only) and gives you the option to back up home directories and package configuration as well. This backup procedure simply creates a gzipped tarball of all the files you specify on the local system in /var/backup. Therefore, you will want to ensure that you have ample disk space on this partition before you begin the process:
-
Log in to Voyager and click Config.
-
Select the link for Backup and Restore under the System Configuration heading. This will bring you to the screen shown in Figure 20.15.
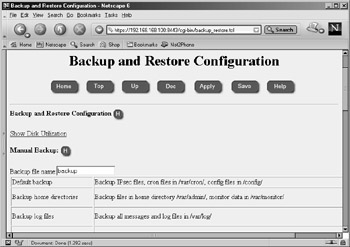
Figure 20.15: Backup Configuration -
Enter a filename such as backup in the section marked Backup file name. The system will automatically add the current date to the filename, so if you include the date, the filename will be redundant.
-
System files will be backed up by default, including any IPsec files, cron config, and your /config directory. Now you must select from the list of other backup options. This list could be different for you depending on which packages you have in your active configuration. You need to toggle the option button next to each of these options to Yes if you want to back up any of the items in the list that follows. For our example, we select home directories and FireWall-1 NG FP2. These are all set to No by default:
-
Back up home directories (/var/admin and /var/monitor) Yes
-
Back up log files (/var/log) No
-
Back up /opt/CPfw1-50-02 (Check Point VPN-1/FireWall-1 NG Feature Pack 2) Yes
-
Back up /opt/CPshared-50-02 (Check Point SVN Foundation NG Feature Pack 2) No
-
Back up /opt/ISS (RealSecure network intrusion detection system Version 6.5) No
-
-
Click Apply. You will see the following message on the top of the Voyager screen: Backup /var/backup/backup_20020908.tgz is running in the background.
-
When the process is complete, you will see the file in /var/backup as follows:
-rw-r--r-- 1 root wheel 136969567 Sep 8 12:19 backup_20020908.tgz
You need to refresh the page to see the backup archive listed on the screen. Click Up and then click Backup and Restore under the System Configuration heading.
-
Click Save.
| Warning | There is a problem with backing up the Check Point FireWall-1 NG FP1 and FP2 packages on IPSO. In FP1, the backup scripts are not present, but you can download a patch that will allow you to make a backup of the Check Point FireWall-1 package only. You can obtain the patch from Nokia by referencing Resolution #10405. You will still need to back up the SVN Foundation manually. In FP2, the scripts are there, but the SVN Foundation script is corrupt. In order to correct this problem, follow the instructions provided in Nokia Resolution #13387. |
Now that you have a backup of system files, you might want to FTP or SCP it off the Nokia to another system for safekeeping. You can use FTP to accomplish this task from within this same screen in Voyager. Scroll down to where it says Remote Transfer Archive File and fill in the FTP site information, then choose the backup file that you want to transfer. When you're done, click Apply and you will see the following message:
Remote Transfer: the ftp is running in the background. the file transfer might fail, please check /var/log/messages for the status of the transfer.
This process could take a while because the file is quite large, mostly because we backed up package configuration information. If we had backed up the default files only, the file size would be considerably smaller, as shown in the following output:
-rw-r--r-- 1 root wheel 67878 Sep 8 12:31 defaultonly_20020908.tgz
| Note | When making a backup with CLISH, use the following commands: |
Now you might be asking, "can I schedule regular backups of my Nokia system?" The answer is yes. Starting with IPSO 3.5, the ability to schedule backups is built into Voyager with the use of cron, which is discussed in detail a little later in this chapter. To schedule a regular backup, scroll down to the section labeled Scheduled Backup on the Backup and Restore Configuration screen and select from the pull-down menu one of the following: None (default), Daily, Weekly, or Monthly. See Figure 20.16, where we selected Monthly and then clicked Apply. Now you are able to select the date, hour, minute, and filename for the monthly backup, as well as the files that you had to choose from when doing a manual backup earlier. When you are finished making your selections, click Apply and then click Save. The files will be backed up to /var/backup/sched and will be time-stamped. The configuration you specify will be entered into the /etc/crontab file.
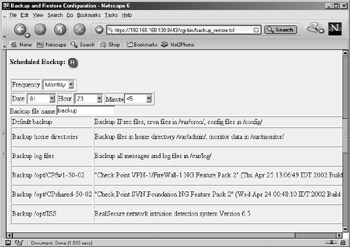
Figure 20.16: Scheduling Backups
You might want to delete backup files from /var/backup occasionally as well, and you can do that by scrolling down to the very bottom of the Backup and Restore Configuration screen. Simply click the delete option button next to the backup filename that you want to remove, and then click Apply (see Figure 20.17).
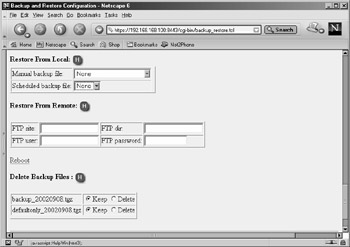
Figure 20.17: Restore from Backup
Restoring Backups
You can restore a backup by either using a backup file on the local system in /var/backup or by using FTP to retrieve the backup file off a remote FTP server. If you are restoring a configuration from one Nokia to another, ensure that you have IPSO loaded and the software packages installed before you begin to restore the configuration files. You should also make sure that you are using the same version of IPSO and the same software package versions that you were using on the system from which you initially took the backup. Follow these steps to restore a backup from a local file:
-
Ensure that the file you want to restore from is in the /var/backup directory.
-
Log in to Voyager and click Config.
-
Click Backup and Restore under the System Configuration heading.
-
Scroll down to the Restore From Local: section (as shown in Figure 20.17) and select the backup file you want to restore from either the Manual backup file: or the Scheduled backup file: pull-down window.
-
Click Apply and then click Save.
-
Click the Reboot link on the same page.
-
Click the Reboot icon and the system will be rebooted with the new configuration.
| Note | To restore a backup through CLISH, use the following command: |
|
EAN: 2147483647
Pages: 240