Viewing an Individual Picture and Its Comments
| The final page left to implement is PhotoDetail.aspx. When users click the View link in the PhotoAlbum.aspx page, they are taken to this page, where the picture and its comments are shown. Anonymous users may view the picture's comments, but only authenticated users may leave a comment. In the PhotoAlbum.aspx page we saw how to retrieve and display all pictures belonging to a particular user whose information was passed through the querystring. Rather than displaying all pictures, in PhotoAlbum.aspx we need to return information only about the picture whose PictureID value equals the ID value passed through the querystring. To accomplish this, start by adding a SqlDataSource control to the page and set its ID property to pictureDataSource. Next, configure the wizard so that the PictureID, Title, and Description columns are returned from the Pictures table. Add a filter expression so that only the record whose PictureID value matches the ID querystring value is returned (see Figure 24.19). Figure 24.19. Return the one record whose PictureID value matches the ID querystring value.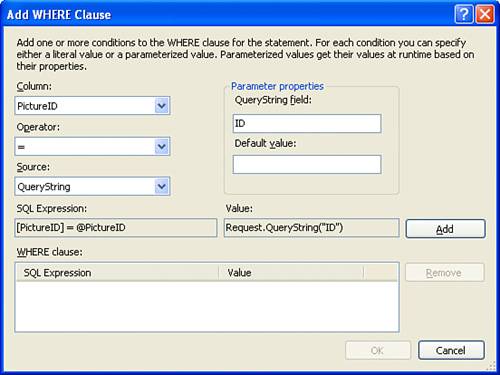 After the pictureDataSource SqlDataSource has been configured, drag and drop a DetailsView control from the Toolbox onto the page and bind it to the SqlDataSource just added. This will add three BoundFields, one for each column returned by the SqlDataSource control. From the DetailsView's smart tag, click on the Edit Fields link and remove the PictureID BoundField, replacing it with an ImageField. Next, set the ImageField's DataImageUrlField and DataImageUrlFormatString properties to PictureID and ~/UploadedImages/{0}.jpg, respectively.
After these steps, take a moment to view the page through a browser. Figure 24.20 shows PhotoDetails.aspx when viewing the Blue Hills photo in Jisun's photo album. Figure 24.20. The title, description, and picture of the Blue Hills are displayed.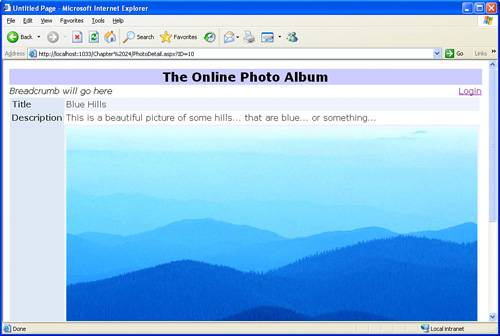 Allowing Authenticated Users to Add CommentsWhen an authenticated user views a particular picture, she should be able to leave a comment. A comment consists of a subject, a body, and the date and time the comment was made. Furthermore, a comment is associated with both a userthe person who made the commentand a particular picture. The user making the comment will be able to enter both the subject and body of the comment through the ASP.NET page, but the comment's date and time, UserId, and PictureID values will be set programmatically, much like when adding a new picture to a photo album in the PhotoAdmin/Default.aspx page. Because only authenticated users can leave comments, start by adding a LoginView control beneath the DetailsView added a moment ago. When an anonymous user visits this page, let's display the message "Only logged in users can leave comments", along with a link to the login page. Enter this message into the AnonymousTemplate; for the login link, add a LoginStatus control. Next, we need to add a SqlDataSource control that will retrieve the comments for the picture being viewed as well as provide capabilities for adding comments. Put this SqlDataSource outside the LoginView control because comments are viewable by both anonymous and authenticated users. Set this SqlDataSource control's ID property to commentsDataSource and configure the control to return all columns from the Comments table: CommentID, UserId, PictureID, Subject, Body, and CommentMadeOn. Add a filter expression on PictureID so that only the current picture's comments are returned (see Figure 24.19) and add an ORDER BY clause so that the results are sorted by CommentMadeOn in descending order. Click the Advanced button and check the Generate INSERT, UPDATE, and DELETE Statements check box. Finally, take a moment to go to the Source view and remove the Type="Object" attribute from the UserId INSERT parameter. Next, add a DetailsView control to the LoggedInTemplate, set its ID to dvAddComment, and bind it to the commentsDataSource control. Configure the interface for adding new comments by performing the following steps:
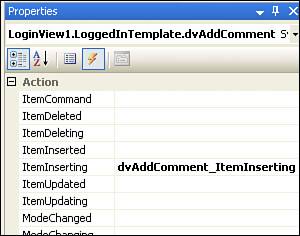
At this point the DetailsView control's user interface has been set up to correctly collect the subject and body of the user's comment. All that remains at this point is to programmatically set the UserId, PictureID, and CommentMadeOn values before the actual INSERT statement is sent to the database. As we saw in the photo administration page, the DetailsView control's ItemInserting event fires right before the INSERT statement is issued; an event handler for this event can programmatically set the values used in the INSERT statement. Creating an Event Handler for a Nested ControlIn Hour 7, "Working with Objects in Visual Basic," we saw how to create event handlers with Visual Web Developer: From the code portion, simply select the control from the left drop-down list and its event from the right drop-down list. Unfortunately, this technique cannot be used when working with controls that are nested within another control because the left drop-down list contains only non-nested controls. A nested control is a control that resides within the template of another control. In PhotoDetails.aspx, the dvAddComment DetailsView, for which we need to create an event handler for its ItemInserting event, is nested within a LoginView control. To create event handlers for nested controls, we need to use the following steps:
After you complete these steps, an event handler will be added to the source code portion of the page. However, the event handler syntax lacks the Handles controlID.Event syntax that is present when you create an event handler through the drop-down lists. To see the difference, go to the photo administration page and note the ItemInserting event handler for the dvCategoriesInsert DetailsView:
When you add the ItemInserting event handler for the dvAddComment DetailsView, the Handles statement is not present:
As discussed in Hour 7, the Handles statement is what associates a particular control's event with a particular event handler. You may be wondering, then, how the event handler dvAddComments_ItemInserting is associated with the dvAddComments control's ItemInserting event. When you add an event handler through the Properties window, the event is tied to the control through the declarative HTML portion. If you go to the page's Source view, the DetailsView's declarative markup has been altered to include an attribute titled OnItemInserting="dvAddComments_ItemInserting": <asp:DetailsView runat="server" OnItemInserting="dvAddComment_ItemInserting" ...> ... </asp:DetailsView> This attribute associates the control's event with the event handler. More generally, the syntax is as follows: OnEventName="EventHandler" Setting the INSERTed Values ProgrammaticallyThe ItemInserting event handler needs to programmatically set the UserId, PictureID, and CommentMadeOn values being inserted into the Comments table. To accomplish this, use the following three lines of code: e.Values("UserId") = Membership.GetUser().ProviderUserKey e.Values("PictureID") = Request.QueryString("ID") e.Values("CommentMadeOn") = DateTime.Now The first line of code sets the UserId value to the currently logged-on user's UserId; the second line of code assigns the ID value in the querystring to PictureID; the third and final line sets the CommentMadeOn field to the current date and time. After you add these lines of code to the event handler, take a moment to add a new comment to a given picture. If you visit the page as an anonymous user, you should see a message instructing you to log on. When you are authenticated, you should see two text boxes for the subject and body. Go ahead and enter a comment. At this point we've yet to complete the user interface for displaying added comments, so you won't see the comment on the web page. However, you should see the added comment when viewing the contents of the Comments table through Visual Web Developer.
Displaying CommentsWith the user interface for adding comments complete, all that remains for this page is displaying the existing comments. To display the appropriate comments, we just need to add a GridView control and bind it to the commentsDataSource control. Because both anonymous and authenticated users can view a picture's comments, add the GridView beneath the LoginView control. Configure the GridView so that it supports paging and sorting; then edit its fields, removing all but the Subject, Body, and CommentMadeOn BoundFields. Finally, customize the CommentMadeOn BoundField, changing its HeaderText property to Date. Figure 24.22 shows the two comments that have been left for the Blue Hills picture in Jisun's photo album. Figure 24.22. The picture's comments are shown at the bottom of the page.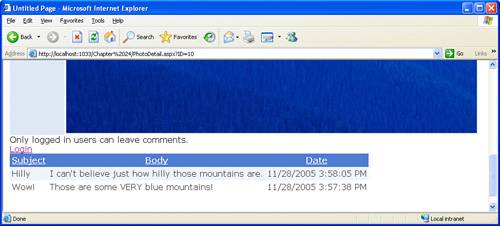 |
EAN: 2147483647
Pages: 233
- Structures, Processes and Relational Mechanisms for IT Governance
- An Emerging Strategy for E-Business IT Governance
- Assessing Business-IT Alignment Maturity
- Linking the IT Balanced Scorecard to the Business Objectives at a Major Canadian Financial Group
- Measuring ROI in E-Commerce Applications: Analysis to Action