Partitioning the Application into Manageable Tasks
| If you have never worked on a decent-sized software application, you may be experiencing a plethora of emotions regarding the work that lies ahead of us. You may be a bit excited because this will be your first opportunity to create a fully functional, real-world ASP.NET application. You may also be a bit anxious because there is a good deal of work ahead, and only this hour and the next with which to complete it! At this point there is one very large task on our plate: "Create the photo album website." In life, whenever you are faced with a task that seems overwhelming, break it down into smaller, more manageable tasks. As those who have had experience creating software applications know, this pearl of wisdom rings even more true when it comes to software development. When breaking down a complicated step into many smaller steps, I find it helpful to break down the task into just one step and then implement that substep before breaking down tasks any further. For example, you might start breaking up the "Create the photo album task" into steps like "Create the home page," "Create the login page," "Create the photo album page," and so on. Then, rather than actually creating these ASP.NET pages, you may try to break down the task to another level. The "Create the home page" task can be broken down into "Displaying a welcome message" and "Showing the list of users who have photo albums." The "Showing the list of users who have photo albums" task can then be further broken down into "Use a SqlDataSource control to get the list of users in the database" and "Use a GridView control to list these users, with a link to the users' albums" tasks. At this point, however, you're likely to soon feel overwhelmed again because the list of to-do items keeps growing. Instead, break down each step into substeps and then implement those substeps. In our example that would mean after breaking "Create the photo album task" into steps like "Create the home page," "Create the login page," and so on, we would actually create the web pages. Granted, these pages would not have any real functionality in them at this point, but implementing the substeps before drilling down further in any other step helps keep the list of steps on our plate at sensible levels. When you're creating ASP.NET web applications, the implementation process typically adheres to the following pattern:
Although step 4 is written here as a single step, it may involve a large number of substeps, depending on the complexity of the page being implemented. In this hour we will start by proceeding through the first three steps. Following that, we'll implement a number of the site's pages, wrapping up the entire project by the end of the next hour.
Adding a Simple Master PageAs we discussed in Hour 21, "Using Master Pages to Provide Sitewide Page Templates," the first step to take when creating a multipage ASP.NET site is to create a master page. With the master page in place, we can start creating the individual web pages in the site. This initial master page need not be perfect and can later be modified. The idea is to get a master page created right off the bat because it's much easier to create a new page that inherits from a master page than to take an existing page and configure it to use a master page. Therefore, our first step is to create a master page. Feel free to have your master page's look and feel be unique to your tastes, but do make certain that, at minimum, you have a ContentPlaceHolder control, a place to put a SiteMapPath control, and a place to put a LoginView control. As Figure 23.1 shows, my master page consists of a three-row table. The first row spans two columns, has a purple background, and displays the title of the website. The second row has two columns. The left column will eventually hold a SiteMapPath control; for now, I've just put the text Breadcrumb will go here. The right column will eventually contain a LoginView control that will display a Login link for anonymous users and a personalized message for authenticated users. For now, though, I've just put in the text Login information will go here. The bottom rowwhich, like the top row, spans two columnscontains the master page's sole ContentPlaceHolder control. Figure 23.1. Start by creating your site's master page.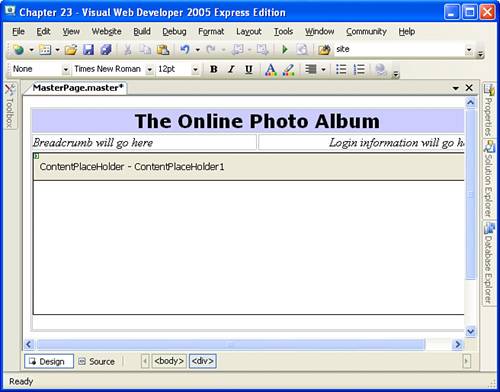 Creating the Dummy Web PagesWhen you have the master page in place, the next step is to identify and create the site's web pages, having them inherit the master page we just created. Our site needs the following pages:
For the photo album administration pages, first create a folder named PhotoAdmin and then add to that folder the files Default.aspx and ManageCategories.aspx; all other pages should be added to the website's root directory.
As we discussed earlier, at this point we're not worried about adding any functionality to these pages. We'll come back to these pages one at a time and add the necessary functionality; for now, we just want to focus on doing one task at a time. Rather than leaving these new pages without any content at all, I usually place the name of the page in the Content region. At this point we have tackled the first three steps for creating the photo album application. Congratulations! We are now ready to actually implement the site's web pages. |
EAN: 2147483647
Pages: 233