An Overview of Data Web Controls
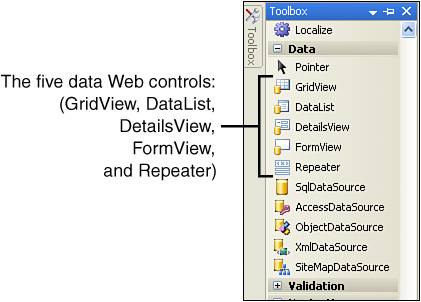
| ASP.NET contains a number of Web controls whose sole purpose is to display data from a data source control. These controls, which I call data Web controls, can be found in the Data region of the Toolbox above the data source controls. As Figure 15.1 shows, there are five data Web controls: GridView, DataList, DetailsView, FormView, and Repeater. In this hour we will be examining only two of these data Web controlsthe GridView and the DetailsView. Figure 15.1. The Visual Web Developer Toolbox contains a number of data Web controls.
To display data with a data Web control, we need a populated data source control, such as the SqlDataSource control. After this data source control has been added to the page and configured, displaying its data through a data Web control is a cinch: Simply drag the appropriate data Web control onto the ASP.NET page and, through its smart tag, specify the data source control to use. That's it! To illustrate the simplicity in displaying data in an ASP.NET page, let's take the AccessingData.aspx page from the preceding hour and enhance it by adding a GridView control. (Recall that the AccessingData.aspx page has two SqlDataSource controls: one that returns all records and columns in the Books table and one that returns only those books whose BookID is less than or equal to 3 and was published in 2005.) Start by bringing up this page and going to the Design view. Next, drag on a GridView control from the Toolbox's Data section. The GridView, which we'll be examining in much greater detail later in this hour as well as next hour, displays the data in the data source control in a grid. After you add the GridView to your page's Design view, your screen should look similar to Figure 15.2. Figure 15.2. A GridView has been added to the page.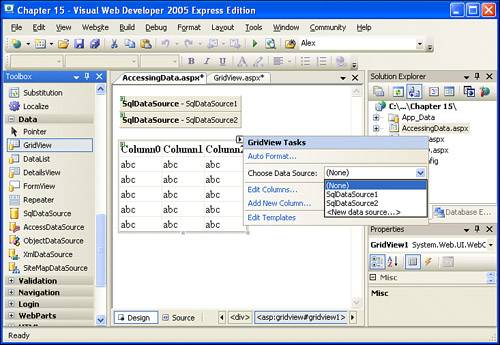 By default, the GridView shows up as a five-row grid in the Design view with generic field names Column0, Column1, and Column2. This is how the GridView appears in Visual Web Developer when there is no data source associated with it.
Assigning a data source control to the GridView is easy. In the smart tag there's a Choose Data Source task with a drop-down list that contains the data source controls on the page. Simply select the data source control whose contents you want to display in the GridView. After you make a selection, the GridView's field structure will be updated to mirror the columns in the data source control. Go ahead and select SqlDataSource1 as the GridView's data source. When you make this selection, the GridView's appearance in the Design view will be updated to reflect the columns returned by SqlDataSource1, as Figure 15.3 shows. Figure 15.3. SqlDataSource1 has been assigned as the GridView's data source control.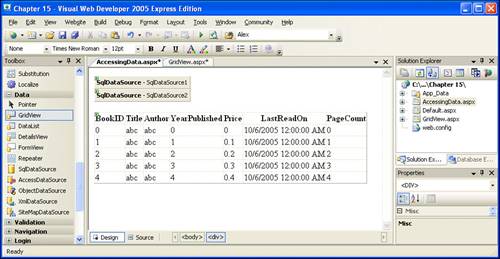
Congratulations, you now have an ASP.NET page that displays the contents of the query executed by SqlDataSource1. Take a moment to view the ASP.NET page in a browser (go to the Debug menu and choose Start Without Debugging). You should see a grid in your browser with a row for each of the five books in the Books table (see Figure 15.4). Figure 15.4. The contents of the Books table are displayed through an ASP.NET page.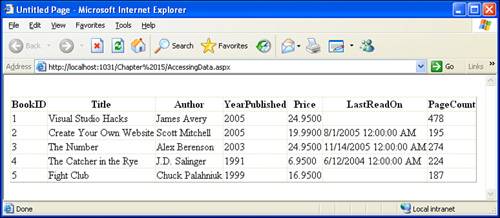
The output in Figure 15.4 is hardly ideal; it lacks any attractive fonts or colors, displays the columns in the order in which they were returned from the data source control, and applies no cell-level formatting. (For example, the LastReadOn value unnecessarily includes the time; the Price value does not include a currency symbol and has four decimal places rather than the typical two.) Don't worry, though, we'll look at how to customize the GridView later in this hour. For now, take note of the process for displaying data on an ASP.NET page. The first step is to add the data source control that retrieves the appropriate subset of data. Following that, we'll add a data Web control and, through its smart tag, specify what data source to use. Although our example in this section used the GridView, the process for associating a data source control with other data Web controls is identical. |
EAN: 2147483647
Pages: 233
- Chapter V Consumer Complaint Behavior in the Online Environment
- Chapter VIII Personalization Systems and Their Deployment as Web Site Interface Design Decisions
- Chapter XI User Satisfaction with Web Portals: An Empirical Study
- Chapter XIV Product Catalog and Shopping Cart Effective Design
- Chapter XV Customer Trust in Online Commerce