Delving into the SQL SELECT Statement
Delving into the SQL SELECT StatementWe use the SQL SELECT statement to retrieve the values of a particular database table's columns via the following syntax: SELECT Column1, Column2, ..., ColumnN FROM TableName Column1 ... ColumnN are columns from the database table TableName. For example, to retrieve the values from the Title and Author columns from the Books table, we would use the following SQL statement: SELECT Title, Author FROM Books Note that this SELECT statement contains two clauses: the SELECT clause and the FROM clause. Clauses are keywords in the SQL SELECT statement that precede the data they operate on. The two required clauses in a SELECT statement are the SELECT and FROM clauses. As you have probably already ascertained, the SELECT clause specifies the columns whose values are to be returned and the FROM clause specifies what database table to retrieve data from.
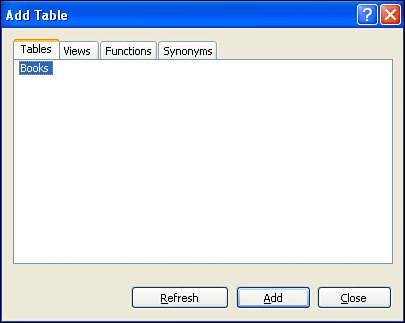
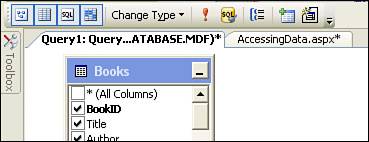
Viewing SQL Queries Results in Visual Web DeveloperWhen you're learning SQL, it helps to be able to run a SQL query against a database so that you can see the specific results returned by the SQL query. Fortunately, Visual Web Developer makes this task quite simple. In fact, Visual Web Developer even can assist with building the SQL query itself! As we saw in the preceding hour, the Database Explorer window lists the databases used in the current ASP.NET website. Take a moment to go to the Database Explorer, right-click on the database name, and choose the New Query option from the context menu. This will display the query window, which first prompts you to select what tables you'd like to query. Because our database has only one tableBooksthis is the only option you'll see listed (see Figure 14.7). Figure 14.7. Select what table(s) you want to query. Select the Books table and click the Add button; this will add the table to the query window. After adding the Books table, click the Close button in the dialog box. At this point your screen should look similar to Figure 14.8. Figure 14.8. Create and run a query from the query window.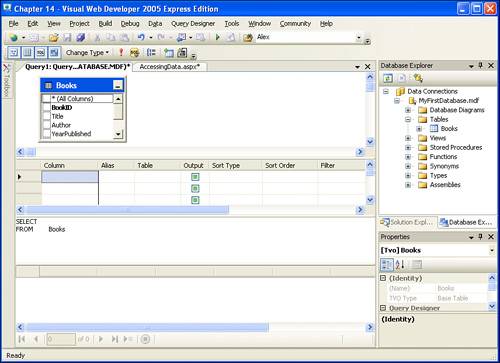 By default, the query window contains four regions:
The first three panes work together, in a sense. For example, if you check a subset of columns in the Books table representation in the diagram pane and then execute the query, the criteria pane and SQL pane will be updated accordingly. Likewise, if you write a SQL query by hand in the SQL pane and then execute the query, the diagram pane and criteria pane will be updated. The results pane merely shows the results of the executed query, regardless of what pane was used to express the query. Along the top of the query window are a series of icons that are especially useful (see Figure 14.9). Starting from the left, the first four icons toggle what panes are displayed. You can show or hide the panes you don't use. (Personally, I like to enter my SQL queries by hand, so I turn off the diagram and criteria panes.) Next is the Change Type icon, from where you can specify what type of SQL query you are interested in running (SELECT, INSERT, UPDATE, or DELETE). Next to that is the red exclamation point icon. This icon, when clicked, executes the query and displays the results in the results pane. The next icon, when clicked, validates the SQL query syntax, informing you of any syntax errors in your SQL query. The remaining icons are for functionality that's beyond the scope of this book. Figure 14.9. The Toolbar icons can be used to customize the query window. Let's practice using the query window. Go ahead and type into the SQL pane the following query: SELECT * FROM Books Next, click the red exclamation point icon in the Toolbar to execute the query. At this point the diagram and criteria panes should update to reflect the SQL query entered in the SQL pane, and the results should be shown in the results pane. Figure 14.10 shows the query window after this SELECT statement was executed. Figure 14.10. The results of the SQL query are displayed in the results pane.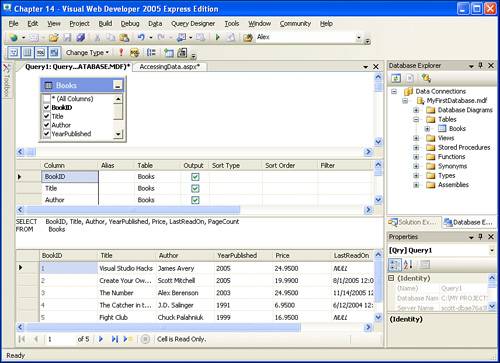
One thing to note is that at times the query engine will rewrite your SQL queries. I typed in SELECT * FROM Books as my query, but the query was rewritten to SELECT BookID, Title, Author, YearPublished, Price, LastReadOn, PageCount FROM Books Of course, this query and my query are identical in their results. Also, note that the results in the results pane are identical to the results we saw in the Test Query step of the SqlDataSource control's wizard in Figure 14.6. Let's try executing another SELECT statement. Change the SQL query in the SQL pane from SELECT * FROM Books to SELECT Title, Author FROM Books This SQL query will return all of the rows from the Books table, displaying the values for the Title and Author columns. After you have entered this query into the text box, execute the query; the results are shown in Figure 14.11. Notice how the diagram and criteria panes have been updated to reflect the new SQL query and how the results pane has only two columns returned instead of seven. Figure 14.11. The SQL query returns the values for two columns.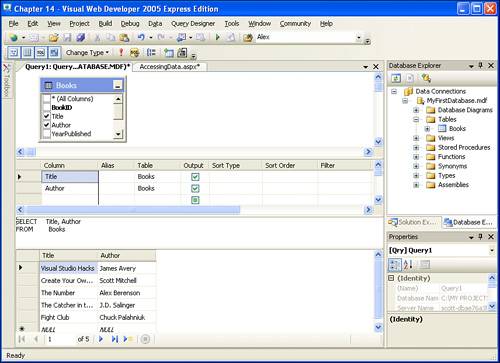 Restricting Returned Rows Using the WHERE ClauseThe SELECT statement, when composed of just the SELECT and FROM clauses, returns all of the rows of the specified database table. For example, the SQL query results shown in Figures 14.10 and 14.11 display all of the rows in the Books table, the only difference between the two results being the columns whose values are returned. Often, when querying database data, we are not interested in all of the data in a table, but only a subset. For example, when you are searching Amazon.com for books on ASP.NET, the search results page lists only those books that match your search criteria rather than all of the books in Amazon.com's database. To limit the rows returned by the SELECT statement, we use the WHERE clause. The WHERE clause specifies conditions that a row must match in order to be returned by the SELECT statement. For example, the following SQL SELECT statement returns only those rows in which the Title column's value equals The Number: SELECT * FROM Books WHERE Title = 'The Number' Go ahead and enter this query into the text box of the Test Query dialog box and click the Test Query button. The results should show all of the columns of the Books table, but only one rowthe book The Number.
As you can see, the WHERE clause has a Boolean condition preceding it: Title = 'The Number'. The = operator here is synonymous with the = operator in Visual Basic, which we examined in Hour 5, "Understanding Visual Basic's Variables and Operators." In addition to the = operator, other comparison operators, such as <, <=, >, and >=, can be used as well. Table 14.1 summarizes these other comparison operators.
In addition to the comparison operators, a number of Boolean operators can be used to string together multiple Boolean expressions. These Boolean operators are AND and OR, and are synonymous with the Visual Basic And and Or keywords. For example, the following SQL SELECT statement returns the Title, Author, and Price columns of books whose YearPublished equals 2004 or whose Price is less than or equal to 20.00: SELECT Title, Author, Price FROM Books WHERE YearPublished = 2004 OR Price <= 20.00 This query returns the Title, Author, and Price columns for three books: Create Your Own Website, The Catcher in the Rye, and Fight Club.
Understanding What Happens When a WHERE Clause Is PresentWhen a WHERE clause is used, the following sequence of steps happens behind the scenes. Each record in the queried table is enumerated. The condition in the WHERE clause is checked for each record. If the condition returns the value TRue, the record is included in the output; otherwise, it is discarded. For example, consider the following query: SELECT Title, Author FROM Books WHERE Title <> 'The Number' AND BookID <= 3 For each row in the Books table that is visited, the WHERE clause's condition is analyzed. Starting with the first book, Visual Studio Hacks, we see that this book's title doesn't equal The Number and its BookID is indeed less than or equal to 3; therefore, the book Visual Studio Hackswill be returned by the SELECT statement. The next book is Create Your Own Website. Again, this book's title does not equal The Number and its BookID is less than or equal to 3, so it's returned in the results as well. The third book, however, is The Number. Clearly, this book won't be returned because the Title <> 'The Number' condition will return False. The next book evaluated is The Catcher in the Rye; this book, however, won't be in the resultset. Yes, the book's title is not The Number, but its BookID is equal to 4, which is not less than or equal to 3. Similarly, the final book, Fight Club, will also be omitted from the results because its BookID value is greater than 3. Therefore, the aforementioned SQL statement will return the Title and Author columns for two books: Visual Studio Hacks and Create Your Own Website. Ordering the Results Using the ORDER BY ClauseYou may have noticed that the results returned by the SQL queries we have examined so far have all been ordered by the BookID value. To see this point illustrated, refer to Figure 14.10, which shows the results of the query SELECT * FROM Books. What if we want the results ordered by some other column value, though? Perhaps we want to list the books and have the list ordered alphabetically by the books' titles. The SELECT statement can include an optional ORDER BY clause, which specifies the column to sort the results by. To retrieve books sorted alphabetically by title, we could use the following SELECT query: SELECT * FROM Books ORDER BY Title Figure 14.12 shows the query window when this SQL query is used. Note that the books are ordered by the values in the Title column, instead of by the values in the BookID column. Figure 14.12. The books are ordered alphabetically by their Title column value.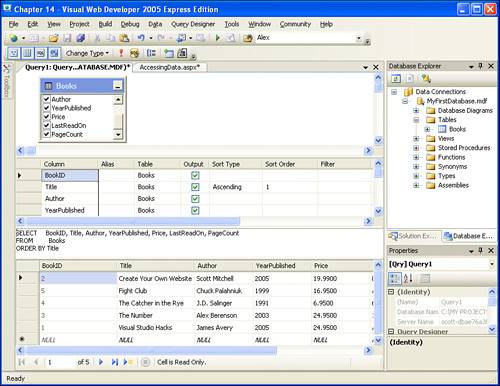
Sorting in Ascending and Descending OrderBy default, the ORDER BY clause sorts the results of a query by a specified column in ascending order. You can specify that the sort ordering should be in descending order by adding the DESC modifier in the following fashion: ORDER BY ColumnName DESC Notice that sorting the results by a column that contains alphabetic characters in ascending order, such as the Title column, has the effect of sorting the results in alphabetical order. If you want to sort the results in reverse alphabetical order, use the DESC keyword. |
EAN: 2147483647
Pages: 233