Filtering and Sorting Data from the SqlDataSource Control s Wizard
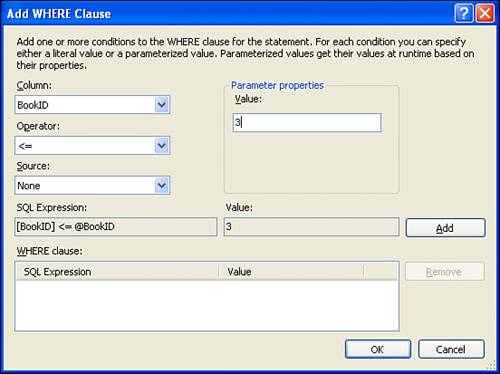
Filtering and Sorting Data from the SqlDataSource Control's WizardIn the "Working with the SqlDataSource Control" section, we looked at how to use the SqlDataSource control's wizard to return all records from a specific table. However, we didn't examine how to filter or sort the results. Now that we have a bit more experience with the SQL SELECT statement, let's return to examining the SqlDataSource control's wizard and see how to filter and sort the results. Start by returning to the AccessingData.aspx page we created earlier in this hour. Add another SqlDataSource control to your page's Design view and click the Configure Data Source link from the control's smart tag. Because we've already created and stored a connection string for the MyFirstDatabase.mdf file in our web application's web.config file, the drop-down list in step 1 of the wizard lists this connection string. Pick this connection string value and click the Next button. From the Configure the Select Statement screen, go ahead and select the Books table from the drop-down list and click the * option (refer to Figure 14.5). As we saw earlier in this hour, this will issue a SELECT * FROM [Books] query to the database, which will return all records from the Books table ordered by the BookID values. At this point we are ready to filter and sort the data as needed. Note the WHERE and ORDER BY buttons on the right of the Configure the Select Statement screen. These buttons will bring up dialog boxes that we'll use to configure the WHERE and ORDER BY clauses of our SELECT statement. Filtering the SqlDataSource Control's DataAs things stand now, all of the records from the Books table will be returned. Imagine, however, that we want to return only those records that have a BookID value of 3 or less and were published in 2005. We can add these WHERE clause filters via the SqlDataSource's wizard by clicking the WHERE button. This will display the Add WHERE Clause dialog box, shown in Figure 14.13. Figure 14.13. Filter the results using the Add WHERE Clause dialog box.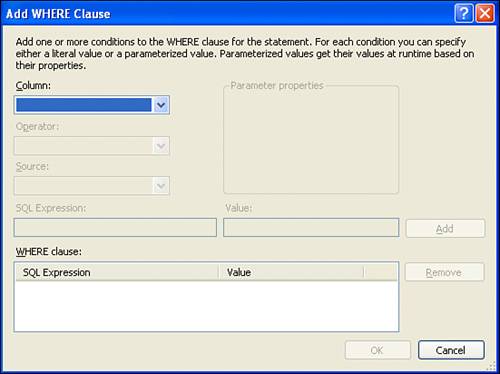 Adding a filter through the Add WHERE Clause dialog box involves a number of steps, such as choosing what column to filter on, the operator to filter with, and what value to use in filtering. To add the filter expression on the BookID column, perform the following steps:
Congratulations, you have added your first WHERE clause expression using the SqlDataSource wizard! Because we want our query to have two WHERE clause expressions, our work is only halfway done. Repeat the preceding steps, this time adding an expression that filters on the YearPublished column for results with values of 2005. After adding both filter expressions, click the OK button to return to the Configure the Select Statement screen. At the bottom of this screen, you will see the SQL query the wizard has constructed thus far: SELECT * FROM [Books] WHERE (([BookID] <= @BookID) AND ([YearPublished] = @YearPublished))
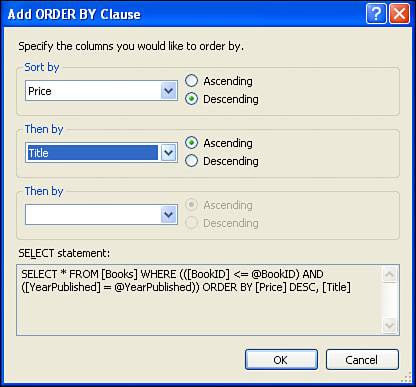
Sorting the SqlDataSource Control's DataAt this point we have added two filter expressions to the WHERE clause. However, the results will still be returned ordered by BookID. Let's instead have the books ordered by Price in descending order (from most expensive to least). If there are any ties in Price, let's break them by alphabetically sorting on the Title. To accomplish this, click on the ORDER BY button, which is beneath the WHERE button in the Configure Select Statement screen. This will bring up the Add ORDER BY Clause dialog box, from which you can specify up to three columns to order the results. The second and third columns specified in this dialog box dictate how ties are to be broken. That is, the results are sorted by the column specified in the first drop-down list. If there are any ties in the results, the second column is consulted; finally, if there are any ties there, the third column specified is used to break those ties. Figure 14.15 shows the Add ORDER BY Clause dialog box after it has been configured to sort first by Price in descending order, with ties being broken based on the alphabetical ordering of the Title. Figure 14.15. The results will be ordered by Price in descending order, with ties being broken by Title. As Figure 14.15 shows, after we add the ORDER BY clause, the final SQL statement for our SqlDataSource control is
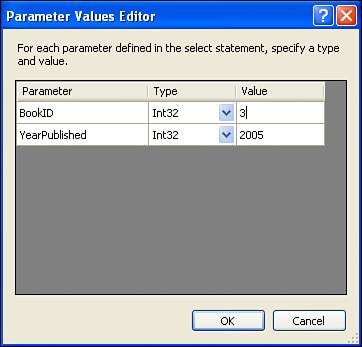
Testing Queries with WHERE ClausesAfter you've entered the ORDER BY clause, click the OK button to return to the Configure Select Statement screen. At this point, our SQL query is complete; it returns all columns from the Books table, sorting by Price in descending order, breaking ties by sorting on Title alphabetically, where only records that have a BookID less than or equal to 3 and were published in 2005 are returned. Click the Next button to advance to the Test Query screen. When you have a query that involves a WHERE clause, clicking the Test Query button will prompt you to supply values for the WHERE clause filter expressions. For this example, we are prompted to enter values for BookID and YearPublished (see Figure 14.16). You can either leave in the default values3 and 2005, respectivelyor you can enter different numbers. Figure 14.16. Specify the values for the WHERE clause filter expressions. If you leave in the values of 3 and 2005 for the BookID and YearPublished filter expressions, you should see two books in the resultsVisual Studio Hacks and Create Your Own Website (see Figure 14.17). These are the only two books that have a BookID value of less than or equal to 3 and were published in 2005. Visual Studio Hacks is listed before Create Your Own Website because it has a higher price. Figure 14.17. The query returns two records from the Books table.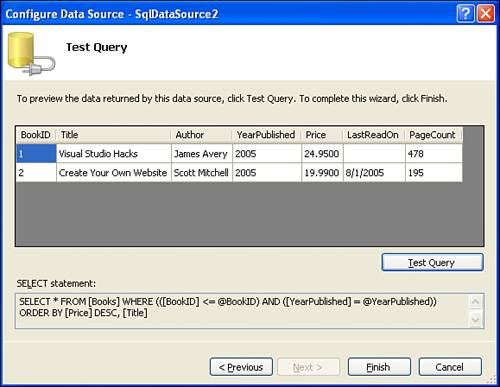 To complete the SqlDataSource control's wizard, click the Finish button. If you want to practice with the Add WHERE Clause and Add ORDER BY Clause dialog boxes, click the Previous button to return to the Configure Select Statement screen. A Look at the SqlDataSource Control's MarkupAfter you have configured the SqlDataSource control to have both WHERE and ORDER BY clauses, take a moment to go to the page's Source view to examine the markup generated by the control:
The ID and ConnectionString properties are nothing new; we examined them back in the "Examining the Data Source Controls" section at the start of this hour. The SelectCommand has been made more intricate, though, now including both a WHERE clause and an ORDER BY clause. Notice that no values are supplied for the filter expression values, even though we provided hard-coded values in the Add WHERE Clause dialog box. Instead, a parameterized query is used. A parameter is a placeholder in a SQL statement that has the form @ParameterName. It serves as a location where a value will be inserted right before the actual SQL statement is sent off to the database. The SqlDataSource control lists the parameters for the SelectCommand in the <SelectParameters> element. There are two <asp:Parameter> elements within <SelectParameters>: one for the @BookID parameter and one for the @YearPublished parameter. Here, their hard-coded values are specified in the DefaultValue property. When a user visits the ASP.NET page, the SqlDataSource control will take those parameter values and squirt them into the appropriate places within the SELECT query before sending off the query to the database. Although this may seem like a bit of overkill now because the values are hard-coded, its utility will become more apparent when we start having parameter values specified by the user visiting the page or from other external sources. We'll see how to base parameter values on user input in Hour 17, "Working with Data-Bound DropDownLists, RadioButtons, and CheckBoxes." |
EAN: 2147483647
Pages: 233
- Integration Strategies and Tactics for Information Technology Governance
- Assessing Business-IT Alignment Maturity
- Linking the IT Balanced Scorecard to the Business Objectives at a Major Canadian Financial Group
- A View on Knowledge Management: Utilizing a Balanced Scorecard Methodology for Analyzing Knowledge Metrics
- Managing IT Functions