Customizing Your Email
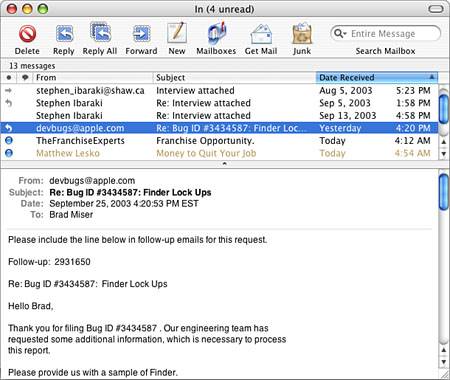
Sending, Receiving, and Replying to EmailIf you have used an email application before, such as Outlook Express, Entourage, or Eudora, using Mail to send, receive, and reply to email will be familiar to you after you learn about the Mail interface. The main Mail window has three panes. The top pane contains the Mail Toolbar and the Status Bar. The second pane from the top is the Message List, in which you see the list of items in the selected mailbox. The lower pane of the Mail window is the reading pane in which you read a mail item that is selected in Message List. All your mailboxes are in the Mail Drawer, which is a window that pops out of either side of the main Mail window (see Figure 12.13). Figure 12.13. The Mail application uses three panes to enable you to browse, view, and organize your email.
The Message pane of the Mail window behaves much like a Finder in List view. For example, you can change the width of the columns, sort the window, and so on. The columns in the default Mail window are the following (from left to right in Figure 12.13):
The Mailbox Drawer shows all your mailboxes. You can open the Mailbox Drawer by selecting View, Show Mailboxes (Shift- TIP The Mailbox Drawer can appear on either side of the Mail window. To change the side on which the Drawer appears, hide the Mailbox Drawer and then drag a message from the Message List pane to the side on which you want the Drawer to be located. The Mailbox Drawer pops open on that side. Until you change its location again, it remains on that side. You can expand or collapse the contents of a mailbox by using its expansion triangle. The Drawer contains several mailboxes and folders by default. The Inbox is used to store all your received mail; within the main Inbox is a mailbox for each of your email accounts. You also see Out, Drafts, Sent, and Trash mailboxes; the purpose of each of these should be self-evident. You might also see Drafts and Sent Messages folders for specific types of email accounts. NOTE If you use a .Mac, IMAP, or Exchange email account, the Drafts, Junk, and Sent Messages mailboxes appear and have folder icons. These are folders stored on your Mac, whereas the other mailboxes are stored online. If you configured a .Mac email account to store messages online, they are stored in the online folders rather than those stored on your Mac. Retrieving and Reading EmailThere are several ways to retrieve email from your accounts, including
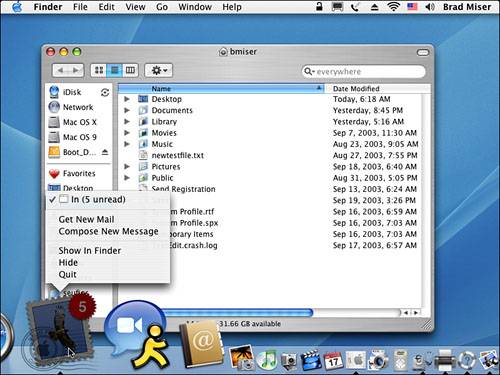
NOTE The first three methods listed retrieve mail for all the email accounts you have configured in Mail (for those accounts that are enabled and that you set to be included in the retrieve all action using that account's settings). TIP You can temporarily hide the Reading pane by double-clicking the border between the Message List and the Reading pane. The Reading pane disappears and the Message list consumes the entire Mail window. Double-click the bottom of the Mail window to reopen the Reading pane. You can change the relative height of the two panes by dragging the resize handle located in the center of the bar between the two panes. When you get mail, it is placed in the In mailbox, with the account's mailbox. When you receive email, Mail's Dock icon indicates that you have new email and shows you the total number of new messages you have received. If you chose to have Mail play a sound when new mail is received, you hear that sound when mail is recieved. When you open the Mail icon on the Dock, a list pops up that shows you all the windows open in Mail, as well as some useful commands (see Figure 12.14). Figure 12.14. When you receive new mail, Mail lets you know how many messages you have received (five in this case); you can quickly access the mailboxes containing the new messages by opening the Mail icon on the Dock and selecting your In mailbox.
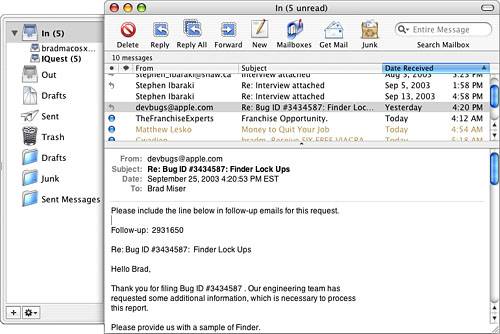
When you select In on the Dock menu, you move into Mail to read your email; each unread message has a blue dot in the Status column to indicate that it is a new message. The number of new messages is also indicated next to the In mailbox. TIP You can also create a new message or check for new email from the Mail Dock menu. If you have more than one email account, each account has its own Inbox. To see all your inboxes, click the expansion arrow next to the In folder (see Figure 12.15). The Inbox for each of your accounts appears. Select an Inbox to see the messages for that account only, or select the In folder to see all your messages at the same time. Figure 12.15. Each of my email accounts has its own Inbox, as you can see listed under the In folder.
TIP In Mail, you can display the contents of more than one mailbox at a time. To do so, select File, New Viewer Window (Option-
NOTE You can see the activity of Mail as it downloads messages using its Activity Viewer. To see the Activity Viewer, select Window, Show Activity Viewer (or press The Status bar just above the Message List pane tells you the number of messages in the currently selected mailbox. When Mail is doing something, such as retrieving email, you see information about that activity at the left edge of the Status bar. Reading Individual MessagesTo view the contents of a mailbox, select it in the Drawer. The Message list shows the messages contained in that mailbox. To read a message, select it in the Message list and read it in the Reading pane. TIP
To read your mail, use the following shortcuts:
TIP If the mailbox you are viewing has several messages in it, select those that are interesting to you; then hold down the Shift key to select contiguous messages or hold down the Working with Email Threads
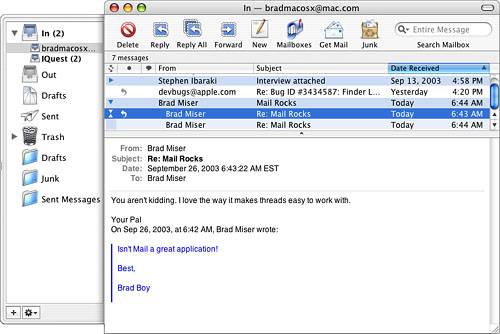
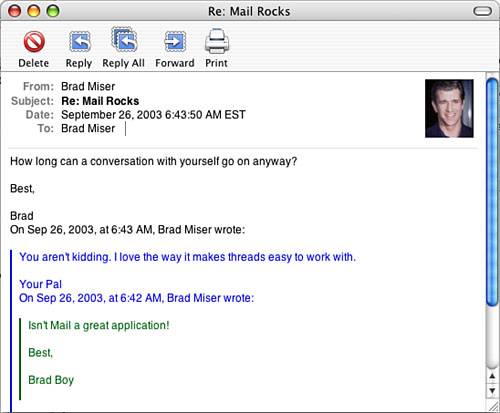
To organize messages in the Message List pane by threads, select View, Organize by Thread. Messages that are part of a thread are highlighted in the selected color and are grouped together (see Figure 12.16). Select View, Organize by Thread again to return the Message pane to its previous organization. The messages in a thread are sorted just like other messages in the Message List pane. Figure 12.16. While all the messages at the bottom of the Message List pane are from me, they are part of a thread.
NOTE If you don't organize by threads, messages in threads are still highlighted with the color indicated in Mail's preferences settings. Following are some thread tips:
TIP Mail defines the messages that make up a thread by a special header element. This means you can change the subject of a reply in a thread and Mail will still recognize that the message is part of the thread. However, not all applications can do this and sometimes header information is removed from a message; therefore, it is usually better to leave the subject as it was when the thread was started. If the person who sent you a message is in your Address Book and has an image on her card, that image appears in the upper-right corner of the email message (see Figure 12.17). Figure 12.17. The image contained in a person's address card appears in the upper-right corner of a message you receive from that person.
Writing and Sending EmailWriting email in Mail is also quite similar to other email applications. You can create a new mail message in several ways, including the following:
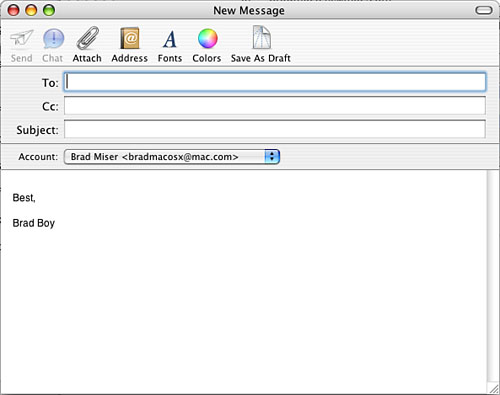
TIP If you point to the From block on an email message and click, a pop-up menu appears. On this menu, you can see the email address of the person, chat with the recipient, create a new message, open the related address card (if the recipient has a card, that is), or create an address card. When you create a new message, you see the New Message window (see Figure 12.18). Creating the message is straightforward. If the message is not already addressed, type the email address(es) in the To and Cc fields. Mail attempts to match what you type to the addresses in your Address Book or on the list of previous recipients that Mail maintains automatically. The addresses that match what you type appear on a drop-down list. You can move up and down this list with the up- and down-arrow keys. To select an address on the list, highlight it and it is entered in the message's address box. (If there is only one address for the name you type, it is selected by default.) You can enter multiple addresses in an address field by typing a comma and then repeating the previous steps to add more addresses. When you have added all the addresses in the To field, press Tab to move to the next field. Figure 12.18. If you have used other email applications, Mail's New Message window will no doubt look familiar.
TIP Mail automatically tracks a list of people to whom you have sent email. This list is called the Previous Recipients list. When you enter an email address in the To field, Mail attempts to match what you are entering to the recipients on this list. If it finds a match, it fills in the rest of the address for you. You can view the list by selecting Window, Previous Recipients. On this list, you can view addresses to or delete addresses from the list, or add addresses to your Address Book. TIP When an address is selected on the drop-down list that appears when Mail attempts to match the address you are typing, you can add it to the message and be ready to enter the next address by pressing comma. To use your Address Book to address a message, open the Address Book by clicking the Address icon on the New Message window's toolbar or by pressing Option- TIP You can add a Bcc (blind carbon copy) address line by selecting View, Bcc Header or by pressing Option- Enter the subject of the message in the Subject field. Select the account from which you want to send the mail using the Account pop-up menu (your default account is listed automatically). Mail uses the following two rules to determine the account that is used to send a new message:
You can determine which account is the default account by the order in which your accounts are listed on the Accounts pane of the Preferences window or by the order in which the account inboxes are listed under the Inbox in the Mailbox drawer. The account that is highest in the Preferences window or is first under the Inbox listed in the Account pop-up menu automatically. To change the order of the accounts, drag them up or down in either location. TIP The New Message window has its own toolbar; you can customize its toolbar just as you can other Mail and Mac OS X toolbars (View, Customize Toolbar). If you have configured Mail to show it, select the signature you want to use from the Signature pop-up menu. Move into the body and type your message. As you type, Mail checks your spelling. When it identifies a misspelled word, it underlines the word in red. You can Control-click or right-click a misspelled word to pop up a menu that enables you to change the word to the correct spelling, ignore the spelling, or learn the word that Mail thinks is misspelled. TIP You can also control Mail's spell checker using the Spelling commands on the Edit menu. You can open the Spelling window by selecting Edit, Spelling, and then Spelling again. You can check the spelling in a message by selecting Edit, Spelling, Check Spelling. You can turn off Check Spelling As You Type by selecting Edit, Spelling, Check Spelling As You Type. NOTE Because I encourage the use of plain-text email rather than formatted email, I won't be addressing formatting email in this chapter. However, if you select to create RTF messages, use the commands on the Format menu to format them. You can change the format of a new message (plain text or rich text) by moving the pointer into the body of a new message and opening the contextual menu (Control-click or right-click). Use the resulting pop-up menu to change the message's format. As you work with a new message, open its contextual menu to gain quick access to various commands, such as formatting commands for an RTF message, Spell Checker controls, and quoting commands. To send a message, do one of the following:
TIP While you're composing a message, you can save it in the Draft mailbox by either selecting File, Save As Draft (
Replying to EmailReplying to messages you receive in Mail is also similar to other applications. By default, Mail marks the different levels of quoting with different colors along with a change bar. As with other applications, you can select the message to which you want to reply and click Reply on the toolbar; select Message, Reply; or press You can use the same tools to reply to a message as you use to write a new message. NOTE You should always quote carefully in your replies. Quoting makes email much more effective because it gives the reader a good context for the information you are providing. Quoting is one reason I prefer plain-text messages. Quoting in a plain-text message is much easier; formatting often gets in the way of clear quoting. You can also perform the following actions on mail you have received:
TIP You can open a message's contextual menu to access many useful commands, such as Reply, Reply All, Forward, and so on. NOTE You might be tempted to bounce spam email that you receive. However, this usually doesn't do any good because most spam includes a bogus return address so your bounced message has no legitimate place to go. You can use the Bounce command to respond to email from legitimate organizations that have sent unwanted email to you. Hopefully, the bounce results in your address being removed from the related mailing list. Use Mail's Junk Mail feature to deal with spam. Deleting EmailYou can delete messages by selecting the messages you want to delete and doing one of the following:
Deleted messages are stored in the Trash folder in the Drawer. You can open this folder just like other folders you have. Messages aren't actually removed until the Trash folder is emptied. When you use an IMAP account, such as a .Mac email account, you have to empty the Trash folder to actually remove the messages from the server. If you don't, those messages continue to count against the total storage space you have on the server. Typically, you are limited to a certain storage space for all your messages (under an IMAP or a .Mac account, all your messages remain on the server). Because messages in the Trash folder count against this limit, you should empty this folder more frequently under an IMAP account than you do with POP accounts. Because they are actually IMAP accounts, .Mac email accounts are limited to a certain amount of storage. If the messages stored in your .Mac email account approach or exceed this limit, you receive email messages warning you that you are exceeding your allotted storage space. To move messages off the server, you need to move them from the Inbox for that account to one of your personal mailboxes stored on your Mac or to the Trash and then empty it. You can determine whether deleted messages are stored on the server by using the Special Mailboxes tab of the Accounts pane of the Mail Preferences window. Open this tab and uncheck the "Store deleted messages on the server" check box. This causes the messages you delete to be downloaded to your Mac, so they won't count against your storage limit. You can also use the "Permanently erase deleted message when" pop-up menu to select a time period for your deleted messages to be permanently erased. NOTE Just like the Inbox, each email account has its own Trash. To empty Mail's Trash, do one of the following:
|
EAN: 2147483647
Pages: 273
- Structures, Processes and Relational Mechanisms for IT Governance
- Measuring and Managing E-Business Initiatives Through the Balanced Scorecard
- Technical Issues Related to IT Governance Tactics: Product Metrics, Measurements and Process Control
- Governance in IT Outsourcing Partnerships
- Governance Structures for IT in the Health Care Industry