| Before you can start using Mail to work with your e-mail, you need to configure the accounts that it uses. If you entered account information in the Setup Assistant when you installed Mac OS X, those accounts will be configured for you already. For example, if you set up or entered the information for your .Mac account in the Setup Assistant, your .Mac e-mail account will be configured in Mail. If you are like most Mac users, you probably have more than one e-mail address; you can use Mail to access any or all of them. There are also several other areas that you don't necessarily have to configure before you begin using Mail, but I have included them in the section so that all the configuration information is together for your reference. Configuring E-Mail Accounts The most basic configuration for Mail is the e-mail accounts you are going to access it with. Before you get started, gather the following information for each mail account you want to configure in Mail: Account type There are three types of e-mail accounts with which Mail can work. A Mac.com account is one provided by Apple's .Mac servers. A POP (Post Office Protocol) account is provided by most ISPs. An IMAP (Internet Message Access Protocol) is similar to a POP account, but offers additional features. NOTE When you use a mac.com e-mail account with Mail, it is configured as an IMAP account. In Mail, it is treated as its own category because it is part of your .Mac account.
Your e-mail address This should be self-explanatory. Host name This is the address of the server that handles retrieving your e-mail. For POP accounts, it often looks something like pop.isp.net. Your e-mail username This is your username for your e-mail account, which might or might not be the same as your username for your Internet account. Typically, this is everything before the "@" in your e-mail address. Your e-mail password This is the password for your e-mail account, which might or might not be the same as that of your Internet access account. SMTP (Simple Mail Transfer Protocol) host This is the address of the server that handles sending your e-mail. Authentication You need to know whether your SMTP server uses authentication. SMTP username This is the username for your SMTP server; it is usually the same as your e-mail username, but it isn't always the same. SMTP password Again, this is usually the same as your e-mail password.
To add e-mail accounts to Mail, do the following: -
Launch Mail. -
Choose Mail, Preferences (or press Option+ +;). +;). -
Click the Accounts button to see the Accounts pane of the Preferences window (see Figure 12.11). Figure 12.11. If you configured a .Mac account when you installed Mac OS X, your .Mac e-mail account will be configured in Mail automatically.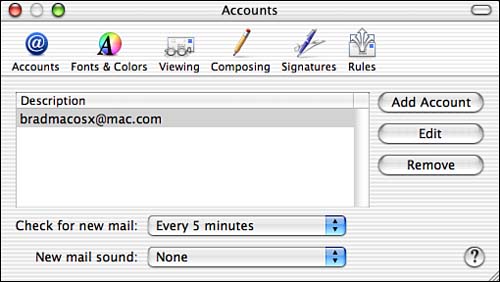
-
Click Add Account to see the Add Account sheet. This sheet has three tabs, which are Account Information, Special Mailboxes, and Advanced. -
On the Account Information tab, choose the account type from the Account Type pop-up menu. NOTE Mail helpfully fills in many fields with examples of how the data you should enter probably looks. -
Enter a description of the account in the Description field. -
Enter the rest of the information for the account and the incoming mail server, such as e-mail address, mail server, and mail server username. NOTE What you enter in the Full Name data field will be what appears next to your return e-mail address shown in the E-Mail Address data field. -
Open the Outgoing Mail Server pop-up menu and choose the outgoing mail server on the list. If the server you want to use is not on the list, choose Add Server. You will see the SMTP Server Options dialog. -
Enter the outgoing mail server address in the Outgoing Mail Server field. -
If the account uses authentication, choose the type of authentication it uses on the Authentication pop-up menu and configure the rest of the fields in the dialog accordingly. Click OK when you are finished configuring the outgoing mail server. -
Click the Special Mailboxes tab. This tab provides several controls you can use to control how the account you are configuring behaves. The options you see depend on the type of account you are creating. For example, you see a different set of options for an IMAP account than you will for a POP account. Because .Mac accounts are popular with many Mac users, you will see the options you can configure in the following list (see Figure 12.12). You can configure the options on this tab for other account types in a similar way, although the specific options you have might be different. -
Use the check box in the Drafts area to determine whether messages are stored on the .Mac server when you are writing them. -
Use the controls in the Sent area to determine whether sent messages are stored on the server and when sent messages are deleted. -
Use the Junk controls to configure how Mail handles messages that are classified as Junk. -
Use the Trash controls to configure how trash is handled (see Figure 12.12).
Figure 12.12. You can configure these special mailbox actions when using a .Mac mail account.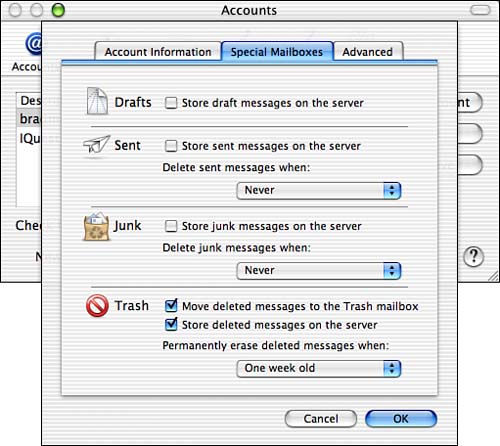
-
Click the Advanced tab. Just like the Special Mailboxes tab, the specific controls you see will depend on the type of account you are configuring (see Figure 12.13). The rest of these steps assume a .Mac account, but you can configure other account types similarly. Figure 12.13. These are the Advanced controls for a .Mac e-mail account.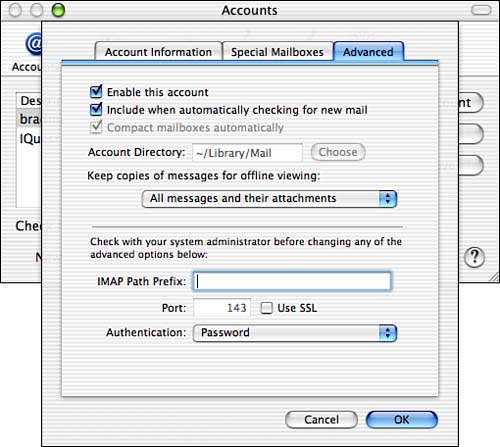
-
Use the "Enable this account" check box to enable or disable the account. -
Check the "Include when checking for new mail" check box if you want this account always included when Mail checks for mail. -
Use the Keep copies of message for offline viewing pop-up menu to determine what Mail does with the messages it receives when you are not connected to the Internet. For example, if you choose All messages and their attachments, all your messages and any attachments they contain are downloaded to your Mac so that you can view them even if you aren't connected to the Net. If you choose Only message I've read, only the messages you have read will be downloaded to your Mac. -
Click OK to close the Accounts sheet. (In almost all cases, you can leave the other options set as they are.) You will return to the Mail Preferences window and will see the account you just created.
IMAP Accounts One area in which an IMAP account (such as a .Mac account) is significantly different from a POP account is in how e-mail is stored. Under an IMAP account (such as a .Mac e-mail account), mail is always left on the server until you delete it manually. The benefit of this is that you can access that mail from different machines without forwarding it to each machine or having duplicate copies (on the server and in the inbox in your e-mail applications). As you will learn later, when you work with an IMAP account that has a limited amount of storage for e-mail messages, you have to be aware of how full your e-mail storage is and make sure that you keep it under its limit. When you use a POP account, the mail you read is actually downloaded to your Mac. So a copy exists in both places. With POP accounts, you should check the "Remove copy from server after retrieving a message" check box and choose a timeframe for messages to be deleted on the pop-up menu. Otherwise, the e-mail you read remains on the server, and you might download it again the next time you check your e-mail. |
-
Use the Check accounts for new mail pop-up menu to determine how often Mail checks for new messages. TIP If you use a dial-up Internet account, you might want to set this to a large value or to Manually so that your phone line isn't constantly tied up because of Mail checking for e-mail. -
Choose a sound for new e-mail using the pop-up menu at the bottom of the window.
TIP You can use custom mail sounds by first creating the sounds (in the AIFF format) and placing them in the Library/Sounds folder in your Home folder. Then, choose Add/Remove on the pop-up menu and select the custom sound you want to use.
Using steps similar to these, you can add the rest of your e-mail accounts to Mail to work with them all from the Mail application. As you read previously, the steps for a specific account will depend on the type of e-mail account you are adding. Just use the specific configuration information provided for each account and repeat the previous steps. NOTE Mail can't access an AOL e-mail account. However, you should be able to add just about any other e-mail account to it.
Setting Other Mail Preferences There various other Mail preferences you might want to set. The general steps you use to set these preferences are shown here: -
Choose Mail, Preferences to open the Mail Preferences window. -
Click the icon for the area of preferences you want to set. -
Set the preferences. -
Set more preferences or close the Preferences window.
In the following sections, you will get an overview of each preference area and a description of some of the more useful preferences you can set. Setting Fonts & Colors Preferences Use the Fonts & Colors pane of the Mail preferences window to control how text appears in Mail windows. Use the font and size pop-up menus to choose the font and size for the Message list font (the pane in which all the messages in a mailbox are listed) and the message font (which is the font used for messages you read). If you prefer a fixed-width font for plain text messages, check that check box and use the pop-up menus to choose the font and size. If you want different levels of quoted text to use different colors, check the "Color quoted text" check box and choose the colors for each level.
E-mail Formats Mail supports two e-mail formats: plain text and Rich Text Format (RTF). Plain text messages contain no formatting, but RTF messages can be formatted. Whether the formatting you apply in an RTF message will be seen or not depends on the e-mail application the recipient of your e-mail uses. Some can interpret RTF messages correctly, but others cannot. E-mail purists prefer plain text format because any e-mail application can handle them, and plain text messages are quicker to compose and read (which is part of the point of e-mail in the first place). And proper quoting is much easier with a plain text message. I prefer plain text myself for these very reasons. Many mailing lists enable you to choose the format in which you receive messages. You often can choose between plain text or HTML formats. Choosing the plain text format will result in much faster performance, although you won't see all the bells and whistles that can be contained in an HTML e-mail message. However, plain text messages usually contain links to that content on the Web so that you can easily view the specific content you want to see. |
Setting Viewing Preferences Using the Viewing pane of the Mail Preferences window, you can control the following viewing options: Use the "Show Header Detail" pop-up menu to determine how much information is shown in the header of e-mail messages you receive. Your choices are Default, None, All, or Custom. If you choose Custom, you can choose the specific data you want to see in the header of your messages. TIP Note that the Show Header Detail pop-up menu affects mail you have already downloaded. For example, you can choose an e-mail message to read and then choose a level of header detail from the Show header detail pop-up menu to change the header information for the mail you are reading.
Check the "Show online buddy status" check box if you want the status of people whom you have designated as being online buddies to be displayed. This helps you know when these people are online so that you can chat with them. Check the "Highlight thread of selected message in color" check box, and choose a color by using the color button. Threads (a series of messages connected by replies to an original message) in your mailbox will be highlighted with the color you select so that you can spot a thread more easily. Uncheck the "Display images and embedded objects in HTML messages" check box if you want only the text portion of messages that you receive to be displayed.
Setting Composing Preferences The Composing pane of the Preferences window controls various composing options, which are the following: -
Use the "Format" pop-up menu to set the default format for new messages you can create. Your options are Plain Text or Rich Text. You can override your default choice for specific messages. TIP For example, if you choose Plain Text as your default format, you can create a message in the Rich Text format by creating the message and choosing Format, Make Rich Text (Shift++T). If you choose Rich Text, you can use choose Format, Make Plain Text (Shift++T) to create a plain text message. -
Check the "Check spelling as I type" check box to have Mail check your spelling as you type messages. -
Use the "Always Cc: myself" check box to include yourself in the Cc block of every message you send. This can be a handy way to keep copies of the messages you send. -
Check the "Automatically complete addresses" check box to have Mail look up addresses on specific servers. Then click the Configure LDAP button and use the resulting sheet to configure the servers on which you want Mail to look up addresses. -
Check the "When sending to a group, show all member addresses" check box to list members of a group by their names in an e-mail that you send to a group (rather than listing just the group name). -
Use the two check boxes in the Replying area to control how your replies are created. Your options are to use the same mail format as the original message (such as plain text) and to include the original message's text in your reply (which is a good idea so that you can use quoting). If you choose to use quoting (which you should), use the radio buttons to determine whether the entire message is quoted or only the selected part. The second option is preferable because if you don't select any text in the original message when you reply to it, the entire text is quoted, which is the same thing the Include all option does anyway.
Setting Signature Preferences You can configure signatures to be attached to your e-mail messages. You can have as many signatures as you would like, and you can select a default signature or choose one each time you compose a new message. -
Click the Signatures icon to open the Signatures pane of the Mail Preferences window. -
Click Add Signature. -
Name the signature in the resulting Signature sheet. -
Enter the signature in the sheet. -
Click OK. You will return to the Signatures pane and will see the signature you just created. -
Create other signatures you want to use. -
Use the Select Signature pop-up menu to choose the signature that is used by default on e-mail messages you create and send. You can choose any of the signatures you have created, None, Randomly, or Sequentially. -
If you want to choose a signature each time you compose mail, check the "Show signature menu on compose window" check box.
Setting Rules You use the Rules pane to set up automated mail rules.  To learn how to create rules for your e-mail, see "Configuring and Using Rules for E-Mail," p. 319. To learn how to create rules for your e-mail, see "Configuring and Using Rules for E-Mail," p. 319.
Configuring the Mail Toolbar As with the Finder toolbar and other Mac OS X toolbars, you can configure Mail's toolbar to be more compatible with the way you work. -
Use the Hide Toolbar or Show Toolbar commands on the View menu to hide or show Mail's toolbar. You can use the Show/Hide toolbar button in the Mail title bar as well. -
Choose View, Customize Toolbar to add buttons to, remove buttons from, and reorganize the toolbar. -
Choose View, Hide Status Bar to hide the status bar that appears just below the toolbar. If you want to show the status bar again, choose View, Show Status Bar.
|