 | Mac OS X version 10.2 supports handwriting recognition, meaning that you can input text and graphics using a pen and tablet device. This is accomplished through Mac OS X's Ink technology. When you install an Ink-compatible device, an Ink pane appears in the System Preferences utility; you use this to configure how you want handwriting recognition to work. Then, you can input directly into most applications or you can input into the InkPad application and paste the content into another application. |
Finding and Installing a Tablet Tablet devices enable you to input information and execute control using a pen-type mouse that you use to "write" on the tablet. These devices are often favored by artists and others who need more precise input capabilities and a "softer touch" than can be achieved with a standard mouse. However, because support for handwriting recognition is built into Mac OS X, anyone can use a tablet to input information into a Mac. Mac OS X supports tablets produced by Wacom Technology, which is the major manufacturer of such devices. Just because you are limited to a single manufacturer, though, doesn't mean that you don't have options. Wacom produces various tablets that offer different sizes and features (see Figure 21.4). Figure 21.4. Here, you see the variety of Wacom tablets that are available.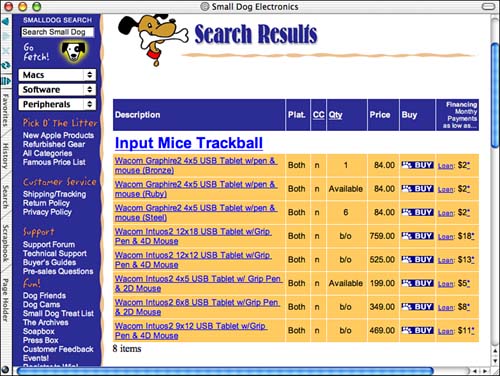
NOTE  | Check out all the details about Wacom tablets on www.wacom.com. You can purchase a tablet at the Wacom site or at www.smalldog.com. |
Choosing a tablet is mostly a matter of deciding how much you can afford to spend and the specific features you want. For example, you can get a 4x5 tablet for less than $100. A 9x12 tablet costs about $470. All the tablets include an input pen and a mouse with at least two buttons. A good mid-level tablet is the Intuos2 6x8 tablet that includes the two-button mouse with scroll wheel and the input pen (see Figure 21.5). Figure 21.5. The Intuos2 6x8 tablet provides a good amount of working space and includes a pen and a nice two-button, scroll-wheel mouse.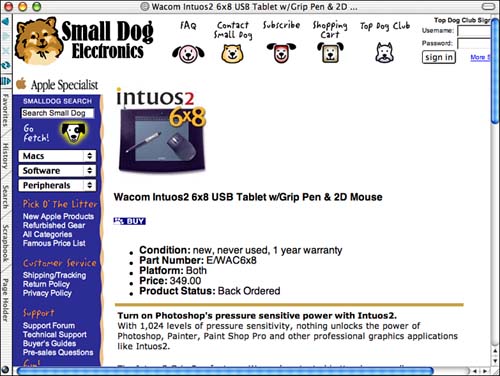
Installing a tablet is not any more complicated than installing any other device. You simply connect the tablet to an available USB port. However, because the tablet needs power to operate, you must connect it using a USB port that provides power to peripheral devices. You can connect it to a USB port on the Mac itself, one on an ADC display, or one on a powered USB hub. You can't connect it to a USB port on the keyboard. Then install the software provided with the tablet. That is all there is to it. NOTE Because Ink support is built into Mac OS X, you might wonder why you need to install additional software. You should install the software that comes with the tablet to ensure that the latest drivers are installed. The Wacom software also provides access to advanced configuration options that are beyond those you can configure with Mac OS X's Ink technology. Covering the details of advanced configuration of a tablet is beyond the scope of this chapter. To explore the tablet software, open the Wacom Tablet application that is installed in the Wacom folder located in the Applications folder.
Configuring Ink NOTE Before you get started with Ink, you need to understand that getting handwriting recognition to work reliably takes some time and experimentation. Unless you have picture-perfect penmanship, you will have to do some trial and error to get it to work reliably. Expect to spend some time and effort configuring and experimenting with Ink. Make adjustments to Ink, then try writing. Then, make more adjustments and try again. Eventually, you will be able to make it work pretty well.
After you have installed a tablet, you need to turn on handwriting recognition and configure it. -
Open the System Preferences utility. You will see the Ink icon (see Figure 21.6). Figure 21.6. When you install a tablet, the Ink icon will appear in the System Preferences utility.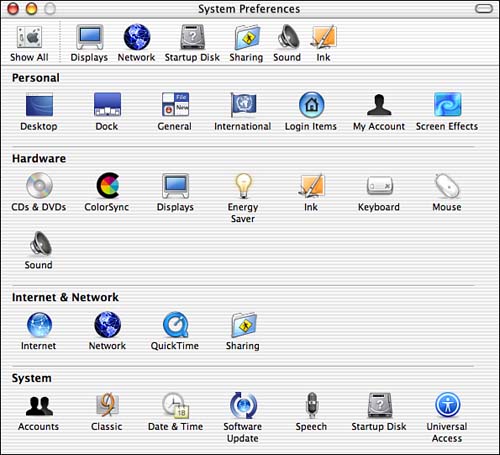
-
Click the Ink button to open the Ink pane (see Figure 21.7). The Ink pane has three tabs. You use the Settings tab to configure handwriting recognition. The Gestures tab shows you symbols you can write to enter symbols or to do specific commands. For example, if you write an upside down "T," a Tab is entered. You can use the Word List tab to add words that you use frequently but that might not be recognized by Ink. Figure 21.7. You use the Ink pane of the System Preferences utility to configure handwriting recognition.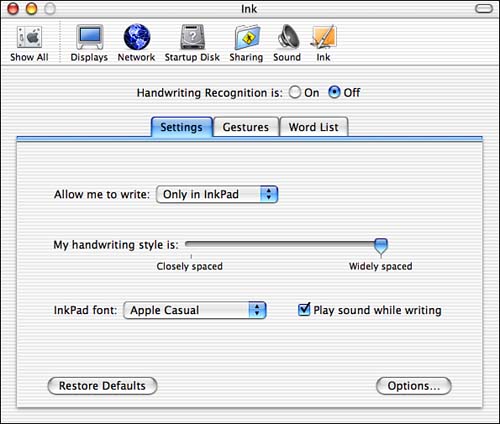
-
Turn on handwriting recognition by clicking the "On" radio button. The InkPad window will appear. At first, the InkPad is collapsed and you will see only the InkPad toolbar (see Figure 21.8). The InkPad window floats on top of all other windows so that it is always available. Figure 21.8. The InkPad toolbar provides the controls you use to work with Ink.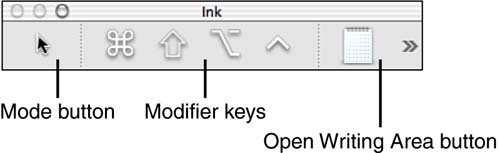
-
Use the Allow me to write pop-up menu to determine where you want to be able to make input via the tablet. If you choose Only in InkPad, you will always use the InkPad writing area to write or draw and then paste your input into another application. If you choose Anywhere, you can write directly in any application, such as an e-mail application or a word processor. TIP If you choose Anywhere on the pop-up menu, the Mode button on the InkPad toolbar becomes a Pen to indicate that you can write anywhere. You can click the Mode button to switch back and forth between these modes. -
To configure the input sensitivity for your handwriting style, use the slider labeled My handwriting style is. If you tend to place your letters closely together, move the slider to the left. If your letters are more widely spaced, move the slider to the right. (As you can see in Figure 21.7, I have adjusted Ink for my writing, in which letters are spaced far apart.) You will need to adjust this slider to match the handwriting recognition to your writing style. -
Use the InkPad font pop-up menu to choose the font that is used in the InkPad writing window. -
If you want to hear sounds while you write, leave the "Play sound while writing" check box checked. If you don't want this audible feedback, uncheck the check box. -
Leave the Ink pane open because you will need to use it again.
After you have done some basic configuration, get started experimenting with Ink to see how well it recognizes your handwriting. -
In the InkPad toolbar, click the Open Writing Area button. The InkPad window will expand and you will see a virtual sheet of paper. -
Move the Ink pane of the System Preferences utility so that you can see it and the InkPad writing area. -
Click the Gestures tab so that you can see the list of characters and commands you input by making specific gestures (see Figure 21.9). Figure 21.9. The Gestures tab shows you the gestures you can make to input specific characters and commands.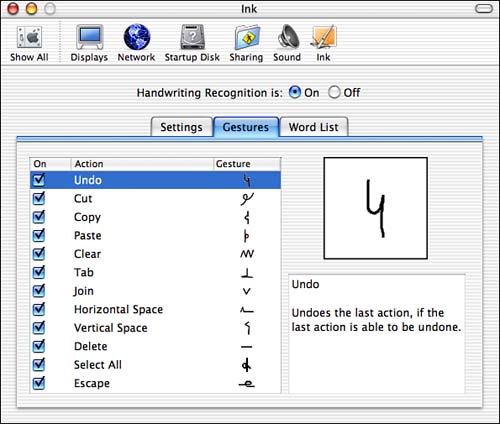
TIP The tablet has a pen mode, in which you write on the tablet with the pen, and a mouse mode, in which you use the mouse on the tablet just like using a regular mouse. The mode buttons are located at the top of the tablet's writing area. Make sure you press the pen mode button before you start writing. -
Click the Text input button to place the tablet in the text mode it is selected by default. NOTE If you leave your other mouse connected, it can be confusing to know where the pointer is currently located because it will tend to remain at its last position. When you relocate it with the pen, it will remain there only as long as you continue to provide input with the pen. When you release pressure on the pen, the pointer will jump back to its previous location, which might be outside of the InkPad window. For best results, disconnect your standard mouse when you are using the tablet. When you want to use a mouse, put the tablet in mouse mode and use its mouse. -
Move the pointer over the writing area on the InkPad. When you are over the writing area, the pointer will change to a pencil icon. -
Use the tablet's pen to write on the tablet. Don't use cursive characters; write in "printing" format. As you write, you will see your characters appear in the window. When you pause for a specific period of time, Ink will attempt to interpret your input and will enter the characters you write as words. Sometimes this will work fairly well and the words you intended to write will be right. Sometimes what you will see is gibberish. The results you get depend on how closely Ink's configuration matches your penmanship. This is where trial and error comes in. Using a pen can be a bit challenging because, unlike a mouse, the pen doesn't have to be in contact with the surface of the tablet to register a location. You can move the pointer just by placing the pen fairly close to the tablet's surface. The pen's location will be registered and you can move the pointer by moving the pen. However, the mouse works just like a standard mouse: It has to be in contact with the tablet's surface to make input. -
When you place the pen on the tablet's surface, you can start to write. Write smoothly and pause between each word. When you see that you are approaching the edge of InkPad's window, lift the pen and move it to another location. Where you write in the InkPad window doesn't matter, nor does the location of each word relative to the others. Ink recognizes your input on a word-by-word basis. The words you write will be input as a sentence no matter where you write each word. In fact, you can write one word right on top of another if you want to. Ink captures everything from the time you touch the pen to the tablet until you raise the pen again as a word. When you pause for a period of time, Ink will translate your writing and you will see the text at the top of the InkPad window (see Figure 21.10). Figure 21.10. Using a pen to write text efficiently takes some time and practice.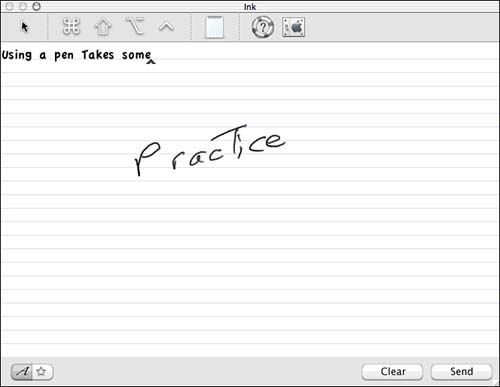
NOTE If you move the pointer outside of the InkPad window, you won't be able to continue writing. For best results, use the InkPad window's Resize handle to make it as large as possible. -
After you have written quite a bit of text, use the Ink pane of the System Preferences utility to fine-tune Ink to your writing style (an explanation of your options is provided in the following paragraphs).
Use the Ink controls to configure Ink so that it better recognizes your handwriting. Use the My handwriting style is slider located on the Settings tab of the Ink pane to adjust Ink for your handwriting. If Ink enters words before you are done writing them, meaning that you end up with partial words, it may be that you space characters more widely apart and so Ink thinks you are done with a word because of the space between the letters you write. If this is the case, move the slider to the right. You can access additional controls by clicking the Options button on the Settings tab (see Figure 21.11). Figure 21.11. Use these options to fine-tune Ink to match your handwriting style.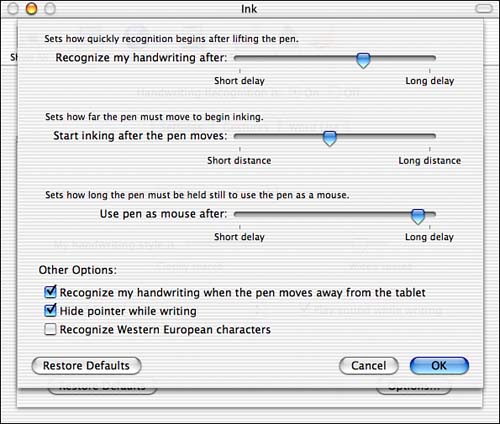
Use the Recognize my handwriting after slider to adjust the time between the point when you lift the pen off of the tablet and when Ink recognizes words. If you tend to write slowly, move the slider to the right. If you write quickly, move the slider to the left so that Ink can keep up with you. Use the Start inking after the pen moves slider to determine how sensitive Ink is to your moving the pen on the tablet. Move the slider to the left to have Ink start writing (called inking). Move the slider to the right to require more movement to start registering characters. Use the Use pen as mouse after slider to set the amount of time you must hold the pen still to use it as a mouse. Check the "Recognize my handwriting when the pen moves away from the tablet" check box to trigger word recognition after you lift the pen from the tablet. Check the "Hide pointer while writing" check box if you want the point to be hidden while you use the pen to write. Continue experimenting with writing in the InkPad and making adjustments until your writing is recognized reliably. This will take some time and patience, but if you continue refining the adjustments, you can make it work fairly reliably. NOTE There are numerous adjustments you can make to the tablet, pen, and mouse using the Wacom Tablet application. For example, you can configure the mouse's buttons and the pen's button. Covering the details of this application is beyond the scope of this chapter. If you are going to use a tablet, you should explore this application to better configure your tablet.
Using Ink After you have configured Ink to reliably recognize your handwriting, there are two general ways you can use it. One is to make all input via the InkPad application. -
Open the application in which you want to make input, and create a new document, such as an e-mail message. -
Switch to the InkPad window. -
Write your e-mail message. -
Click the Send button. The text you input will be pasted into the active document window. You can then edit it just like text you typed in (see Figure 21.12). Figure 21.12. Here you can see that text that I entered in the InkPad has been pasted into a new Mail message window.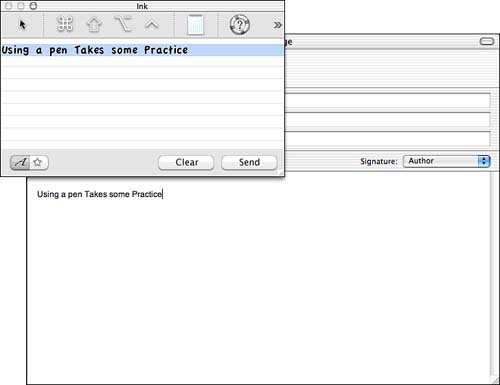
You can also write directly in many applications. -
Open the Ink pane of the System Preferences utility and choose Anywhere on the Allow me to write pop-up menu. (You can also click the mode button in the InkPad toolbar.) -
Open an application and create a new document, such as a new e-mail message. -
Move the pointer into the blank document and start writing. As you write, an InkPad window will pop up and show you the text you are writing. When you release the pressure on the pen, Ink will recognize what you wrote and enter that text in the document (see Figure 21.13). Figure 21.13. Here I am entering text directly into an e-mail message.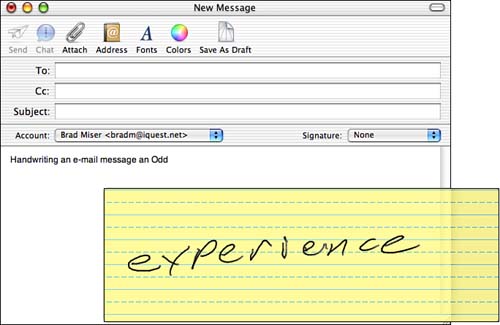
Not all applications will recognize Ink input, but most OS X applications will. The best way to figure out whether an application that you use supports Ink is to try it. If an application doesn't support direct entry using Ink, you can always use the InkPad to enter text. TIP If you click the Graphic mode button (the star) at the bottom of the InkPad window, you can also draw in the window and paste the result into your documents.
There are many more tricks of the handwriting trade you will need to learn in order to use Ink effectively, but the information in this section should get you started. To learn more, explore the Ink help system and Apple's Support Web site. NOTE The most advanced tablets are incorporated into LCD monitors so that you can input directly onto the images on which you are working. Check them out at www.wacom.com/lcdtablets/index.cfm.
|