Using Sound in Your Movies
| Using iMovie, you can create rich, full soundtracks for your movies. You can include the following four types of sound in your movies:
You use the Timeline Viewer to control the audio portion of your movie. As you saw in an earlier section, the Timeline Viewer enables you to see all the tracks that are part of your movie. Each track on the Timeline Viewer is used to create and edit one of the three audio tracks you can have in your movie. The top track displays the native sound in your clips. Typically, the top Audio track is used for sound effects and narration and the bottom Audio track is used for music. Functionally, there is no difference between these tracks, and you can use them however you want. The tracks you see are all time-based views of your movie. The left side of the tracks represents the beginning of your movie, and the right side represents the end. You also see the Playhead, which works the same way it does in the Clip Viewer and the Monitor. For example, you can move it in the same ways, and the timecode shows its location in the movie. The frame at which the Playhead is currently located appears in the Monitor window. You use the tools on the Audio pane to work with a movie's soundtracks (see Figure 24.12). Figure 24.12. You can use the Audio pane to add sound to a movie.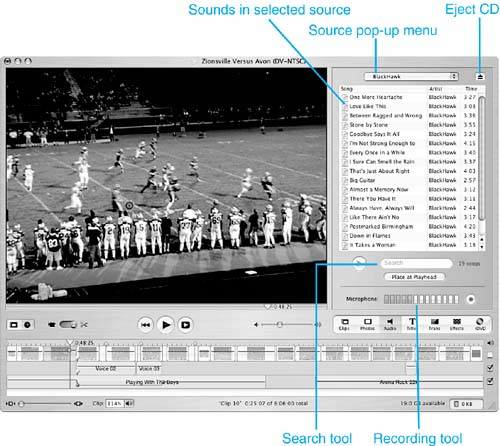 This pane includes the following tools:
Working with Native SoundYour movie probably has some sound that came with the video clips. If you recorded your clips with a DV camcorder, these sounds are whatever you recorded, for better or worse. Each clip has its own soundtrack, which is what you see represented in the Native track of the Timeline Viewer. The bars you see show the beginning and end of each audio clip (and by no coincidence, each video clip). Muting Native SoundsThe most basic change you can make is to mute the Native track so you don't hear any of its sounds. To mute the Native track, uncheck the Audio On check box located on the right end of the Native track. Now when you play your movie, you won't hear any Native sound from it. To hear the native sounds again, check the Audio On check box. Changing Relative Volume LevelsBecause your clips probably came from different sources or were recorded under different conditions, the sound level from one clip to the next might vary quite a bit. Although some variation is natural (you expect the roar of a jet plane to be louder than a cat walking across the road), too much variation (or the wrong variation, such as if the cat is louder than the airplane) can be annoying or distracting. Use the Relative Volume pop-up menu and text box to set the relative sound levels of the various sound clips on the Native track:
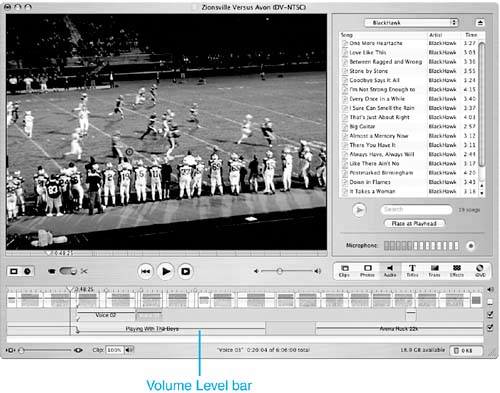
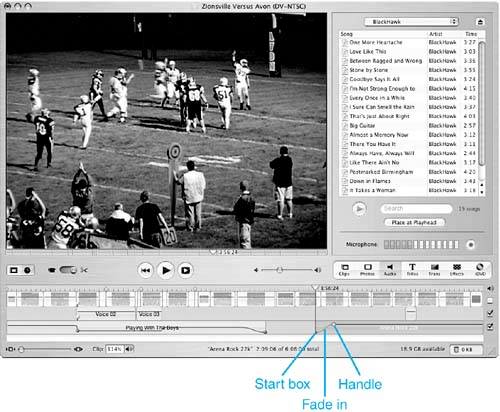
TIP You can change the relative sound levels for several clips at once by holding down the Shift or Fading SoundsYou can use iMovie's Clip Volume Levels tool to make the sound of a clip fade in or out smoothly. If you make a clip's sound fade in, it starts completely silent and smoothly increases to the level you set. Similarly, if you fade out a sound, its volume smoothly becomes quieter until by the end of the clip, when it has faded to silence. NOTE If you add a Fade Out or Fade In transition to a clip, its sound also fades, so you don't need to use the Edit Volume tool to fade the sound for that clip. To fade sound, perform the following steps:
TIP Before you can move a marker, you must select it. When a marker is selected, it is yellow. When it isn't selected, it is purple. NOTE To remove a marker (thus returning the Volume Level bar to its previous location), select the marker and press the Delete key or select Edit, Clear. Editing a Clip's Native SoundAs you learned when you began editing clips, whatever you do to a clip's video, you do to the clip's sound. This works the other way, too; changing the sound affects the video--unless you extract the sound from the clip (you learn how to do this in the next section). You should play each clip and listen carefully to its sound. Crop or trim the clips as needed to eliminate sounds you don't want or to include sounds you do want (without messing up the video). Extracting a Clip's Native SoundYou can extract the audio portion of the clip to work with it independently from the video clip. Extracting the audio from a clip also enables you to move it relative to the video clip. This is useful if you don't want to use all the audio but want to keep all the video in a clip. One of the best uses for the extracting audio feature is when you have a clip containing background music that should be at least somewhat synchronized with the video, such as a ballet performance. You can extract the audio, and then you can edit the video part of the clip without hacking up the music that goes with it. You can then spread the extracted music so the single music clip covers all the video. Although the music might not exactly match what is happening in the video anymore, this is much less distracting than music that jumps around as the edited scenes play. To extract a clip's sound track, select that clip on the Timeline Viewer. Then select Advanced, Extract Audio. The audio portion of the clip will be extracted and placed on the top Audio track. When you extract it, it's still in sync with the video clip from which it came. After the audio clip is extracted, you can use the audio-editing techniques you've learned about in this chapter to work with it. For example, you can move it around, lock it in place, and so on. When you extract audio from a video clip, the audio actually is copied to the audio track rather than cut from the video clip. The volume of the audio that is part of the video clip is set to zero so you never hear it again. Does this matter? Not really, but you shouldn't extract an audio clip unless you really need to. Because it is not actually removed from the video clip, your movie file is larger than if you didn't extract the audio (because iMovie carries two versions of that sound). If you want to mute only a specific audio clip, set its relative volume to zero instead of extracting it. This also means you can hear the sound of a video clip from which you have extracted the sound by selecting that clip and using the Relative Volume slider to increase the sound of the clip again. You can use this for some interesting sound effects because you can have multiple versions of the sound playing at the same time, with each being slightly out of sync with the others. TIP You can lock audio to a video clip so that when you move the video, the audio goes along for the ride and always remains in sync with the video. When a clip is locked, you will see the locked icons. One will appear at the beginning of the locked audio, and the other will appear at the point at which the audio is locked on the corresponding video clip. Adding Sound Effects to Your MovieOne of the more fun aspects of making a movie is adding sound effects to it. You can use the tools on the Audio pane to add sound effects to do this. To work with sound effects, open the Audio pane and select iMovie Sound Effects on the Source pop-up menu. The list in the middle of the pane shows all the built-in sound effects. Expand a collection of sound effects by clicking the expansion triangle next to it. The effects in the collection will be listed in the window. To hear a sound effect, double-click it or select it and click the Play button. The effect you click will play so you can preview it. Continue previewing sounds until you find one you want to use in your movie. When you find the perfect sound effect, drag the sound effect from the Audio pane and drop it onto one of the Audio tracks. When you move it over the track, a yellow line will appear on the track where the clip will be placed when you release the mouse button; this line will indicate the point at which the sound effect will start playing. In other words, where you place the effect on the track determines where in the movie the effect is heard. When you release the mouse button, a bar representing the sound effect will appear (see Figure 24.15). You can work with the sound effect just as you can with the other elements in an audio track. Figure 24.15. A sound effect has been added to the movie.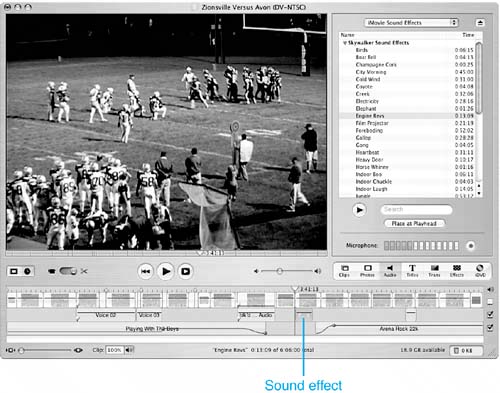 Drag the Playhead to the left of the sound effect you just placed and press the spacebar to preview it. To move the sound effect, click it to select it (its box will darken to indicate it is selected) and drag it to a new location. When you select the effect, the Playhead jumps to the beginning of the sound effect. At that point, the Playhead sticks to the sound effect and you can move it frame by frame using the left- and right-arrow keys (hold down the Shift key to move it 10 frames at a time). When you have the effect positioned so it plays at the perfect point in the video, you should lock it to that spot so that, if you move the video, the sound effect still plays at the right time. To do so, select the effect and select Advanced, Lock Audio Clip at Playhead ( If you want to move the sound relative to the video track again, select the clip and select Advanced, Unlock Audio Clip ( You can also overlap sound effects. To do so, simply drag one effect on top of another. At those moments where the sound effects overlap, both effects play. You can more easily manage overlapped sound effects by placing one in each Audio track. TIP You can add other sound effects by importing audio files, such as WAV, AIFF, or MP3. When you import a sound file, it is placed on the Audio 2 track at the current location of the Playhead. Recording Sound for Your MovieUsing the Audio pane, you can record your own sounds to play during your movie. One obvious use for this is to add narration to various parts of your movie. To record sound from an external source, you need to have some sort of microphone attached to your Mac. Some Macs have built-in microphones; other Macs have microphone jacks (although these sometimes require that you use a PlainTalk microphone). One of the best ways to record sound is to use a USB microphone. To record narration, use a headset-type microphone, such as those included with voice recognition software. Or add a USB sound input device that enables you to connect a standard microphone to it. To record narration or other sound for a movie, perform the following steps:
Adding Music to Your MovieA music sound track can help you convey a full range of emotions or simply make your movies more enjoyable to watch. There's just something about musicwe love to hear it, even when our main purpose is to watch something. Because working with music is much like working with the other sounds you have already learned about, you already understand almost everything you need to know about adding music to one of iMovie's audio tracks. You can use either the Audio track to store the music you want to play during allor partsof your movie. You can use several pieces during your movie, or you can have one piece play throughout. There are three ways to add music to a movie. The easiest way is to use music from your iTunes Music Library. You can record from an audio CD and import music as well. Because using music from your iTunes Music Library is the best way, it is the only one covered in this chapter. Frankly, because iTunes enables you to manage all the music with which you work, you aren't likely to use one of the other methods anyway. To add music from your iTunes Library to a movie, perform the following steps:
Mixing Audio TracksAfter you have added all the audio to your movie, play it. Listen to the individual tracks (use the Audio On check boxes to turn tracks on or off) and then listen to how the various sounds interact. Use the editing controls to change the relative volumes of the tracks. For example, your music should be quieter than any sound effects you want your audience to hear. You can use the Relative Volume tools to make this happen. You can also move music and sound effects between the two Audio tracks. This can be especially useful if you want to use part of one track but mute the rest of it. You can drag the sound from one track to the other and mute the track you don't want to hear. NOTE If any of your sound tracks extend beyond the end of your video track, it continues to play while the video track shows a black screen. When you change a video clip after you have added audio tracks, be sure to preview the entire movie again to ensure you haven't created a problem. The audio tools you learned how to use throughout this section work on all types of audio. For example, you can use the fade tools to fade a song, use the Relative Volume tools to set the relative volume of narration to music, and so on. Use these tools to blend all the sound in the soundtrack together. |

EAN: 2147483647
Pages: 317