| To this point, you have used only one of iMovie's two viewers. The Clip Viewer is a good place to focus on the video track of your movie. But as you get into finer levels of detail in the editing process and start working with audio, you will switch over to the Timeline Viewer. This view will provide a more detailed view of your movie, and you will see all the tracks that make up your movie. To switch to the Timeline Viewer, click its button (it has a clock icon) to see the Timeline Viewer (see Figure 24.11). This viewer looks more complicated than the Clip Viewer, and it is. This complexity enables you to do lots of great things, especially with your movie's audio track. Figure 24.11. The Timeline Viewer enables you to see all the tracks in your movie. 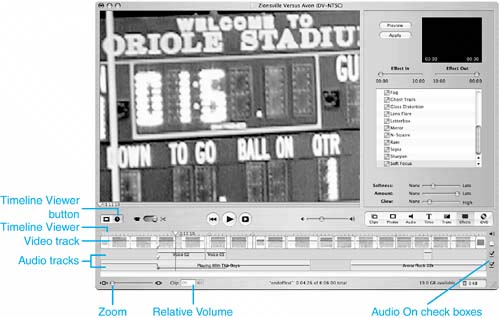
The Timeline Viewer has the following components: Video track The top track on the Timeline Viewer displays the video track for the movie. You can see each clip in the movie, including video clips, transitions, and titles. This information is exactly the same as in the Clip Viewer, although it looks a bit different. The video track also includes the audio that is part of the video. Audio tracks You can place any sound on either of the Audio tracks, including sound effects, sound you record, and music. The sound on the track is represented by blocks when the sound is a sound effect or by bars when the sound is recorded sound or music. Zoom You can select the magnification of the Timeline Viewer using the Zoom slider. When the slider is to the left, you see more of the movie's timeline but the elements you see are smaller and more difficult to work with. When you move the slider to the right, you zoom in and can see elements in greater detail. As you edit a movie, you can use this slider to change the view to be appropriate for the task you are doing. For example, when you are synchronizing sound, you might want a close-up view so you can position objects in precise relative positions. When you are recording sound from an audio CD, you might want to see more of the movie to see how much longer the sound you are recording will play relative to the movie's length. Relative Volume This pop-up menu and text box enable you to set the relative volume of clips. For example, you might want narration in your movie to be louder than the music score. You can choose the relative volume level on the pop-up menu or enter a percentage in the box to set the relative volume levels of various audio elements. Unlike the Volume slider in the Monitor, this slider does change the movie. It is called Relative Volume because you change only the relative volume levels of elements in your movie, not the actual volume of the movie itself (which is controlled by the viewer when your movie is played). Audio On check boxes The Audio On check boxes determine whether the audio contained in a track is audible or silent. When a track's Audio On check box is checked, the sound contained in that track is heard. Conversely, to mute a track's sound, you uncheck its Audio On check box.
NOTE You can do everything on the Timeline Viewer that you can on the Clip Viewer. You can click a clip to select it. The clip will be highlighted in blue, and then you can apply effects, transitions, and titles to it. You can also edit in the Monitor just as you can when you select a clip on the Clips pane or in the Clip Viewer. Use the Clip Viewer when you want to make large changes to your movie, such as placing and moving clips, adding transitions, and so on. For finer work, such as adding sound effects, use the Timeline Viewer.
|