| You can add all sorts of interesting visual effects to make your movie look better and even more interesting. Applying Effects to Your Movie The Effects pane contains a number of effects you can apply to the clips in your movie (see Figure 24.10). Figure 24.10. You can use the Effects pane to apply a variety of special effects to your movies. 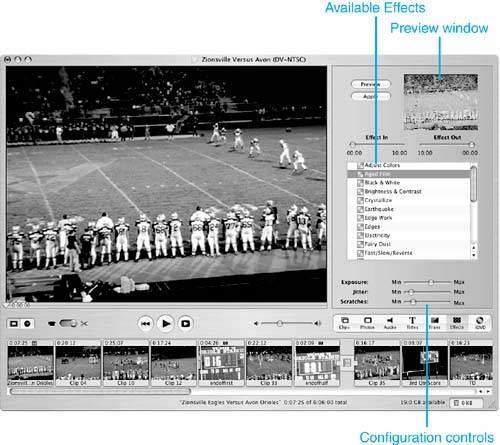
The Effects pane includes the following tools: Preview window When you select an effect, you will see a preview of it in the Preview window. Preview button Click this button to see a preview of the selected effect in the Monitor. Apply Click this button to apply the selected effect to the selected clip. Effect In The Effect In slider controls the number of frames over which the effect is applied. When the slider is all the way to the left, the effect is applied in full force from the start of the clip. As the slider is moved to the right, the effect fades in and is applied gradually over the time selected on the slider up to the maximum amount of time on the slider (10 seconds). For example, if you wanted to apply the black-and-white effect to a clip surrounded by two color clips, you might want the color of the clip to slowly fade away so the transition to black-and-white isn't jarring. Effect Out The Effect Out slider controls the time over which the effect fades out. When the slider is all the way to the right, the effect remains in full force until the end of the clip. As the slider is moved to the left, the effect begins to fade out from the point at which the slider is set (the maximum amount is 10 seconds before the end of the clip). Available Effects This area contains the list of effects from which you can choose. You can use the scroll tools to see all the available effects. Configuration tools Various sliders appear when you select certain effects; these sliders enable you to change some aspect of the effect. For example, when you select the Ghost Trails effect, you see three sliders that enable you to configure that effect. Some effects don't have configuration tools; these effects are either on or off.
The Effects pane is a bit different from the Transitions and Titles tool panes. The tools on the Effects pane are related to each other only in that they are effects you apply to the video track. This differs from the tools on the Transitions pane, for example, on which all the tools are related to creating transitions. Exploring the iMovie Effects Although they do different things, all iMovie effects work similarlyafter you use some of them, you can easily use all of them. Table 24.1 lists the effects on the default Effects pane. Table 24.1. iMovie Special Effects ToolsEffect | What It Does |
|---|
Adjust Colors | Enables you to adjust the hue, color, and lightness of a clip. | Aged Film | Makes the clip look old by adding scratches, jitters, and other artifacts that appear in video captured with old cameras. | Black & White | Converts a clip into blackand-white. | Brightness & Contrast | Enables you to adjust the brightness and contrast of a clip. | Crystallize | Makes it appear that you are viewing the clip through a piece of crystal or glass (you control the amount of distortion). | Earthquake | Causes the clip to "shake." | Edge Work | Displays a pattern on the screen. | Edges | Highlights the edges of everything on the screen. | Electricity | Causes an "electric" line to appear at the top of the clip as if it is being hit by lightning or a Tessla Coil. | Fairy Dust | Causes a trail of "fairy dust" to move across the screen. | Fast/Slow/Reverse | Enables you to make a clip play in reverse and to change its speed. | Flash | Makes a flash of light wash out the clip for a time. | Fog | Shrouds the clip in digital fog. | Ghost Trails | Causes the clip to be ghosted so objects are trailed by faint copies of themselves as they move. | Glass Distortion | Makes the clip appear as if you are viewing it through glass. | Lens Flare | Causes a spot of light to appear as if the camera were pointed toward the sun when the clip was captured. | Letterbox | Places black bars at the top and bottom of the screen to simulate the letterbox format. This effect actually cuts off the top and bottom part of the clip rather than reformatting it into the true letterbox format. | Mirror | Makes the clip appear with a mirror image of itself. | N-Square | Makes the clip play in each of multiple squares on the screen; you set how many squares appear onscreen. | Rain | If rainy days and Mondays get you down, you won't like this one. | Sepia | Applies a wood grain texture to the clip to make it appear old. | Sharpen | Adjusts a clip's sharpness. | Soft Focus | Applies a blur to the images in a clip. |
NOTE Be careful about using the Brightness & Contrast controls on your clips. The relative brightness levels of video can vary depending on the device you use to show your movie. For example, you might find that a clip appears slightly darker in iMovie than it does when you export it to videotape. Thus, if you make it brighter in iMovie, it might appear washed out when you view it on a TV. You should do some testing on your setup and how you will view your movie (such as exporting a sample to videotape) before you make many of these adjustments.
Applying Effects to Clips The general steps to apply a special effect are the following: 1. | Select a clip to which you want to apply an effect.
| 2. | Select the effect you want to apply.
| 3. | Set the time it takes for the effect to be applied and the time over which it disappears.
| 4. | Use the effect's other controls to adjust that effect's properties, while previewing the effect along the way.
| 5. | Apply the effect to the selected clip.
|
When a clip has an effect applied to it, you'll see an icon next to the timecode in the clip's box on the Clip Viewer. You can change a clip that has an effect applied to it by updating the effect: 1. | Select the clip that has an effect applied to it. You will see the clip in the Monitor.
| 2. | On the Effects pane, select the effect you want to change and use the Effects tools to configure it.
| 3. | Click Apply, and the effect will be applied to the clip; the clip will be rendered again.
|
When you apply an effect to a clip, iMovie renders that clip using the effect you apply. However, it also saves the original clip so you can go back to it if you want: 1. | Select the clip that has an effect applied to it.
| 2. | Select Advanced, Revert Clip to Original. The clip is restored to its previous condition.
|
You can restore a clip only until you empty the iMovie Trash. This is because the original version of the clip is stored in the Trash when you apply an effect to it. When the original version is removed from iMovie (by emptying the Trash), it is no longer available to be restored. Don't empty the iMovie Trash until you are sure you won't want to restore any of the modified clips to their original conditions. iMovie's effects are interesting and fun to apply. Here are some more tips about effects: You can apply multiple special effects to the same clip. When you apply two or more special effects to the same clip, the number of effects you have applied is indicated by the number next to the special effects icon. If you apply multiple special effects to a clip and want to restore it to its original condition, you have to use the Restore Clip command once for each effect you applied to the clip to get it back to its original condition. For example, if you applied two effects to a clip, you must use this command twice to restore the clip to its original state. As with transitions, you shouldn't add special effects just because you canwhich might be a temptation because they are fun to play with. A few special effects go a long way.
|