Distributing Your Movie
|
|
| Watching a movie in iMovie is okay, but iMovie is not really intended to be a viewing application. After you have finished your movie and are ready to release it to the world, you export your movie from iMovie. What you export it to depends on how you want your viewers to be able to watch your movie. People can watch your movie in three primary ways. You can record your movie on videotape that others can watch with a VCR. You can also export your movie to a QuickTime file that can be viewed on a computeryou then transmit your movie file to others in a variety of ways, including by email, on the Web, and on CD-ROM. The third, and definitely coolest, way is to use iDVD to record your movies on a DVD that can be played in a standard DVD player. The good news is that you can export the same movie using any or all of these methods to get your movie to as many people as possible. Distributing Your Movie on VideotapeDistributing your movie on videotape offers several benefits. The first is that the quality of your movie appears to be higher because you don't have file size or other technical limitations to deal with (as you do when you want your movie to be viewed on a computer). The second is that almost everyone has access to a VCR and TV and watching a videotape is easy. A third benefit is that storing a movie on videotape is easy (a tape doesn't hog valuable disk space, for example). Using videotape results in good viewing quality, as well as easy viewing and storage. The first step to getting your movie on videotape is to export your movie from iMovie to your DV camcorder. This process works similarly to getting clips from the DV camcorder into iMovie. Follow these steps to export your movie:
Several things happen, all of which are automatic, so you can sit back and relax. iMovie will set your camcorder to record and then wait a few seconds to ensure that your camcorder is ready. The camcorder will begin recording while displaying 1 second (unless you set it to a different amount) of black screen. After the black screen, your movie will begin to play and your camcorder will record it. A progress bar will show how much longer you have to go (because your whole movie plays, the process takes as much time as your movie is long). You won't hear any sound while your movie is being recordedthis is normal operation. When your movie is finished, iMovie will stop your camcorder. Your movie is now captured on the camcorder; from here on, you can treat it just like any other movie you have recorded. For example, you can connect the camera to a VCR and record your movie to a VHS videotape. NOTE Some DV camcorders enable you to pass through a signal. This means you can output to a VCR at the same time you are inputting to the DV camcorder through FireWire. This is good because you can make a first-generation recording directly on the VCR at the same time you record it on your DV camcorder. In fact, you might not even have to record it on the DV camcorder at all. To find out whether your DV camcorder has this feature, connect it to a VCR at the same time as you connect it to your Mac. If you see a picture through the VCR while you export the movie to the DV camcorder, you can pass on through. Distributing Your Movie ElectronicallyYou can also distribute your movie as a QuickTime file for viewing on a computer. The primary advantage of this method is that it is an easier and much less expensive way to get your movie to many people than using videotape. TIP You can also distribute your movie via email or on your .Mac HomePage by using the related pane of the Share sheet. The primary disadvantage to viewing your movie on a computer is that the quality is largely dependent on the computer being used and the technical savvy of the person to whom you have sent the movie. (Although it's easy, playing a QuickTime movie requires a bit more knowledge than playing a videotape does.) The steps to create a QuickTime version of your movie are the following:
iMovie will begin to export your movie, and a progress bar that gives you an idea of where you are in the process will appear onscreen. Unless your movie is really short, the export process will take a long time, so plan on doing something else for a while. Eventually, the progress bar will go away. When it does, you are finished exporting the movie. This QuickTime movie can be viewed just like any other QuickTime movie (for example, in the QuickTime Player or on the Web). The only complicated part of this process is choosing the format in which you want to export the movie. When exporting to QuickTime, you must always trade off file size versus quality. The better the quality of your movie, the bigger the file is (and the more resources it consumes to send or store). When choosing quality and file size, always keep the recipient of the movie in mind. If you know that the person to whom you plan on emailing it uses a 56K modem, keeping the file size small is important. If you are using a CD, maximize quality; it doesn't matter how big the file is (as long as it isn't bigger than the amount of space on the disc, of course). Exporting Your Movie to DVDUsing the iDVD application, you can put your iMovie projects on DVDs that can be played in a standard DVD player.
The iDVD pane enables you to add chapter markers to a movie and then send a movie to an iDVD project (see Figure 24.17). Figure 24.17. You can use the iDVD pane to add chapter markers and send a movie to iDVD.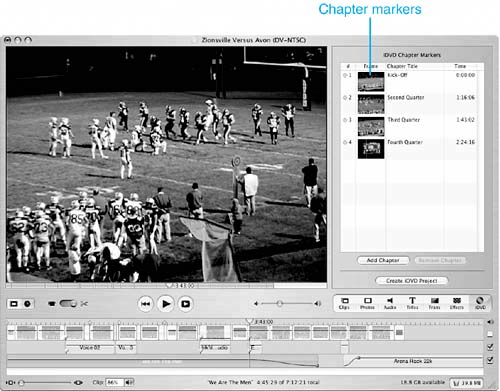 An overview of the tools on the iDVD pane is provided in the following list:
To add chapter markers to a movie, perform the following steps:
After you have added chapter markers, click the Create iDVD Project button to open iDVD, create a new iDVD project, and add the movie to it. |
 To get an overview of iDVD,
|
|
EAN: 2147483647
Pages: 317