| note  | If you only use an iPod shuffle, the information in this chapter doesn't apply and you can skip it. |
You can use your iPod to keep track of time and as a basic, but perfectly functional, alarm clock. This is handy when you travel because you don't need to carry a separate clock with you. Or, if you are like me and don't wear a watch, an iPod can help you keep track of time. Configuring the Time on an iPod Before you use the iPod as a clock, you need to configure its time and date. Use the following steps to do this: 1. | Select Main menu, Extras, Clock, Date & Time. You'll see the Date & Time menu (see Figure 10.1).
Figure 10.1. You use the iPod's Date & Time menu to configure your iPod's clock. 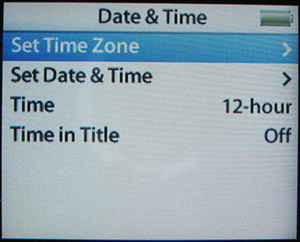
| 2. | Select Set Time Zone. You'll see the Time Zone menu.
| 3. | Scroll on the list of time zones until you see the time zone you are in.
| 4. | Highlight your time zone and press the Select button. The iPod's time zone will be set to the one you selected, and you will return to the Date & Time menu.
| 5. | Select Set Date & Time. You'll see the Date & Time menu again, except that this time it will be in the set date and time mode (see Figure 10.2). The hour will be highlighted.
Figure 10.2. You use this screen to set the time and date on your iPod. 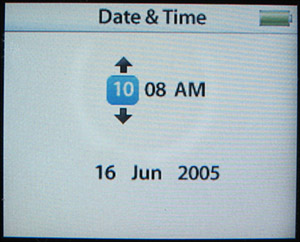
| 6. | Use the Click Wheel to increase or decrease the hour until the correct hour is displayed.
| 7. | Press the Fast-forward button so that the minute display is highlighted.
| 8. | Use the Click Wheel to increase or decrease the minute until the correct minute is displayed.
| 9. | Press the Fast-forward button so that the AM/PM indicator display is highlighted.
| 10. | Use the Click Wheel to change the AM/PM to the correct value.
| 11. | Continue using the Fast-forward button and Click Wheel to set the correct date, month, and year.
| 12. | Press the Select button. The date and time you selected will be set, and you will return to the Date & Time menu.
| 13. | Highlight the Time setting. The default value is to use a 12-hour clock.
| 14. | To use a 24-hour clock, press the Select button. The Time setting will become 24-hour, and a 24-hour clock will be used.
| 15. | To display the time in the menu title area, highlight Time in Title and press the Select button. The Time in Title setting will become On, and the time will be displayed in the title bar instead of the menu title (see Figure 10.3).
Figure 10.3. Placing the time in the title bar makes using an iPod as a clock much more convenient. 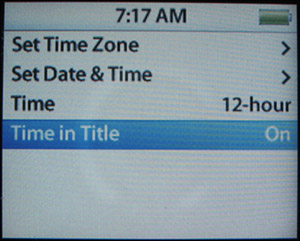
| 16. | Press the Menu button to return to the Clock menu.
|
Displaying the Time on an iPod There are a couple of ways to display the time and date on an iPod: Select Main menu, Extras, Clock. You'll see the Clock display (see Figure 10.4). In the title area, you'll see the current date, and just below the title, you'll see the current time. Figure 10.4. Who says an iPod can't do everything that a $2 watch can do? 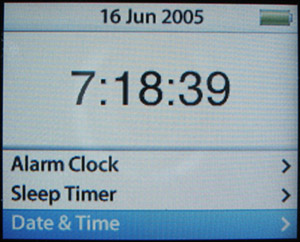
If you turn the Time in Title setting to On (as described in step 15 in the previous list of steps), the time will be displayed in the title area of every screen a second or two after you move to a new screen. When you first move to a screen, you will see the title, but after that small amount of time passes, the title will be replaced by the current time.
tip  | For faster access to the Clock display, add the Clock command to the Main menu. See "Setting Up Your Main Menu Preferences" on page 95. |
Setting and Controlling an Alarm You can also use the iPod's alarm clock to wake you up or remind you of an important time. To set an alarm, perform the following steps: 1. | Select Main menu, Extras, Clock, Alarm Clock. You'll see the Alarm Clock screen (see Figure 10.5). By default, the alarm is turned off, which is indicated by the Off setting.
Figure 10.5. You use this screen to set your iPod's alarm. 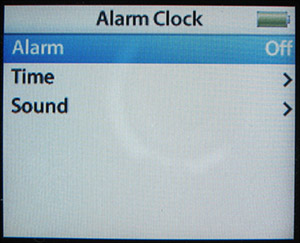
| 2. | Highlight Alarm and press the Select button. The Alarm setting will become On, and the alarm will be active.
| 3. | Highlight Time and press the Select button. You'll see the Alarm Time screen.
| 4. | Use the Click Wheel to select the time you want the alarm to sound. Drag clockwise to increase the time or counterclockwise to decrease it.
| 5. | When the correct alarm time is set, press the Select button. You'll return to the Alarm Clock menu.
tip  | Even though you set the alarm by the minute, you can get to any time quickly by rapidly dragging around the Click Wheel in full circles. |
| 6. | Highlight Sound. By default, the alarm sound setting will be Beep, which you can hear even if you don't have earphones or speakers connected to the iPod. If you choose a different sound, you have to have speakers or headphones attached to the iPod to hear the alarm.
| 7. | If you want to have a playlist start playing instead, press the Select button. You'll see a list of playlists on your iPod.
| 8. | Highlight the playlist you want to use as the alarm sound and press the Select button. You'll return to the Alarm Clock menu.
| 9. | Press the Menu button. You'll return to the Clock display. A bell icon will appear on the right side of the time to indicate that the alarm is set.
|
When the appointed time comes along, your iPod will turn on and play the beep sound or the selected playlist. If you combine an iPod with a set of speakers, such as the Altec Lansing IM3cs that I recommended in Chapter 8, "Using an iPod with a Home Stereo or Car Stereo," it becomes a very nice bedside alarm clock. This is especially useful when you frequently stay in hotel rooms in which you can find a bewildering variety of alarm clocks, each of which requires different steps to set. With your iPod, you don't need to bother with those. Just set its alarm and drop it into the speakers. You can then wake up to your favorite tunes. |


