Modifying Existing Styles
3 4
After you learn how to create styles, modifying existing styles is a snap. The main difference between creating and modifying styles is that you use the Modify Style dialog box instead of the New Style dialog box. To access the Modify Style dialog box, perform any of the following actions:
- In the Style Area, double-click the style name you want to modify to open the Style dialog box, and then click the Modify button.
- In the Styles And Formatting task pane, hover the mouse pointer over a style in the Formatting Of Selected Text drop-down list or Pick Formatting To Apply list, click the down arrow, and choose Modify.
- In the Styles And Formatting task pane, right-click a style in the Formatting Of Selected Text box or Pick Formatting To Apply list, and choose Modify.
The Modify Style dialog boxes for paragraph, character, table, and list styles look very similar to their counterpart New Style dialog boxes. These dialog boxes allow you to configure most of the same settings that are available when you create a new style.
Assigning Keyboard Shortcuts to Styles
One style modification trick that will come in handy when you're working with styles is assigning keyboard shortcuts to commonly used styles. If you use the same few styles as you work your way through a document, you might find it tiresome to repeatedly click a style in the Styles And Formatting task pane or select a style in the Style list. In those cases, it's quicker to create a keyboard shortcut that you can press whenever you need a particular style. Creating a shortcut is quick and easy. To do so, follow these steps:
- In the Styles And Formatting task pane, right-click the style you want to associate with a keyboard shortcut, and choose Modify. The Modify Style dialog box opens.
- In the Modify Style dialog box, click the Format button, and then click the Shortcut Key menu option. The Customize Keyboard dialog box opens, as shown in Figure 10-9.
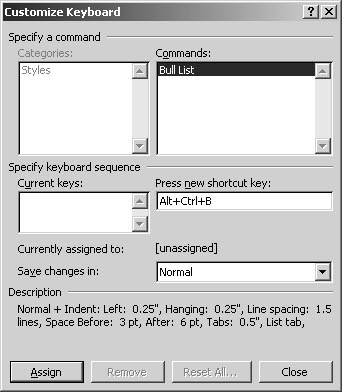
Figure 10-9. You can use the Customize Keyboard dialog box to create
keyboard shortcuts for styles. - Press the keyboard shortcut you want to use. If the combination is already in use, the dialog box will indicate which feature uses the keyboard shortcut; if the combination is available, the Currently Assigned To label will indicate that the keyboard command is unassigned.
- In the Save Changes In drop-down list, specify whether you want to save the keyboard shortcut in the global Normal template, in another template, or in the active document.
- Click Assign.
After you create a keyboard shortcut, you can type text, click within the paragraph or select the text you want to format, and then press the keyboard shortcut.
Renaming a Style
Sometimes you might want to rename a style—maybe the style's purpose has changed since the style was created, or maybe you want to make the style's name more descriptive. Regardless of your reasons, you can change a style name easily by following these steps:
- Right-click a style name in the Styles And Formatting task pane, and choose Modify.
- In the Modify Styles dialog box, click in the Name box, edit the style's name, and click OK.
Keep in mind that the name change is effective only in the active document. If you want to apply the name change globally, you need to save the style in the active template by selecting the Add To Template check box before you click OK.
You can also rename styles stored in documents and templates using the Organizer, as discussed in the section "Copying Styles from One Document to Another."
Adjusting Style Properties
As we've seen, you can select all instances of a given style of text and then apply formatting. But an easier and more efficient method (especially if the document is still in the creation stage) is to modify the style's properties. When you modify an existing style's properties, all text currently formatted with that style is updated to match the new settings. This reaction to modifications enables you to change the look of your document rapidly and efficiently, without having to revisit every instance of a style and manually applying formatting changes. This benefit can potentially help you avoid making hundreds of changes by hand.
To modify a style's properties, open the Modify Style dialog box, and remove and apply the appropriate formatting settings. You can use the controls in the Formatting section as well as the Format button's drop-down menu. After you've made your changes, click OK. Your document will be reformatted with the modified style settings.
Tip - Modify the default style settings
Because many styles are based on the Normal style, you can easily change the entire look of your document by modifying the Normal style's default font—for example, you might want to use Bookman Old Style in place of Times New Roman to create a more "open" look. (The Bookman Old Style font is wider than Times New Roman, which is considered fairly narrow.) The modifications you make to a style will apply only to the active document if the Add To Template check box is cleared when you implement style modifications.
Caution
Changing a built-in style and saving it in a template—especially the Normal template—can wreak havoc on documents that are based on the template.
Updating an Existing Style to Match Selected Text
In addition to modifying style properties and using the Automatically Update feature, Word 2002 provides another shortcut to reformatting styles used in an active document. Namely, you can change an existing style by instructing Word to modify the style to conform to selected text. To take advantage of this backdoor approach to formatting, follow these steps:
- In your Word document, format and select the text you want to use to modify a style.
- In the Styles And Formatting task pane, right-click the style you want to change, and choose Update To Match Selection.
After you choose the Update To Match Selection option, the style is modified to match the selected text's formatting, and all text formatted with the style takes on the new formatting settings. The changes you make using this option apply to the active document only.
Deleting Styles
Naturally, when you create and modify styles, you'll probably want to delete a few as well. You can delete styles from the active document's task pane or completely obliterate a style from a template. This section describes how to delete styles from the active document.
To learn more about editing templates (including deleting styles from templates), see Chapter 22 "Formatting Documents Using Templates, Wizards, and Add-Ins."
When you delete a style from an active document, you are essentially either deleting a custom style you created for the active document or instructing Word to not use a particular style found in the document's template. If you delete a paragraph style, Word applies the Normal style to all text that was formatted with the deleted style and removes the style definition from the task pane. You can delete styles in two main ways:
- Right-click a style in the Styles And Formatting task pane, and choose Delete.
- Double-click a style name in the Style Area, select the style (if necessary) in the Style dialog box, and click Delete.
Note
You can't delete the built-in Word styles from the All Styles view in the Styles And Formatting task pane. You can delete built-in styles from other views in the Show drop-down list in the Styles And Formatting task pane, because in those cases you're merely configuring the active document's task pane view, not modifying the template.
EAN: 2147483647
Pages: 337