Formatting Paragraphs by Aligning and Indenting Text
3 4
One of the most common paragraph formatting tasks is aligning paragraphs within a document. As you know, you can set margins to specify overall page and document alignment. But alignment matters don't stop there. You can also control alignment at the paragraph level by specifying text alignment and indentation. You can configure paragraph alignment settings using these familiar methods:
- Click buttons on the Formatting toolbar or press keyboard shortcuts to quickly format paragraphs.
- Use the horizontal ruler to align paragraphs visually.
- Configure settings in the Paragraph dialog box.
In this section, we'll examine the intricacies of each of these techniques.
For more information about setting margins and configuring overall page setup parameters, see Chapter 21, "Mastering Page Setup and Pagination."
Aligning Paragraphs Using Toolbar Buttons and Keyboard Shortcuts
The quickest way to apply paragraph formatting is to click within a paragraph or select a few paragraphs and then click a button on the Formatting toolbar or press a keyboard shortcut. Of course, these processes are limited by their default settings, but in many cases, the easiest route proves to be the best when it comes to paragraph formatting. To review which Formatting buttons and keyboard shortcuts can assist you in formatting paragraphs, see Table 7-1.
Numbered and bulleted lists also use paragraph formatting settings. For more information about lists, see Chapter 8, "Enumerating with Lists, Lists, and More Lists."
Aligning Paragraphs Using the Ruler
Formatting toolbar buttons and keyboard shortcuts supply quick access to paragraph formatting options, but the Word ruler offers visually oriented people an intuitive and more precise method for controlling paragraph alignment. The trick to effectively using the ruler is to become comfortable with the ruler's markers. To get up to speed, have a look at Figure 7-2, which shows the latest incarnation of the Word ruler (which looks extremely similar to the ruler used in earlier versions of Word). The next few sections describe how to use the ruler markers to format paragraphs.
Table 7-1. Formatting Toolbar Buttons and Keyboard Shortcuts for Aligning and Formatting Paragraphs
| Format | Toolbar button | Keyboard shortcut | Description |
|---|---|---|---|
Align Left | | Ctrl+L | Aligns information along the left margin of the page or specified area, with a jagged right edge. |
Align Center | | Ctrl+E | Aligns the midpoint of each line with the horizontal center of the page or area. |
Align Right | | Ctrl+R | Aligns information along the right margin of the page or specified area, with a jagged left edge. |
Justify | | Ctrl+J | Aligns text flush with both the left and right margins of the page or specified area. |
Line Spacing | | Ctrl+1 (single space), Ctrl+2 (double-space), or Ctrl+5 (1.5 space) | Controls the vertical spacing between lines of text. The Line Spacing tab includes a drop-down list of line spacing options. |
Decrease Indent | | Ctrl+Shift+M | Decreases a paragraph's indent by one tab stop. By default, tab stops are set every 0.5 inch. |
Increase Indent | | Ctrl+M | Increases a paragraph's indent by one tab stop. By default, tab stops are set every 0.5 inch. |
Border | | None | Applies a border to specified text. Clicking the Borders down arrow opens a drop- down menu of common border options. |


Displaying and Configuring the Ruler
By default, Word displays the ruler in all views except Outline view. If you don't see the ruler, you can display it by choosing View, Ruler.
As you can see in Figure 7-2, the 0 spot on the ruler corresponds to the left margin setting. By default, the left and right margins are set to 1.25 inches on 8.5–by-11-inch paper. Thus, the default setup provides 6 inches between the margins for content (see Figure 7-1).
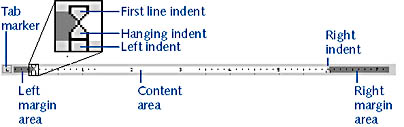
Figure 7-2. You can use the Word ruler to quickly and accurately align document information.
You've probably noticed that the ruler measurements are displayed in inches. If you prefer to use other units of measurement, you can change the default measurement unit setting as follows:
- Choose Tools, Options, and click the General tab.
- On the General tab, click the Measurement Units down arrow, select a measurement unit from the drop-down list, and click OK. Available options are Inches, Centimeters, Millimeters, Points, and Picas.
Adjusting Left and Right Indents
To adjust left and right indents using the ruler, click within the paragraph or select the paragraphs you want to adjust, or select the entire document (press Ctrl+A). Then click and drag the Left Indent or Right Indent marker on the ruler.
Tip
To move the First Line Indent marker along with the Hanging Indent marker, drag the small rectangle below the Hanging Indent marker on the ruler. Dragging the Left Indent rectangle retains the relative settings of the first line and left margin.
When you're working with tables, the ruler offers additional alignment markers, as shown in Figure 7-3. Namely, you can drag column markers to alter margin widths and row height markers to adjust row height; the margin markers move to correspond to the currently selected row and column. You can also indent table cell contents or entire columns.
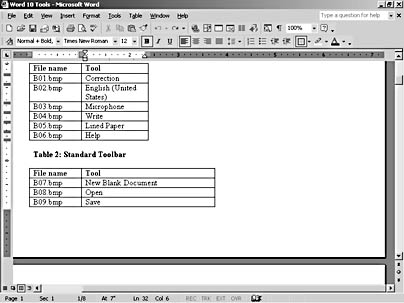
Figure 7-3. When you're working with tables in Print Layout view, you can use the vertical and horizontal rulers to adjust row heights and column widths.
For more information about resizing and aligning tables and table contents, see Chapter 18, "Organizing Concepts in Tables."
Creating First-Line and Hanging Indents
You can use the ruler to create a hanging indent or a first-line indent, as illustrated in Figure 7-4. To do so, click in the paragraph you want to format or select multiple paragraphs, and then drag the First Line Indent marker left or right to the desired location.
Tip
You can press Ctrl+T to create a hanging indent that aligns body text with the first tab marker. (By default, tabs are set every 0.5 inch.) You can press Ctrl+Shift+T to "unhang" an indent, regardless of how the hanging indent was created.
Aligning Paragraphs Using the Paragraph Dialog Box
Using toolbar buttons, keyboard shortcuts, and ruler markers to align paragraphs can be quick, but aligning paragraphs by using the Paragraph dialog box offers its own advantages. By configuring settings in the Paragraph dialog box, you can align paragraphs precisely as well as apply a number of paragraph formatting settings at one time.
To open the Paragraph dialog box, shown in Figure 7-5, choose Format, Paragraph, or right-click a paragraph (or selected paragraphs) and choose Paragraph on the shortcut menu.
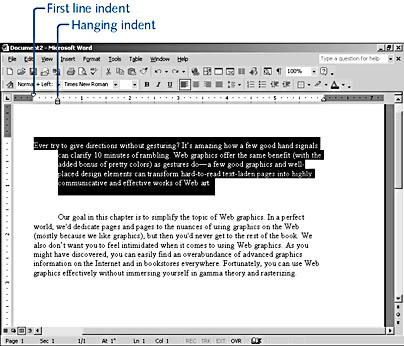
Figure 7-4. You can drag the First Line Indent marker to create a hanging indent or a first-line indent.
Tip
You can also access the Paragraph dialog box by clicking the Alignment or Indentation link in the Reveal Formatting task pane, as described in the section "Modifying Paragraph Attributes Using Reveal Formatting."
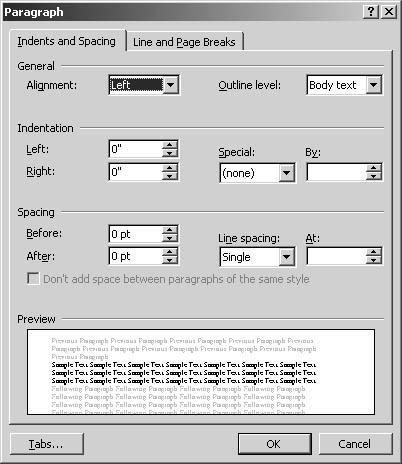
Figure 7-5. The Paragraph dialog box provides precise and complete control of paragraph formatting.
The Indents And Spacing tab offers the following paragraph alignment options:
- Alignment sets the position of paragraph contents, relative to the margins. Available alignment options are Left, Centered, Right, and Justified. The options in this drop-down list correspond to the alignment buttons on the Formatting toolbar.
- Left Indentation indents the paragraph from the left margin by the amount you specify. To display text or graphics within the left margin, enter a negative number in the Left box.
- Right Indentation indents the paragraph from the right margin by the amount you specify. To display text or graphics within the right margin, enter a negative number in the Right box.
- Special and By control the paragraph's first-line indentation. The Special drop-down list has three options: (None), First Line, and Hanging. The (None) option is selected by default. To specify the first-line indent, enter a value in the By box.
You can configure other paragraph settings in the Paragraph dialog box, including paragraph spacing parameters, as you'll see next.
EAN: 2147483647
Pages: 337
- Structures, Processes and Relational Mechanisms for IT Governance
- A View on Knowledge Management: Utilizing a Balanced Scorecard Methodology for Analyzing Knowledge Metrics
- Measuring ROI in E-Commerce Applications: Analysis to Action
- Technical Issues Related to IT Governance Tactics: Product Metrics, Measurements and Process Control
- Governing Information Technology Through COBIT