Inserting Web Page Components
3 4
In addition to adding text and graphics to your Web pages, you can present multimedia information, including movies, background sounds, and scrolling text. Word makes inserting these types of components easy by providing toolbar buttons on the Web Tools toolbar. To display the Web Tools toolbar, choose View, Toolbars, Web Tools, or right-click a toolbar, and choose Web Tools on the shortcut menu. In this section, you'll learn how to insert multimedia components. The Web Tools toolbar also provides buttons that help you create interactive Web forms. Creating interactive Web forms is discussed in the section "Creating Interactive Forms."
Inside Out
Multimedia files are not automatically stored in the HTML folder when you save a Web page in Word. Therefore, the best way to approach inserting a movie or sound file into your document is to copy the multimedia elements into your HTML folder before you add the component to your page. That way, the links to the multimedia component will work properly after you upload your Web page files.
Inserting a Movie Component
When you create a Web page in Word, you can insert a movie directly in your Web page. Keep in mind that this option includes the movie directly on your page, similar to displaying a graphic. You can configure the movie to play when the Web page is opened, when the user moves the mouse cursor over the movie, or in both instances. To insert a movie in your Web page, follow these steps:
- Position your insertion point where you want to insert a link to a movie, and then click the Movie button on the Web Tools toolbar.
The Movie Clip dialog box opens, as shown in Figure 31-20, and a default Movie icon is displayed in your document.
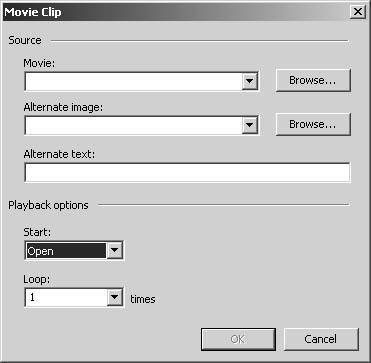
Figure 31-20. You use the Movie Clip dialog box to insert a movie in your Web page.
- In the Movie box, type the path or Web address of the movie file you want to link to, or click Browse to locate the file.
Tip
You can use AVI, MOV, ASF, and RM movie formats in Web pages. - In the Alternate Image box, type the path or Web address of the graphics file you want to designate as a substitute when the user's browser doesn't support movies or when the user turns off the display of movies.
- In the Alternate Text box, type the text you want to appear in place of the movie or alternate image.
- Click the Start down arrow, and select one of the following options in the drop-down list:
- Open plays the movie when the user downloads the Web page.
- Mouse-Over plays the movie when the user moves the mouse cursor over it.
- Both plays the movie when the user downloads the Web page or moves the mouse cursor over the movie image.
- In the Loop box, enter the number of times you want the movie to repeat, or click the down arrow and select a specific number or Infinite, and then click OK.
Tip - Control the movie's display while you work
To review a movie while you're working on your Web page document in Word, you can right-click the image representing the movie and choose Play on the shortcut menu. To stop the movie, right-click the movie, and click Stop. To disable the movie altogether while you work, click the Design Mode button on the Web Tools toolbar to work in Design Mode. (To return to standard Web Layout view, click the Design Mode button again.)
Generally, inserting a movie directly into a Web page isn't the best approach to take to Web page design. For the same reasons people turn off graphics or can't view graphics, some users also disable movies or can't view movies. In addition, people with slow Internet connections might not want to wait while movies download. Better design practice dictates that you copy the movie file into your Web page folder and then create a hyperlink (text or graphic) that links to the movie file. That way, users can choose whether they want to view your movie instead of being forced to download it.
To delete a movie from your Web page, click the Design Mode button on the Web Tools toolbar to enter Design Mode. Then right-click the Movie placeholder icon, and choose Cut from the shortcut menu.
Including Background Sound
Another multimedia element you can add to Web pages is background sound. Background sound refers to a sound file that plays when users display your Web page. You should use background sound sparingly. Many people find background sound annoying and a waste of bandwidth. If you find an instance in which a background sound adds to your page (maybe you're displaying a page about cricket chirps), you should feel comfortable adding the feature. Otherwise, your best bet is to provide a link to a sound file so that users can choose whether they want to play the sound file, instead of being forced to run it. Here's how to add a background sound to a Web page in those instances in which a background sound adds significantly to your Web page:
- On the Web Tools toolbar, click Sound. The Background Sound dialog box opens, as shown in Figure 31-21.
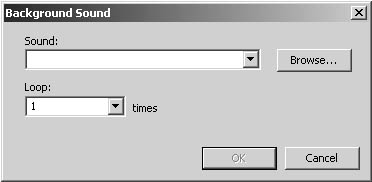
Figure 31-21. You can use the Background Sound dialog box to include background sound in your Web page.
- In the Sound box, type the path or Web address of the sound file you want, or click Browse to locate the file.
Tip
You can insert sound files in WAV, MID, AU, AIF, RMI, SND, and MP2 (MPEG audio) formats. - In the Loop box, type the number of times you want the background sound to repeat, or click the down arrow and select a specific number or Infinite.
To stop the background sound from playing while you work on the Web page, click the Design Mode button on the Web Tools toolbar. (This button stops both movies and background sounds from playing.) To hear your background sound, click the Design Mode button again to return to the standard Web Layout view.
To delete a sound from your Web page, click the Design Mode button, right-click the Sound placeholder icon, and choose Cut on the shortcut menu.
Tip
To stop a background sound when you're viewing a Web page on line, press Esc.
Adding Scrolling Text
Another type of multimedia component you can easily include on Web pages you build in Word is scrolling text, which is more commonly called marquee text by Web designers. Scrolling text is displayed like stock-ticker text—it enters on one side of your document and slides across to the other.
Caution
You should use scrolling text sparingly. Many browsers still don't support scrolling text and either will not display it at all or will display only part of it.
To insert scrolling text in your Web page document in Word, follow these steps:
- On the Web Tools toolbar, click the Scrolling Text button. The Scrolling Text dialog box opens, as shown in Figure 31-22.
- In the Behavior drop-down list, select from the following options. (To preview an option, select it and watch the sample text in the Preview box.)
- Scroll scrolls text across the screen. This is the default setting.
- Slide scrolls text once, stops at the other edge of the page, and then continues to display the scrolling text as static text.
- Alternate bounces the text back and forth between the left and right margins of the page.
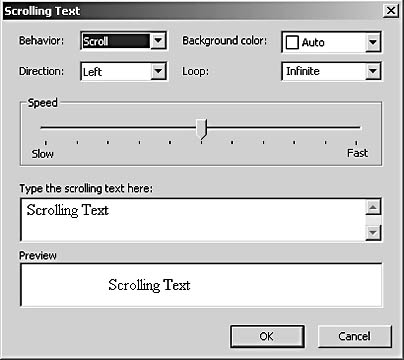
Figure 31-22. You use the Scrolling Text dialog box to include scrolling text in your Web page.
- In the Direction drop-down list, specify whether you want the text to scroll in from the left or right edge of the page.
- If desired, click the Background Color down arrow, and select a color from the drop-down list to be displayed behind the scrolling text. If you want to apply a background color, you must select one from the list; you can't apply custom colors to scrolling text items.
- In the Loop box, type the number of times you want the text to scroll, or click the down arrow and select a value from the drop-down list. By default, scrolling text is configured to scroll infinitely (or as long as the page is displayed). If you select the Slide option in the Behavior drop-down list, the Loop option is unavailable, because a slide implies only one scrolling action.
- Drag the Speed slider to modify how fast or slow your text scrolls (or bounces) across the page.
- Type the text you want to display in the Type The Scrolling Text Here box.
- Click OK when you're satisfied with your scrolling text settings.
After you insert scrolling text, you can further modify the component by working with it in Design Mode (click the Design Mode button on the Web Tools toolbar). In Design Mode, you can enhance your scrolling text in the following ways:
- Resize the scrolling text area by clicking the item and dragging the component box's selection handles.
- Format the scrolling text using Word's text formatting tools, such as the Font dialog box and the Formatting toolbar buttons. Select the scrolling text component (you can't select the text), and then apply the font formatting settings. To view the settings, click the Design Mode button to run the scrolling text. To return to formatting mode, click the Design Mode button again.
- Format the scrolling text component as a hyperlink by right-clicking the scrolling text component in Design Mode and choosing Hyperlink on the shortcut menu. The Insert Hyperlink dialog box opens.
In general, you should use scrolling text to draw attention to a particular informational bit; you shouldn't include critical information in this component (unless the information also appears elsewhere on the page). If a user's browser doesn't support scrolling text, that user might not see the message, so you want to make sure the information is "expendable" to some extent.
EAN: 2147483647
Pages: 337