Using Word as an E-Mail Editor
3 4
Almost everyone has had at least a brush with e-mail in one form or another. As an experienced Word user, you've probably sent more e-mail messages than you care to count. What you need to know about sending e-mail messages in Word is rooted in the Word-specific "how-tos." In this section, you'll see how you can get the most out of the e-mail features in Word.
As you might imagine, you can use Word to send messages formatted as plain text, rich text, or HTML. Most new and updated versions of e-mail applications (including Outlook 2002) offer a choice of plain text or HTML; earlier or scaled-down versions of e-mail applications generally support plain-text messages only. When you use Word, you can use any of the three listed formats. The following pros and cons should help you decide which format best suits your needs:
- Plain-text e-mail messages. By far, the most common e-mail message format is plain text. Plain-text e-mail messages are small, which makes sending and receiving messages quick. In addition, plain-text e-mail messages are easily interpreted by all e-mail applications. The main drawback of plain-text e-mail messages is that they are just that—plain text. You can't specify fonts, create layouts, include color, or apply any other text or document formatting; you can send only a typed message (with an occasional emoticon to spice up your note). To work around this limitation, most people send a plain-text e-mail message and attach document files that contain desired formatting. For more information about attaching files to e-mail messages, see the section "Sending an Attachment."
- HTML e-mail messages. HTML messages represent the newer wave of e-mail messaging. Using HTML messages, you can send highly formatted messages that incorporate font formatting, color, backgrounds, themes, and so forth. You can also use existing documents as e-mail messages without losing the document formatting. The drawbacks of HTML e-mail messages are somewhat significant. First, not all e-mail applications support HTML messages. When an HTML message is sent to a person who's using a text-only e-mail application, the recipient might have to wade through some HTML code gobbledygook before getting to the body of your message. A second drawback of HTML messages is that they are larger, which means that the messages can take longer to send and receive if they contain a lot of formatting and graphics. (This might be a particular concern if you know the recipient will be using a dial-up connection to receive your message.) Before you send HTML messages, make sure that the recipient can view HTML messages and has a relatively speedy Internet or network connection.
- Rich-text e-mail messages. You can also format e-mail messages in Word as rich text, which sends a plain-text e-mail message along with a .dat file (usually named Winmail.dat) containing information about message formatting as well as other data, such as voting button information. If recipients are using Outlook or the Exchange Client, a rich-text message will appear fully formatted. If recipients aren't using Outlook or the Exchange Client, they will receive a plain-text message with the Winmail.dat file attached (and the file's contents will seem meaningless). Unless you're working on an intranet and you need to use some of Outlook's special features, you'll usually want to format your e-mail messages using either the Plain Text or HTML setting.
By default, Word formats new, blank e-mail messages using the HTML format. You can change this setting by configuring the Mail Format tab in the Options dialog box in Outlook. To access this setting, follow these steps:
- In Outlook, choose Tools, Options, and click the Mail Format tab in the Options dialog box.
- Click the Compose In This Message Format down arrow, and choose HTML, Rich Text, or Plain Text in the drop-down list. (HTML is selected by default.)
- Click OK.
Keep in mind that if you format a document before you convert the document to an e-mail message, Word will automatically retain your formatting and send the message as an HTML e-mail message—even if you've specified plain text as your default e-mail message format. The default setting comes into play only when you create new, blank e-mail messages, as described in the section "Sending a Document, E-Mail Style."
Many e-mail options provided by Word are available only if you're using Outlook in conjunction with Word. For more information about using Outlook, see Microsoft Outlook Version 2002 Inside Out, also from Microsoft Press.
Turning Word On or Off as Your E-Mail Editor or Viewer
By default, Outlook is configured to use Word as your e-mail editor. This means that when you click the New Mail Message button on the Standard toolbar in Outlook, a blank e-mail document opens in a Word window. To verify this setting, open a new e-mail message in Outlook (by choosing File, New, Mail Message or pressing Ctrl+Shift+M), and look at the message's title bar. The title bar displays Untitled Message – Microsoft Word, and the window contains the standard Word features (including toolbars, view buttons, Browse By buttons, and so forth).
Although Word offers numerous formatting advantages over the standard Outlook message window, you can specify to not use Word as your e-mail editor if you prefer to use a scaled-down version of the Outlook message window. To control this setting, follow these steps:
- In Outlook, choose Tools, Options, and click the Mail Format tab in the Options dialog box.
- Select or clear the Use Microsoft Word To Edit E-Mail Messages check box, and then click OK.
You can change this setting at any time if you find you prefer one message window over the other.
Sending a Document, E-Mail Style
If you want to use Word to send an e-mail message, you can open an e-mail pane, which appears across the top of your Word window. This e-mail pane contains a number of buttons and text boxes that you can use to format and send your e-mail messages.
You can create new, blank e-mail messages in Word or you can create e-mail messages from existing Word documents, as follows:
- To create a new, blank e-mail message, choose File, New to open the New Document task pane, and click the Blank E-Mail Message link. The e-mail pane opens above a new, blank document, as shown in Figure 30-1.
- To create an e-mail message from an existing document, open an existing document or enter information in a new, blank document, and then click the E-Mail button on the Standard toolbar. The e-mail pane opens above the document's contents, as shown in Figure 30-2. Notice that the Subject box contains the document's file name. (If the document has been saved, the file name is displayed in the Subject box automatically.)
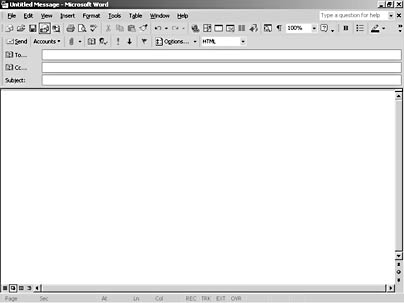
Figure 30-1. You can create a new, blank e-mail message by clicking the Blank E-Mail Message link in the New Document task pane.
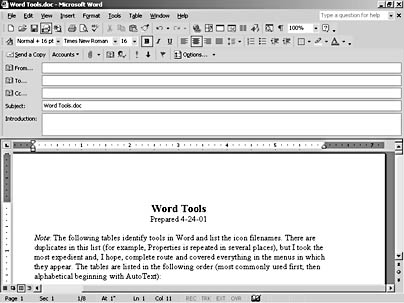
Figure 30-2. You can display the e-mail pane in an existing document, which enables you to send the entire document in an e-mail message.
As you can see in Figures 30-1 and 30-2, the e-mail pane varies slightly depending on how you create your e-mail message. When you click the E-Mail button on the Standard toolbar to add the e-mail pane to an existing document, the e-mail pane includes an Introduction box (discussed in more detail in the section "Including an Introduction in an E-Mail Message"). When you click the Blank E-Mail Message link in the New Document task pane, the e-mail pane includes a drop-down list that allows you to specify whether you want to format the message as HTML, rich text, or plain text.
After you display the e-mail pane in a document—regardless of whether it's a new document or an existing document—you are ready to configure the e-mail settings. Completing the e-mail pane is similar to addressing standard e-mail messages, as described here:
- In the e-mail pane, enter recipient names in the To box and the Cc box, if necessary. (For more information about adding recipients, see the section "Specifying Sender and Recipient Identities.")
- Enter a subject in the Subject box, enter the document contents if necessary, and then click Send or Send A Copy (depending on how you created the e-mail message).
In addition to this basic procedure, you can use a number of other addressing and formatting features provided in Word. For example, you can include introductory text, specify a sender other than yourself, include an attachment, create a custom signature, and control a number of other e-mail related features, as described in the next few sections.
Including an Introduction in an E-Mail Message
If you click the E-Mail button on the Standard toolbar from an open document, Word includes an Introduction box in the e-mail pane. This box allows you to add text without inserting it into the existing document. You might want to do this if you're sending a document for review or sending a copy of a Web page. When you add an introduction, the recipient sees the introduction text separated from the main text by a horizontal rule, as shown in Figure 30-3.
Specifying Sender and Recipient Identities
When you send e-mail from within Word, you can specify the following participating parties:
- Accounts. If you have multiple e-mail accounts set up on your computer, you can specify from which account you'd like to send the current e-mail message. To do so, click the Accounts button in the e-mail pane, and select
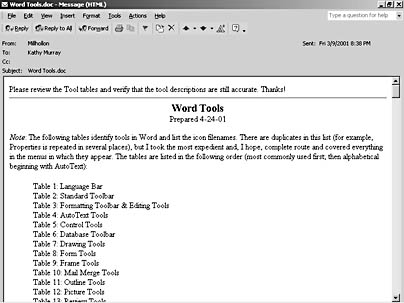
Figure 30-3. The Introduction box enables you to include ancillary text above your e-mail message's main contents.
the account you want to use to send the message. Figure 30-4 shows an Accounts drop-down list on a computer configured with three different e-mail accounts.
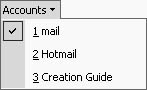
Figure 30-4. The Accounts drop-down list enables you to choose which account you want to use to send a message.
- From. You can choose to send an e-mail message on behalf of someone else by specifying a name in the From box. (If the From box isn't displayed in the e-mail pane, click the Options down arrow, and choose From on the drop-down menu.) When you send a message with a From name to a recipient using Outlook, the message header will show the From name in the Inbox, and the message itself will read Your Name on behalf of Sender's Name when the message is open. To specify a From name, type a name or an e-mail address in the From box, or click From in the e-mail pane to open the Sender dialog box. In the Sender dialog box, choose a name, and then click OK.
Caution
Be careful when using the From box because this option can produce misleading results. If the recipient is using Outlook, the on behalf of statement appears in the message header and the communication is clear. But if the recipient is using another e-mail application, such as Outlook Express, the message header will simply show the name you inserted in the From box—the recipient won't know that the message was created and sent by someone other than the listed name. - To. Obviously, you need to specify a recipient (or recipients) for your message. You can do so by entering e-mail addresses in the To box. If you manually enter multiple recipients, separate each e-mail address with a semicolon followed by a space. You can also enter e-mail addresses by clicking To and choosing names in the Select Names dialog box, shown in Figure 30-5. To specify names in this dialog box, select each name, and click To. After you've added all the names you want to include, click OK.
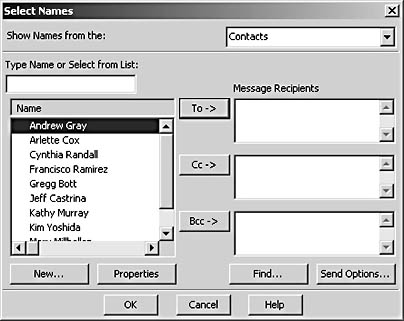
Figure 30-5. The Select Names dialog box enables you to specify e-mail addresses for the To, Cc, and Bcc boxes all at once.
- Cc. You can send copies of e-mail messages to other people by entering their e-mail addresses in the Cc (short for carbon copy) box, either by typing the addresses or by clicking Cc, selecting a name in the Select Names dialog box, clicking Cc, and then clicking OK. When you enter names in the Cc box, all recipients can see the names of all the people who've been sent a copy of the message.
- Bcc. You can use the Bcc (short for blind carbon copy) option to send a copy of an e-mail message to the person indicated in the Bcc box without revealing to the recipients specified in the To and Cc boxes that the additional copy was sent. To send blind copies of any e-mail messages, enter e-mail addresses in the Bcc box, either by typing the address or by clicking Bcc, selecting a name in the Select Names dialog box, clicking Bcc, and then clicking OK. If you don't see the Bcc box in the e-mail pane, click the Options down arrow, and choose Bcc in the drop-down list.
Tip - Verify the address resource
If you don't see the name you're looking for in the Choose Sender dialog box (which appears when you click From in the e-mail pane) or in the Select Names dialog box (which appears when you click To, Cc, or Bcc), verify that the proper address resource is displayed in the Show Names From The drop-down list. By default, Word presents the names stored in your Outlook Contacts folder, as shown in Figure 30-5.
Setting E-Mail Priority
At times, you might want to mark e-mail messages as urgent or not-at-all-urgent (also known as low priority messages). Marking your messages indicates instantly to recipients who are using Outlook or Outlook Express whether they should give special attention to a message. To set e-mail priority for a message, use the following techniques:
- To send a high-priority message, click the Importance: High button in the e-mail pane. A red exclamation point appears next to the message in the Importance column in the recipient's Inbox if the recipient is using Outlook or Outlook Express. (The treatment may vary in other e-mail applications.)
- To send a low-priority message, click the Importance: Low button in the e-mail pane. In Outlook or Outlook Express, a blue down arrow appears next to the message in the Importance column in the recipient's Inbox.
By default, e-mail messages are classified as normal priority; normal priority messages aren't accompanied by any priority marker. You can also configure message priority levels by clicking the Options button in the e-mail pane to open the Message Options dialog box, clicking the Importance down arrow, and choosing Low, Normal, or High in the drop-down list.
Adding a Message Flag
You can add flags to e-mail messages to indicate that you or the recipient needs to perform some type of follow-up action in response to a message. The flag will appear only in Outlook (not Word), in the Sort By: Flag Status column. To flag a message, follow these steps:
- In the e-mail pane, click the Message Flag button. The Flag For Follow Up dialog box appears.
- Click the Flag To down arrow, choose a flag type, such as Call, Follow Up, Do Not Forward, and so forth.
- Click the Due By down arrow, and choose a due date on the pop-up calendar. You can also click the down arrow for the adjacent drop-down list and specify a due by time.
- Click OK to close the Flag For Follow Up dialog box.
When you send the message, it will be accompanied by a flag in your Sent box in Outlook and in the recipient's Inbox if the recipient is using Outlook or Outlook Express. You can also add flags to and remove flags from existing messages in your Inbox.
Sending an Attachment
One of the most frequent tasks associated with e-mail messages other than sending notes is transferring files and objects as attachments. You might want to send attachments if a recipient doesn't use an HTML e-mail application or if you're sending a large document, graphic, movie file, spreadsheet, or other file type. You attach files in Word in the same manner you attach files in other e-mail applications. To do so, use one of the following techniques:
- Open the document you want to send as an attachment, and then choose File, Send To, Mail Recipient (As Attachment).
- In the e-mail pane, click the Insert File button to open the Insert File dialog box. Select the file you want to attach to the current e-mail message, and then click Insert. Notice that the file name appears in the Attach box in the e-mail pane, as shown in Figure 30-6.
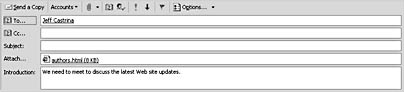
Figure 30-6. The e-mail pane displays the file names of any files attached to the current e-mail message.
- In Windows Explorer, right-click any document, and choose Send To, Mail Recipient.
When you send an attached file, recipients can save the file on their computers and view it locally.
Adding an E-Mail Signature
As you've probably seen during your e-mail travels, many people include a small blurb of information at the end of their e-mail messages. These blurbs are referred to as signatures. Signatures often supply extra contact information, links to Web pages, and sometimes witty or clever comments. Conveniently, you can edit or delete signatures just as you manipulate other text after it's inserted. To create a custom signature that you can use on an as-needed basis, follow these steps:
- Choose Tools, Options, click the General tab, and then click the E-Mail Options button. If necessary, click the E-Mail Signature tab. The E-Mail Options dialog appears, as shown in Figure 30-7.
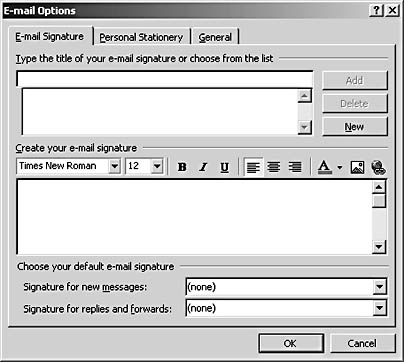
Figure 30-7. You can use the E-Mail Options dialog box to create a collection of signatures that you can choose from when you create e-mail messages in Word.
- In the top box, enter a title for the signature you're creating.
- Enter the signature's content (including text, graphics, and hyperlinks) in the box in the Create Your E-Mail Signature section, and click Add. By default, the newly created signature is assigned to be the default e-mail signature.
Tip - Choose a default signature
You can set any signature to be your default signature by configuring the E-Mail Signature tab in the E-Mail Options dialog box. To do so, select the signature's name in the Signature For New Messages and Signature For Replies And Forwards drop-down lists, and then click OK.
- To add another signature, click New, name the signature, enter the signature information, and then click Add. You might see a message box asking whether you'd like to make the signature the default for all e-mail messages. If so, click Yes or No as appropriate, and then continue to add any additional signatures.
- When you have finished creating signatures, click OK to close the E-Mail Options dialog box, and then click OK to close the Options dialog box.
After you create and set a default signature, Word inserts the default signature in future new, blank e-mail documents you create by clicking the Blank E-Mail Message link in the New Document task pane. In addition, your default signature will be added to messages that you create by replying to or forwarding messages sent to you. If you create a number of signatures in Word, you can easily change which signature is inserted into an e-mail message by right-clicking the existing signature and choosing another signature on the shortcut menu. When you do this, the existing signature is removed and the selected signature is inserted in your document. You can also use this shortcut menu to access the E-Mail Options dialog box (in which you can create a new signature, modify existing signatures, and change your default signature setting). Figure 30-8 shows a blank e-mail document containing a signature along with the shortcut menu showing other available signatures.
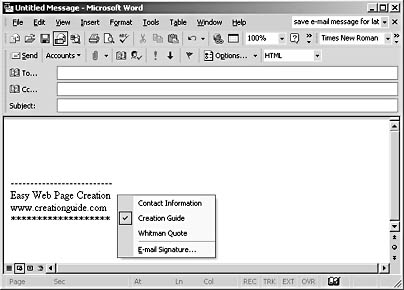
Figure 30-8. You can replace an existing signature by right-clicking it and then choosing another signature name on the shortcut menu.
Routing Documents via E-Mail
Most likely you're familiar with the routing slips used in office settings. In plain language, a routing slip is a list of names of people who need to review an item. When a person on the list reviews the item, she checks off her name, and passes the item to the next person on the list. Routed items can be anything from policy updates to "secret" birthday cards for a coworker. In Word, you can attach the online equivalent of a routing slip to a document, and you can route the document to each person on the list in sequence or all at once. You might want to use this feature if you want a number of people to review and return a particular document.
To create a routing slip, follow these steps:
- Open the document you want to route, and then choose File, Send To, Routing Recipient. If a security warning appears, asking whether it's OK to check your Outlook Address Book, click Yes. The Routing Slip dialog box appears, as shown in Figure 30-9.
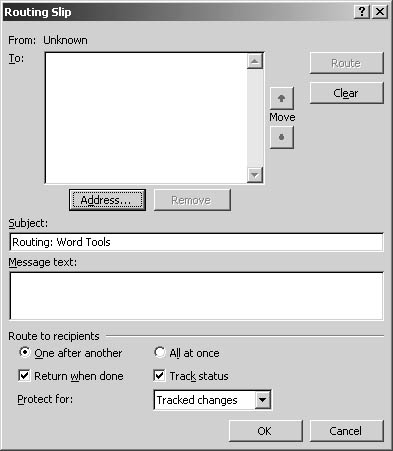
Figure 30-9. You can use the Routing Slip dialog box to create an online routing slip for a Word document.
- In the Routing Slip dialog box, click the Address button. The Address Book dialog box appears.
- In the name list, select the names you want to include on your routing slip (to select multiple names, press Ctrl as you select names), click To, and then click OK to close the Address Book dialog box. The selected names will appear in the To list in the Routing Slip dialog box, as shown in Figure 30-10.
- Adjust the order of recipients in the To list to suit your needs by selecting names and clicking the up or down arrow button to the right of the To list to move the selected name up or down in the list.
- Enter text in the Message Text box, and in the Route To Recipients section, specify whether you want to route the document to each routing slip recipient in sequence or all at once.
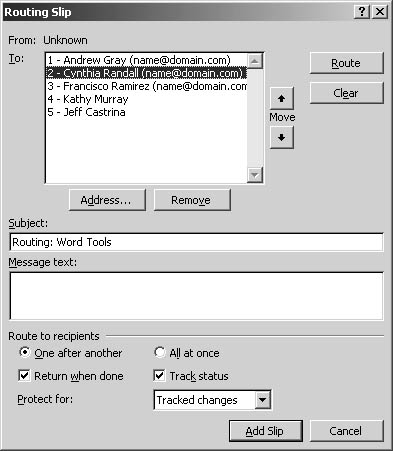
Figure 30-10. The To list in the Routing Slip dialog box specifies the users who will be included in the routing process.
- Click the Route button to begin routing your document. If you receive a security warning, click Yes to continue.
Recipients of a document with a routing slip will receive an e-mail message stating that the attached document is being routed. After the recipient opens and reviews the document in Word, he should choose File, Send To, Next Routing Recipient to forward the document to the next person on the routing slip. If the recipient wants to route the document to another name on the list, he can choose File, Send To, Other Routing Recipient. As the document is routed, the originator of the routed document receives update e-mail messages indicating the latest action (such as Bill routed the document name of document to Julie).
Formatting Messages with Stationery and Themes
If you choose to send HTML-formatted e-mail messages, you can send highly customized messages. You can use the themes provided in Word to format your e-mail messages, as described in Chapter 23, "Using Word's Desktop Publishing Features." You can also add stationery to e-mail messages. Fundamentally, stationery is a scaled-down version of a theme, and the process of applying stationery is similar to applying themes, as shown here:
- The E-Mail Options dialog box opens.
- In the E-Mail Options dialog box, choose the Personal Stationery tab, shown in Figure 30-11.
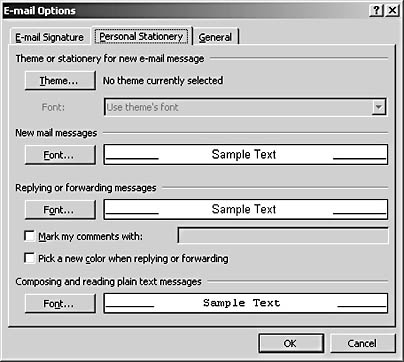
Figure 30-11. The Personal Stationery tab provides a number of format settings for e-mail messages, including the Theme button, which you can use to access the Theme Or Stationery dialog box.
- Click the Theme button. The Theme Or Stationery dialog box appears, as shown in Figure 30-12.
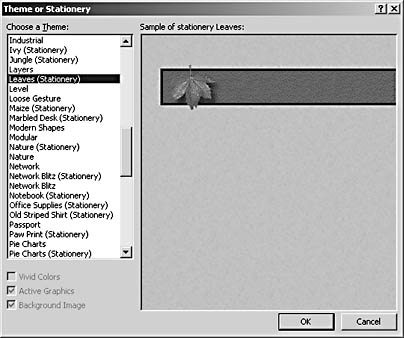
Figure 30-12. You can use the Theme Or Stationery dialog box to select and preview e-mail stationery and themes before applying them.
- Choose a name in the Choose A Theme list. Notice that a number of themes include the word Stationery after the theme name; themes labeled as stationery are scaled-down themes that specify an e-mail message's background and standard text settings (such as color and font).
- View themes in the preview box until you find one you want to use. Select the theme, click OK to close the Theme Or Stationery dialog box, click OK to close the E-Mail Options dialog box, and then click OK to close the Options dialog box.
When you set a default theme, Word applies the theme to all future e-mail messages you create until you reconfigure the default theme setting. The theme won't be applied to e-mail messages or documents you've already created.
Tip - Apply a theme to the current e-mail message only
You can apply a new theme to an existing e-mail message before you send it, regardless of whether the e-mail message has a theme already applied. To do so, choose Format, Theme to access the Theme dialog box. Select a theme, preview the theme, and then click OK. When you use this option, you won't see themes specially formatted as stationery, so you won't find themes listed with the (Stationery) identifier after the theme names.
Setting E-Mail Message Options
You can set a number of e-mail message options within Word by configuring settings in the Message Options dialog box, shown in Figure 30-13. To open the Message Options dialog box, click the Options button in the e-mail pane.

Figure 30-13. Click the Options button in the e-mail pane to access the Message Options dialog box.
The Message Options dialog box enables you to set the following options:
- Importance lets you mark a message as Low, Normal, or High importance. For more information about indicating an e-mail message's importance, see the section "Setting E-Mail Priority."
- Sensitivity lets you specify whether the contents of a message are Normal, Personal, Private, or Confidential. This option serves as an indicator only; it doesn't protect your document in any way.
- Security Settings opens the Security Properties dialog box, which enables you to encrypt e-mail messages and add digital signatures. For more information about security, see Chapter 34, "Addressing Security Issues."
- Use Voting Buttons includes voting buttons in e-mail messages so that recipients can reply to a message by clicking buttons such as Approve or Reject.
- Request A Delivery Receipt For This Message sends a message to you when your e-mail message arrives at the recipient's address.
- Request A Read Receipt For This Message sends a message to you verifying the date and time your message was opened by the recipient. (Of course, this doesn't guarantee that the recipient actually read your message.)
- Have Replies Sent To sends replies to the current message to another e-mail address you specify, such as an assistant's address.
- Save Sent Message To saves the sent message in the specified folder. By default, sent messages are saved in the Sent Items folder in Outlook.
- Do Not Deliver Before stores the message in your Outbox until the specified date and time.
- Expires After allows you to specify a date after which the message becomes unavailable.
- Attachment Format specifies the format to use when sending an attachment. You can choose from Default, MIME, UUEncode, and BINHEX formats.
- Encoding lets you specify the character set used in the message.
- Contacts displays a list of contact names and addresses you can use to link the message to in Outlook.
- Categories assists you in assigning words you can use to find and group related items in Outlook.
After you configure the settings in the Message Options dialog box, click Close to accept the settings and continue creating your e-mail message.
Configuring HTML Options for E-Mail Messages
In addition to configuring settings in the Message Options dialog box, you can control a couple of HTML-specific options for e-mail messages you send that use HTML formatting. To access these HTML-specific options, follow these steps:
- Choose Tools, Options, click the General tab, and then click the E-Mail Options button.
- In the E-Mail Options dialog box, click the General tab, shown in Figure 30-14.
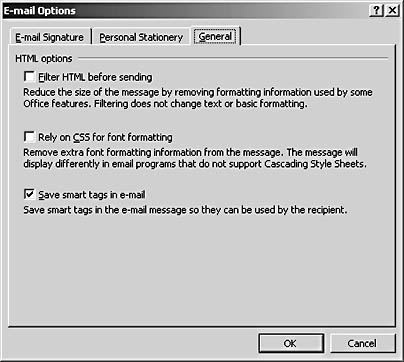
Figure 30-14. The General tab in the E-Mail Options dialog box presents three HTML-specific options you can control when you send HTML e-mail messages.
The General tab provides the following HTML-specific options:
- Filter HTML Before Sending. When you select this check box, Word reduces the file size of your HTML e-mail message without altering the message's appearance. The file size is reduced because Word strips out Word-specific formatting information from the message's HTML source code. If you plan to edit the document in Word later, you should keep this check box cleared.
- Rely On CSS For Font Formatting. When you select this check box, you instruct Word to create a cascading style sheet (CSS) and attach it to the e-mail message. The net result of this action usually reduces the size of the message. The drawback is that if the recipient uses an e-mail application that doesn't support CSS, your document will be displayed improperly.
- Save Smart Tags In E-Mail. If you know recipients will view your message in Outlook 2002, you can instruct Word to use smart tags in the e-mail message. Selecting this check box and sending a message to a recipient who uses an e-mail application other than Outlook 2002 will have no effect.
After you configure the settings in the E-Mail Options dialog box, click OK to save your settings, and then click OK again to close the Options dialog box.
EAN: 2147483647
Pages: 337