Working with Pictures
|
| < Day Day Up > |
|
The pictures we've been talking about thus far have been pictures you choose from the Clip Art task pane, pictures you import from another program, or images you scan or capture with a digital camera. These different ways of bringing images into Word produce different types of files:
-
Clip art can be either bitmapped or vector images.
-
Imported files can also be either bitmapped or vector images.
-
Scanned images and captured photos are always bitmapped images.
Although bitmapped images and vector images each require different editing techniques, you'll use basically the same procedures with them in Word. The primary difference between the two types of image files is what happens to them when you resize them. A bitmapped image will become stretched and blurrier as the graphic is enlarged; a vector image can be resized with no loss of quality or clarity.
Checking Out the Picture Toolbar
When you click one of the images you've added to your document, the Picture toolbar appears by default. This toolbar includes all the tools you need to make simple changes to the images you bring into Word. Table 11-2 introduces each of the Picture toolbar buttons and gives you an idea of when to use each one.
| Button | Name | Description | Use |
|---|---|---|---|
| | Insert Picture | Displays the Insert Picture dialog box so you can import a new file | You want to add another picture as you work in your document. |
| | Color | Gives you a set of four options that range from full color to black and white | You want to use a special treatment on an image— removing color, turning it to black and white. |
| | More Contrast | Makes the darks darker and the lights lighter | You want to make an image appear more abstract by creating sharp contrasts, with less subtle shading. |
| | Less Contrast | Lessens the division between dark and light, blurring the image | You want to create a subtle effect with no sharp contrasts. |
| | More Brightness | Increases the lightness of the overall image | You want to lighten a too-dark photo or image. |
| | Less Brightness | Tones down the brightness, taking the edge off light colors and reflections | You want to darken a too-light photo or image. |
| | Crop | Appears to cut off the edges of an image (in reality preserves the entire image) | You want to select a portion of a photo or image to be used in a document. |
| | Rotate Left | Rotates image to the left 90 degrees each time you click on its side | You want to turn the image, angle text, or skew a line or border. |
| | Line Style | Sets the width of the line style used to border the image | You want to create a boundary or frame for the image. |
| | Compress Pictures | Reduces the space required to save picture files (Web or Print resolution) | You're concerned about file size and want to optimize your document for the Web. |
| | Text Wrapping | Controls the way text wraps around the selected object | You're creating a document that incorporates text and images together in a continuing layout. |
| | Format Picture | Displays the Format Picture dialog box so that you can make choices in one place about cropping, brightness, compression, and more | You want to choose a number of settings for your picture at once. |
| | Set Transparent Color | Creates a "see-through" effect in an image when you click the areas you want changed | You're creating an image with a special effect—for example, a stylized photo or drawing. |
| | Reset Picture | Returns the picture to its size, shape, and brightness and contrast levels before you made any changes to it | You've modified an image and want to discard the changes you've made. |
Inserting Pictures
![]() You're already familiar with the function of the Insert Picture tool on the Picture toolbar. When you want to add an image to your document, click this button. The Insert Picture dialog box appears, enabling you to navigate to the folder storing the image you want to import. Select the picture, and then click Insert to add it to your document.
You're already familiar with the function of the Insert Picture tool on the Picture toolbar. When you want to add an image to your document, click this button. The Insert Picture dialog box appears, enabling you to navigate to the folder storing the image you want to import. Select the picture, and then click Insert to add it to your document.
| Tip | Add multiple images You can add more than one picture at once using the Insert Picture tool. When the Insert Picture dialog box appears, click the first image you want to import, and then press and hold Ctrl while you click additional images. When everything you want is selected, click Insert, and then Word imports all selected images at once into the current document. |
From Color to Black & White and Back
![]() The next button on the Picture Toolbar offers you the choice of turning your color photograph or picture into a grayscale or black and white image. By default, the image is assigned Automatic coloring. If you're preparing a document that will be printed in black and white only, you can change the image to grayscale (which turns each color into a shade of gray) or to black and white, which does away with subtleties and gives you a sharply defined black and white image. Figure 11-14 shows the four different effects of the Color tool settings.
The next button on the Picture Toolbar offers you the choice of turning your color photograph or picture into a grayscale or black and white image. By default, the image is assigned Automatic coloring. If you're preparing a document that will be printed in black and white only, you can change the image to grayscale (which turns each color into a shade of gray) or to black and white, which does away with subtleties and gives you a sharply defined black and white image. Figure 11-14 shows the four different effects of the Color tool settings.
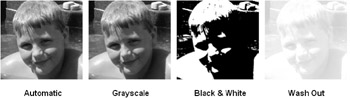
Figure 11-14: The Color tool enables you to create different looks for the images in your documents.
Changing Picture Contrast and Brightness
 In Word, the contrast and brightness controls for your images influence the overall effect of the image in a significant way. The Contrast setting controls the amount of differentiation between light and dark. When you increase the contrast by clicking More Contrast, the darks get darker and the lights get lighter. When you decrease the contrast by clicking Less Contrast, the darks lighten and the lights darken.
 The brightness of your image controls the light-to-dark ratio your graphic displays. Click More Brightness to increase the brightness, and the entire image lightens. When you click Less Brightness, the entire image darkens. The buttons are incremental, meaning that each time you click them, Word changes the amount of brightness just a bit.
| Tip | Test brightness and contrast levels There's no hard and fast rule for brightness and contrast settings for your images. Test out different settings and see what looks best. If you're creating a print document, remember to print a copy as a test, because what you see on the screen won't match the quality of what you see in print. |
Cropping Pictures
![]() Cropping images is a simple process. With the image displayed on your screen, click the Crop button on the Picture toolbar. The pointer changes to a cropping tool. You can then place the tool on the edge or corner of the image where you want to begin cropping and drag the side or corner of the image inward until the amount you want to remove has been cropped out.
Cropping images is a simple process. With the image displayed on your screen, click the Crop button on the Picture toolbar. The pointer changes to a cropping tool. You can then place the tool on the edge or corner of the image where you want to begin cropping and drag the side or corner of the image inward until the amount you want to remove has been cropped out.
| Tip | Reverse a bad crop If you decide after you've cropped an image that you liked it better the way it was before you changed it, you can undo the operation by clicking Undo on the Standard toolbar. If you want to reverse not only the cropping but other changes as well, you can return the picture to its original state by clicking Reset Picture on the Picture toolbar. |
Resizing Pictures
An operation that goes hand-in-hand with cropping is resizing the images you import. This is one technique you'll use all the time—pictures rarely come into your documents at just the right size.
To resize a picture in Word, click the image. Handles appear around the edges of the object. If you want to enlarge the image, click in one corner of the picture and drag the handle outward. A dotted outline follows the pointer, showing the new size of the image, as shown in Figure 11-15. When the image is the size you want, release the mouse button.

Figure 11-15: Resizing follows the same rule of thumb in Word as it does in other applications—click and drag to resize quickly.
| Tip | Resize accurately If you need to resize your picture to fit a space exactly, click Format Picture on the Picture Toolbar to display the Format Picture dialog box, click the Size tab, and then enter the exact measurements for your picture. |
If you're working with bitmapped graphics, like the one in Figure 11-15, you'll notice a loss of clarity when you enlarge the image. To maintain the best clarity possible for scanned and digitized images, keep their sizes as small as your design allows. Several small focused images are better than one large fuzzy one.
| Cross-Reference | One of the headaches with image size and placement is how well—or how poorly—the text wraps (or doesn't wrap) around the picture. For more about text wrapping, see "Controlling Text Wrapping". |
Rotating Pictures
Rotating is fun. If you're creating a special border effect, a text-and-graphics look in which your logo pitches sideways, a rolling star, or some other creative addition to your documents, the Rotate Left tool will come in handy. To rotate an image in Word, follow these steps:
-
Display your document in Print Layout view.
-
Select the image you want to rotate. The Picture Toolbar appears.
-
 Click Rotate Left. Word rotates an image to the left 90 degrees each time you click. A small green handle appears at the top edge of the rotated image; this is the handle that enables you to freely rotate the image.
 -
Position the pointer over the handle. The pointer changes shape to a curved arrow.
-
Drag the handle in the direction you want to free rotate the image. You can control the rotation in either direction, right or left, and modify the rotation as many times as you like. Figure 11-16 shows an image being rotated.

Figure 11-16: You can use both block rotate and free rotate functions right from the Picture Toolbar.Note A block rotate is the process of turning the picture by a certain number of degrees, in this case, 90 degrees. A free rotate is the process of grabbing an image by a handle and moving it to the desired rotation position.
Controlling Line Style
 Not all images need a frame—you'll discover how best to use the line style control settings on a case-by-case basis. With the Line Style options you can select a variety of line styles and widths, and you can further control them in the Format Picture dialog box, which appears when you choose More Lines at the bottom of the Line Style menu, shown below. To choose the line style you want, simply click the picture, click Line Style, and then make your choice.

Compressing Pictures
 Pictures can take up a hefty amount of disk space as well as use your computer resources in printing. Because of the amount of data stored in an image—especially a color image—the files tend to be huge. Word offers the Compress Pictures tool as a way to reduce the amount of space taken up by your picture files. To compress the pictures in the current document, follow these steps:
-
Select one of the pictures in the document. The Picture Toolbar appears.
-
Click the Compress Pictures button. The Compress Pictures dialog box appears, as shown in Figure 11-17.
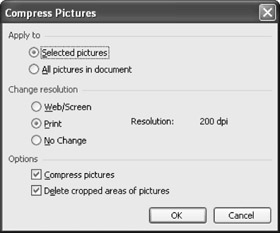
Figure 11-17: You can reduce the amount of space a graphics-heavy file requires by compressing images. -
If you want only the selected picture compressed, leave the default selection of Selected Pictures. If you want to compress all pictures in the document, click the All Pictures In Document option.
In choosing resolution, you can tell Word to lower the resolution for the screen (which also affects Web viewing) or for printing only.
Note If you have Word change the resolution to Web/Screen, the image will be displayed at 96 dots per inch (dpi) on your monitor. If you choose Print, Word reduces resolution to 200 dpi. For best results, test both resolution changes and see whether either works for you. If not, choose No Change, and then Word will compress the file as much as possible without affecting the display or print resolution.
-
For optimum compression, leave the last two check boxes, Compress Pictures and Delete Cropped Areas Of Pictures, selected. They ensure that the pictures are compressed as fully as possible.
-
Click OK to compress the images. Word displays a warning that compression might reduce the quality of the picture and asks you whether you want to apply picture optimization. If you want Word to step in and attempt to optimize your picture in light of the lost resolution, click Apply. If you click Cancel, the compression process is stopped.
If you're working on high-quality documents and file size is a concern but not a priority, you might want to think of ways to creatively reduce the size of your file without resorting to compression. In our experience, compressing images can cause a dramatic loss of quality, and if your objective in using pictures is to make your documents look their best, including a fuzzy or ill-defined image might not be quite good enough.
There are ways, however, that you can control file size as you work:
-
Limit your use of photos. Because of the information stored in a digitized image file, it can be very large. Consider how many photos you want to use in your document and use them effectively.
-
Watch your file types. Some files are larger than others. A small JPG or GIF file takes up less space than the average BMP or TIF file.
Controlling Text Wrapping
The whole point of adding pictures is to illustrate your text, right? So you need a way to help your text and graphics flow together naturally. You coordinate this text-and-art relationship by using the Text Wrapping tool, which is available on the Picture Toolbar.
| Tip | Make a Text Wrapping toolbar You can grab the top of the Text Wrapping list and drag it off in a toolbar by itself. This is convenient if you're working with text wrapping and want to save yourself a few toolbar clicks. |
To set up text wrapping in your document, follow these steps:
-
Select the picture you want to wrap text around. The Picture Toolbar appears.
-
 Click Text Wrapping. A list of Text Wrap choices appears.
 -
Select the Text Wrapping style you want to apply to your picture. Experiment if you like; you can always Undo your choice if you don't like the effect. The Text Wrapping options are the following:
-
In Line With Text—Selected by default; positions the picture in line with text as it appears at the current position.
-
Square—Causes the text to wrap left and right of the bounding box enclosing the picture.
-
Tight—Secures the text to the picture itself, not the bounding box (which might appear to be the same border, depending on the picture you are working with).
-
Behind Text—Causes the text to flow over the top of the picture.
-
In Front Of Text—Causes the text to flow behind the picture.
-
Top And Bottom—Wraps the text above and below the image in the document, if there's room. White space is left bordering the picture on the sides.
-
Through—Wraps text against the border of your picture, which is a nice effect if you have an uneven boundary that text could fill.
-
Edit Wrap Points—Enables you to fine-tune the way the text wraps around the picture. By controlling individual points, you can set a boundary for the text that follows the line of the picture.
-
Adding and Editing Wrap Points
Word gives you the means to create your own kind of text wrapping by creating boundaries for text to flow along. You do this by using Edit Wrap Points selection from the Text Wrapping tool on the Picture toolbar. For example, consider the example shown in Figure 11-18. In this example, the top and bottom edges of the wrap area were extended to make room for handwritten comments.
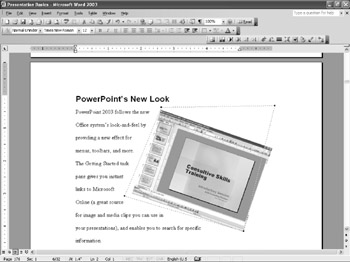
Figure 11-18: You can create your own text wrapping boundaries with Edit Wrap Points.
Here's the process for creating and working with edit wrap points:
-
Select the picture you want to work with. The Picture Toolbar appears.
-
Click Text Wrapping, and then choose Edit Wrap Points from the menu. A red dashed boundary with several black handles appears around your picture.
-
Grab one of the handles with the mouse pointer and drag it outward, to the edge of the boundary you want to create. The line stays where you put it.
-
To create another handle (you aren't limited to following the shape of the image—you can stretch and add edit points any place you choose), simply click in the boundary line and drag it out to the point at which you want it. This creates another handle at that point and establishes the boundary where you put it.
-
After you finish creating your text boundary, click Text Wrapping again, and then click Through. The text wraps up to, but not into, the new text boundary you created.
Formatting Pictures
When you're comfortable working with pictures and you're used to getting the color, shading, brightness, and text wrap choices just the way you want them, you might want to handle all these choices in one place rather than selecting them individually. That's what the Format Picture dialog box is for. Also available from the Picture Toolbar, the Format Picture dialog box, shown in Figure 11-19, enables you to make choices for colors and lines, picture size, text wrapping, alignment, brightness and contrast, cropping settings, and Web text settings.
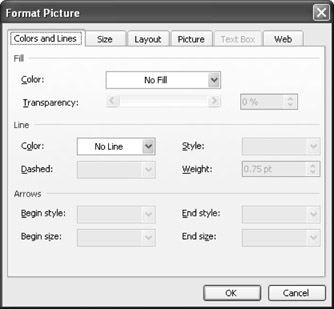
Figure 11-19: The Format Picture dialog box combines many of the options you've worked with individually on the Picture toolbar.
Because most of this is covered elsewhere in this chapter, and because finding your way around a dialog box is doubtless a technique you mastered long ago, it's necessary to describe only one item in the Format Picture dialog box: setting alternative text for Web display.
Creating Web Alternative Text
If you're using Word to create a Web page, when you put graphics on a page, it's possible that the visitors to your site won't ever view them. That's not because of bandwidth issues; that's because some users prefer to browse with their graphics capabilities disabled. It enables them to move more quickly through Web pages and get on with the business of surfing. But if your visitors don't have their graphics enabled and you've got all these great pictures on your site, what are they going to see?
That's where alternative text comes in. You can add a text message that explains what the image would look like if the user chose to view it. Also, alternative text can provide a message while a large file loads or alert a user if a file is missing.
To add alternative text to your document, follow these steps:
-
 Click the picture to which you want to add alternative text and make sure the Picture Toolbar appears. (If it doesn't appear automatically, right-click the image, and then choose Show Picture Toolbar from the menu.)
 -
Click Format Picture. The Format Picture dialog box appears.
-
Click the Web tab. This tab gives you a note box where you can type the message you want to appear in place of the picture, as shown in Figure 11-20.
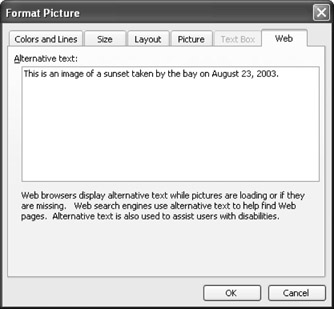
Figure 11-20: Alternative text gives Web visitors something to view if they don't have graphics enabled in their browsers.
Troubleshooting: Graphics are missing from my document
If you don't see graphics in your document, make sure that you haven't enabled the Picture Placeholders option in the Options dialog box. This feature helps speed up screen display by showing only the outlines of graphics. Choose Tools, Options, and then click the View tab. Make sure the Picture Placeholders check box, located in the Show section, is not selected.
|
| < Day Day Up > |
|
EAN: 2147483647
Pages: 373
- Integration Strategies and Tactics for Information Technology Governance
- Linking the IT Balanced Scorecard to the Business Objectives at a Major Canadian Financial Group
- A View on Knowledge Management: Utilizing a Balanced Scorecard Methodology for Analyzing Knowledge Metrics
- Measuring ROI in E-Commerce Applications: Analysis to Action
- Technical Issues Related to IT Governance Tactics: Product Metrics, Measurements and Process Control