Entering Form Fields
|
| < Day Day Up > |
|
Once you have the basic text and design for your form in place, you can add the features that make it truly interactive: the form fields. Word enables you to enter three different types of fields to your forms:
-
Text fields Enable the user to type text, numbers, symbols, or perform calculations in text-entry boxes. Use this type of field when you're asking an open-ended question, when users are asked to provide comments or suggestions, or when you want to provide the flexibility for user-controlled input.
-
Check box fields Enable the user to click a box to add a check mark. Use this type of field when users can select more than one response.
-
Drop-down fields Provide a list of options for the user to review. This type of field is used when there can be only one response selected from a range of options.
The following sections go step by step through the process of adding each of these field types and choosing the options related to the type(s) you selected.
| Note | The options for adding macros to the various form fields and customizing help to assist users in filling out forms are available in each of the Form Field Options dialog boxes for the various field types. For more information on working with macros and customized help in Word forms, see "Adding Help Messages to Forms", and "Incorporating Form Macros". |
Viewing Fields
In the next section, you'll learn how to add fields to your form. Before you'll be able to see a field the way your users will see it, however, you need to protect the field. Simply click the field and then click the Protect Form button on the Forms toolbar. You'll then be able to see a field the way it will appear to users, as shown in Figure 31-11.
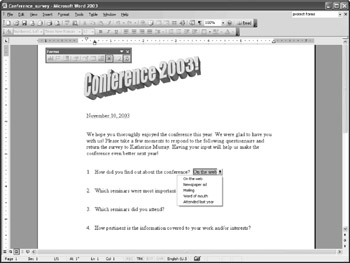
Figure 31-11: You can view a field you create by clicking the field and clicking the Protect Form button.
Inserting a Text Field
It is possible that the text field will be the type of field you use most often. A text field is a basic input tool-it records information you need that only the user can enter. For example, on a service request form, text fields would include the customer name, address, phone number, and email address. Another text field would record any comments on the service to be performed.
To add a text field to your form, follow these steps:
-
Place the insertion point where you want to add the text field.
-
 Click the Text Form Field button on the Forms toolbar. Word inserts the field {FORMTEXT} in your document at the insertion point.
Note The field codes that Word inserts automatically can't be modified; to change the settings for the inserted field type, use the Form Field Options button on the Forms toolbar.
Selecting Text Field Options
 Once the {FORMTEXT} field is placed in your form, you can select the Form Field Options you want to apply to the field. Click the Form Field Options button on the Forms toolbar, and the Text Form Field Options dialog box appears, as shown in Figure 31-12.
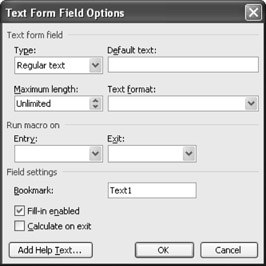
Figure 31-12: You make choices about the text field in the Text Form Field Options dialog box.
Choosing the Text Form Field Type
In the Text Form Field Options dialog box, you choose the type of text field you want to create and Word changes the code accordingly. In the Type list, select one of the following field types:
-
Regular Text Includes text, numbers, symbols, and spaces
-
Number Accepts numbers
-
Date Requires dates
-
Current Date Displays the current date and cannot be modified by users
-
Current Time Displays the current time and cannot be modified by users
-
Calculation Calculates numbers and cannot be modified by users
Tip Add default entries for users You can include a default entry in a text form field so that your user doesn't have to enter it. Simply add the text you want to appear in the field after creating the text form field. In the Text Form Field Options dialog box, type the text in the Default Text box and select the FillIn Enabled check box. The text you entered in the Default Text box will be displayed in the form until the user clicks in the field and types another entry.
Specifying Field Length
You can control the length of the text form field entry you will allow. If you've asked an open-ended question, perhaps requesting user comments about a new site feature you've added, you can leave a virtually unlimited space for user response. If, on the other hand, you want to limit the response to a few words, you can set the limit of the field length in the Text Form Field Options dialog box by following these steps:
-
Click the text form field code to select it.
-
Click the Form Field Options button on the Forms toolbar. The Text Form Field Options dialog box appears.
-
In the Maximum Length box, click the up arrow to display the number of characters you want to allow. Or, as an alternative, you can click in the field and type the number. A character can be a text character, a number, or a symbol.
-
Click OK to close the dialog box and return to the form.
Note If you want to link the text field to a bookmark you've previously created in your document, you can enter the name of the bookmark in the Bookmark box in the Text Form Field Options dialog box. Simply click in the box and type the bookmark name. For more information about creating and using bookmarks, see "Creating Bookmarks for Document Navigation".
Controlling Text Display
If it matters to you or to your data management personnel how data is entered in the forms you create, you can control the capitalization of the text users enter in form fields. You can choose to display entries in all uppercase, lowercase, or in a variety of other displays. To choose the way text appears, follow these steps:
-
Click the text form field code to select it.
-
Click the Form Field Options button on the Forms toolbar. The Text Form Field Options dialog box appears.
-
Click the Text Format arrow. Choose from one of the following options:
-
Uppercase formats entries in uppercase letters.
-
Lowercase formats entries in lowercase letters.
-
First capital displays the entry with an initial first letter.
-
Title case treats the entry as though it is a title entry, with an initial capital letter in each word, with the exception of articles and short prepositions.
-
-
Click OK to close the dialog box and return to the form. Word adds the necessary field code so that the information entered is displayed as you selected.
Tip Calculate changes automatically If you want Word to calculate the fields in your form each time you exit the form, select the Calculate On Exit check box in the Text Form Field Options dialog box and click OK. Each time you exit the form, Word updates the numeric fields and recalculates any equations in the form.
Adding a Check Box Field
If you want to include choices on your form in which users can select more than one option, you can create a list consisting of multiple check boxes. For example, suppose that your IT department is conducting a survey to find out how happy the employees are with the technical support services. You might include a question such as the following:
-
Which of these services are important to you?
-
Same-day response times
-
Talking to a tech support person as opposed to an automated system
-
Being able to get a loaner machine while yours is in the shop
-
You can turn the list items into check boxes so that users can select all the choices that apply to them. To create a check box field, follow these steps:
-
Place the insertion point where you want to add the check box field.
-
 Click the Check Box Form Field button on the Forms toolbar. Word inserts a check box symbol at the insertion point and places the code {FORMCHECKBOX} on the form.
 -
Add the check box label by pressing the Spacebar and typing the label of your choice.
-
Repeat as needed to insert additional check boxes.
Tip Display the form field codes If you want to see which code Word is inserting in your document when you add fields using the Forms toolbar, simply press Alt+F9. The display changes to show the field codes. When you're ready to return to the original display, press Alt+F9 again.
Resizing the Check Box
By default, the check box field is created to match the size of surrounding text. If you want the box to stand out, you might want to modify the size of the check box character. To do this, you need to change the Check Box Size option in the Check Box Form Field Options dialog box by following these steps:
-
Double-click the check box or select it and click the Form Field Options button on the Forms toolbar. The Check Box Form Field Options dialog box appears, as shown in Figure 31-13.
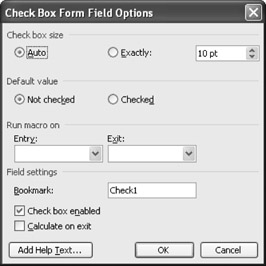
Figure 31-13: The Check Box Form Field Options dialog box enables you to make choices about the way your check box field will look and act. -
In the Check Box Size section of the dialog box, click Exactly, and increase or decrease the size value in the text box to match the size you want.
-
Click OK to save your changes and return to the form.
Note If you want to lock a check box field so that users can't alter it, select the Check Box Enabled check box in the Check Box Form Field Options dialog box.
Creating a Drop-Down Field
You use a drop-down field when you want to provide a list of choices for the user. In the example described above, you might want to give users the choice of rating the kind of experience they most recently had with tech support. To create a drop-down field, follow these steps:
-
Place the insertion point where you want to add the field.
-
 Select the Drop-Down Form Field button. Word adds a drop-down field to your form at the insertion point.
 -
Double-click the form field or select it and click Form Field Options on the Forms toolbar to display the Drop-Down Form Field Options dialog box, shown in Figure 31-14.

Figure 31-14: The Drop-Down Form Field Options dialog box is where you'll enter the items for a drop-down list. -
Add entries to the list by typing items in the Drop-Down Item box and clicking Add. Each item is added to the list.
-
Continue adding items as needed. Click OK to close the dialog box.
|
| < Day Day Up > |
|
EAN: 2147483647
Pages: 373
- Key #1: Delight Your Customers with Speed and Quality
- Beyond the Basics: The Five Laws of Lean Six Sigma
- Making Improvements That Last: An Illustrated Guide to DMAIC and the Lean Six Sigma Toolkit
- The Experience of Making Improvements: What Its Like to Work on Lean Six Sigma Projects
- Six Things Managers Must Do: How to Support Lean Six Sigma