Controlling Objects in Drawings
|
| < Day Day Up > |
|
When you create a drawing using objects, you'll find that you frequently need to adjust existing objects in a number of ways. Because drawn pictures are made of lines and shapes, you can reshape, group and ungroup, reorder, and change the color of one or all parts of a picture. This part of the chapter describes the numerous ways you can work with existing objects when you create drawings in Word.
Modifying Objects
Rarely will you instantly create a shape in the exact position and size required by your drawing. Therefore, you need to become proficient at resizing, reshaping, rotating, and flipping objects before you can successfully create drawings in Word.
Resizing Objects
To resize an object, select the object, and then drag the object's selection handles. You can resize a single shape, a group of selected shapes, or the entire drawing canvas. When you resize drawing objects, Word redraws the lines and shapes to meet the newly designated dimensions.
Reshaping Objects
Many AutoShapes display a yellow diamond-shaped adjustment handle when you select them. This adjustment handle enables you to change the most prominent feature of a shape. For example, you can change the length and width of a star's points by dragging the star's adjustment handle. Figure 12-24 shows a star shape that has been modified using this technique.
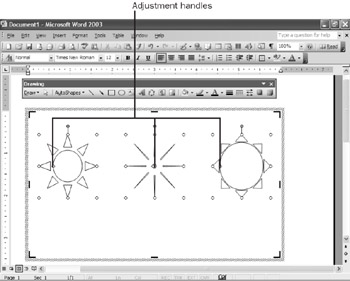
Figure 12-24: These shapes were created from the same AutoShape (Sun in the Basic Shapes menu); each has been modified by dragging its yellow diamond-shaped adjustment handle.
Rotating Objects
In addition to resizing and reshaping objects, you can rotate them. To do so, use either of the following methods:
-
Drag the green round rotation handle located near the top of the object, and then click outside the object to set the rotation position.
-
On the Drawing toolbar, click Draw, choose Rotate Or Flip from the menu, and then choose Free Rotate, Rotate Left, or Rotate Right. When you choose Rotate Left or Rotate Right, you rotate the object by 90 degrees. When you choose Free Rotate, you can rotate the object to any angle by using the rotation handle that appears.
Remember, if your object contains a fill effect and you want the fill to rotate with the object, you must make sure that the Rotate Fill Effect With Shape check box is selected in the Fill Effects dialog box.
| Tip | To restrict the rotation of objects to 15-degree angles, press Shift while you drag the rotation handle. |
Flipping Objects
Flipping an object literally means to flip an object over. (It might help to visualize flipping pancakes when using this feature.) You can flip an object horizontally or vertically. To flip an object, select the object, click Draw on the Drawing toolbar, choose Rotate Or Flip from the menu, and then choose Flip Horizontal or Flip Vertical. Figure 12-25 shows the results of flipping an object horizontally and vertically.
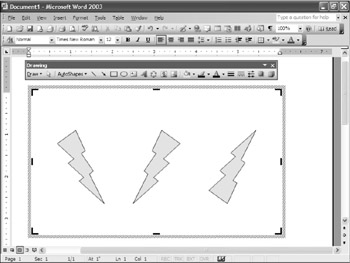
Figure 12-25: To create this figure, three identical lightning bolts were drawn and then the lightning bolt in the center was flipped horizontally while the lightning bolt on the right was flipped vertically.
| Tip | You can flip AutoShapes, pictures, clip art, and WordArt objects. |
Selecting Multiple Drawing Elements at One Time
Sometimes you might want to select multiple objects at one time because you want to perform one of the following tasks:
-
Apply formatting to all selected objects
-
Move all the selected objects without losing the spacing between the objects
-
Delete all the selected objects
-
Prepare to group the objects (as described next)
To select multiple objects, press Shift or Ctrl, and then click each object you want to include. Alternatively, you can click in the drawing canvas, click the Select Multiple Objects button on the Drawing toolbar in the Select Multiple Objects dialog box, click the check boxes that appear next to the names of the objects that you want to select, and then click OK. You can tell which objects have been selected because they now have selection handles. After a group of objects is selected, you can right-click to apply shortcut menu options, click Drawing toolbar buttons to apply formatting, press Delete or Backspace to delete the objects, or drag the selected items to move them as a group.
Repositioning and Aligning Drawing Objects with Precision
As an experienced Word user, you know that you can reposition drawing objects by clicking and dragging them. Moving objects this way to create drawings is especially effective when you use Word's drawing canvas. Sometimes, however, you might want to position objects with more precision. You can control how objects are positioned by using a drawing grid, nudging objects into place, and using the aligning and distributing options provided on the Drawing toolbar, as described here:
-
Using the drawing grid You can use the drawing grid with or without the drawing canvas to help you position graphics. To turn on the drawing grid, click in your document or in the drawing canvas, click Draw on the Drawing toolbar, and choose Grid from the menu. In the Drawing Grid dialog box, select the Display Gridlines On Screen check box, as shown in Figure 12-26, and then click OK. The drawing grid appears. To turn off the grid, in the Drawing Grid dialog box, clear the Display Gridlines On Screen check box.
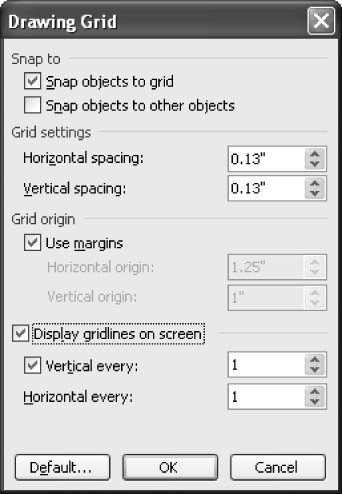
Figure 12-26: The Drawing Grid dialog box provides options you can use to control how the drawing grid looks and behaves. -
Nudging objects into place You can move (nudge) an object up, down, left, or right by 1 pixel by selecting the object, and then pressing the arrow keys, or by selecting the object, and then clicking Draw on the Drawing toolbar, choosing Nudge on the menu, and then choosing Up, Down, Left, or Right. If you have the Snap Objects To Grid option turned on while you are using the drawing grid, as shown in Figure 12-27, choosing the Nudge option moves your object one grid measurement. You can also nudge objects in smaller increments while using the grid by pressing Ctrl while you press the arrow keys.
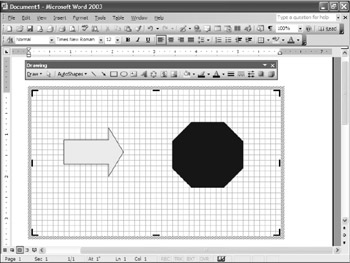
Figure 12-27: You can use the drawing grid to help size, position, and align objects accurately. -
Aligning and distributing objects To help you align and arrange objects evenly relative to each other, you can use the alignment and distribution options in the Draw menu. To do so, select the objects you want to position, click Draw on the Drawing toolbar, and choose Align Or Distribute from the menu. As shown in Figure 12-28, you can align objects vertically (Left, Center, or Right), horizontally (Top, Middle, or Bottom), and distribute selected objects evenly horizontally or vertically.
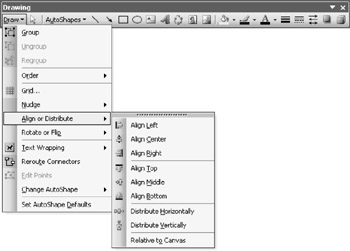
Figure 12-28: After you learn how to align and distribute objects, you'll find that you use these alignment options frequently to create professional-looking drawings.Note If you have the Snap Objects To Grid feature turned on while you work on the drawing grid, you can override the feature by pressing Alt while you drag an object.
Tip By default, objects are distributed relative to each other when you choose an Align Or Distribute setting. To distribute objects relative to the drawing canvas instead, choose Relative To Canvas from the Align Or Distribute menu, before you select an alignment option. To distribute objects that are not on a drawing canvas, you can choose Relative To Page on the Align Or Distribute menu from the Draw menu.
Note The Distribute Horizontally and Distribute Vertically options are available only when three or more objects are selected.
Tip Move drawing objects You can freely move drawing objects only if they are floating objects. If an object is formatted as an inline object, you can only position the object within text lines.
When you move a floating object, you can press Shift while you move it to restrict the object so that it can move only along the horizontal and vertical planes.
Grouping and Ungrouping Objects
You can group objects to ensure that certain objects stay positioned together no matter what. Grouping comes in handy when you want to copy or move drawings as well as ensure that layered objects don't inadvertently become incorrectly layered (for more about layering, see "Controlling Object Layering," next). For example, if you've overlaid a text box on an AutoShape, you might want to group the two objects so that you won't have to reposition the text box within the shape every time you move the shape. In addition, you won't have to worry about the text box being accidentally layered beneath the object, which would hide the text. You can ungroup grouped items at any time, which enables you to edit any part of a grouped object whenever necessary.
To group objects, position your objects, select the objects you want to group (by pressing Shift and clicking each object you want to include or by dragging your cursor to select the objects), click Draw on the Drawing toolbar, and then choose Group from the menu. Alternatively, select the objects you want to group, right-click, choose Grouping from the shortcut menu, and then choose Group.
To ungroup objects, click the group to select it, click Draw on the Drawing toolbar, and then choose Ungroup. Alternatively, right-click the group, choose Grouping from the shortcut menu, and then choose Ungroup.
| Tip | Regrouping your objects If you ungroup a group to make a minor change—maybe you want to resize an object in the group, for example—you can easily regroup the objects after you make your changes. To do so, select any object that was part of the group, click Draw on the Drawing toolbar, and choose Regroup from the menu, or right-click the object, choose Grouping from the shortcut menu, and then choose Regroup. |
Controlling Object Layering
When you create a drawing that contains many objects, you'll need to control which objects are layered in front of and behind other objects. Paying attention to how objects are layered can save you from inadvertently obscuring parts of your drawings that should be visible. The order in which objects are stacked is sometimes referred to as the z-order, based on standard coordinate references, in which x refers to horizontal positioning, y refers to vertical positioning, and z refers to depth positioning. To control the z-order of objects in your drawing, select an object, click Draw on the Drawing toolbar, and choose Order from the menu (or right-click an object and choose Order from the shortcut menu) to access the layering options, as shown in Figure 12-29. You can position an object in front of all layers, in back of all layers, in front of the next layer, or in back of the preceding layer. In addition, you can specify drawing canvases to be placed in front of or behind text if your drawing is a floating object or is a drawing that's not bounded by the drawing canvas.
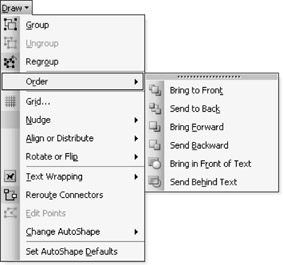
Figure 12-29: Layering objects helps you control which objects appear in the foreground of your drawing and which appear in the background.
| Tip | If you're having trouble selecting an object (perhaps it's buried under other objects), you can press Tab repeatedly to move your selection focus from one object to the next. |
|
| < Day Day Up > |
|
EAN: 2147483647
Pages: 373