Extended Applet JDBC Example
MySQL Database & JDBC
The employee training management system persists its data in a MySQL relational database with the help of JDBC. In this section I want to focus your attention on those aspects of MySQL, relational database design, SQL, and JDBC that are critical to your understanding of the employee training management system and its supporting code.
Setting Up MySQL To Run The Example Code
Proper installation and configuration of the MySQL database is the primary piece of the puzzle and requires executing the following general steps:
-
Step 1: Obtain and install the product
-
Step 2: Create a database named chapter_21
-
Step 3: Establish the required access permissions to the chapter_21 database
-
Step 4: Create two tables within the chapter_21 database named employees and employee_training
-
Step 5: Establish the required access permissions to the tables
These steps are discussed in greater detail below.
Obtaining and Installing MySQL
If you don’t currently have MySQL installed on your computer you will need to do so before proceeding with database and table creation. MySQL is available for a variety of platforms and can be obtained from the MySQL website. [http://www.mysql.com/] The MySQL installation instructions are excellent and I refer you to them to perform the actual installation. I strongly recommend you have a piece of paper and pen ready to take notes regarding installation location and other important installation information.
When installation is complete you should be able to execute two programs from the command line: mysqladmin and mysql.
The mysqladmin Program
To test the installation open a terminal or command prompt window and type mysqladmin. You should see something that resembles the following output:
Referring to example 21.13 — this listing represents the help output from executing the mysqladmin program with no command-line input. The mysqladmin program is used to set database operational parameters and to execute routine database maintenance commands. An important piece of information to take note of is the port number the database is listening on. This information is located on line 53 and is set to port number 3306.
Example 21.13: mysqladmin help
1 [Rick-Millers-Computer:~] swodog% mysqladmin 2 mysqladmin Ver 8.41 Distrib 4.1.10, for apple-darwin7.7.0 on powerpc 3 Copyright (C) 2000 MySQL AB & MySQL Finland AB & TCX DataKonsult AB 4 This software comes with ABSOLUTELY NO WARRANTY. This is free software, 5 and you are welcome to modify and redistribute it under the GPL license 6 7 Administration program for the mysqld daemon. 8 Usage: mysqladmin [OPTIONS] command command.... 9 -c, --count=# Number of iterations to make. This works with -i 10 (--sleep) only. 11 -#, --debug[=name] Output debug log. Often this is 'd:t:o,filename'. 12 -f, --force Don't ask for confirmation on drop database; with 13 multiple commands, continue even if an error occurs. 14 -C, --compress Use compression in server/client protocol. 15 --character-sets-dir=name 16 Directory where character sets are. 17 --default-character-set=name 18 Set the default character set. 19 -?, --help Display this help and exit. 20 -h, --host=name Connect to host. 21 -p, --password[=name] 22 Password to use when connecting to server. If password is 23 not given it's asked from the tty. 24 -P, --port=# Port number to use for connection. 25 --protocol=name The protocol of connection (tcp,socket,pipe,memory). 26 -r, --relative Show difference between current and previous values when 27 used with -i. Currently works only with extended-status. 28 -O, --set-variable=name 29 Change the value of a variable. Please note that this 30 option is deprecated; you can set variables directly with 31 --variable-name=value. 32 -s, --silent Silently exit if one can't connect to server. 33 -S, --socket=name Socket file to use for connection. 34 -i, --sleep=# Execute commands again and again with a sleep between. 35 -u, --user=name User for login if not current user. 36 -v, --verbose Write more information. 37 -V, --version Output version information and exit. 38 -E, --vertical Print output vertically. Is similar to --relative, but 39 prints output vertically. 40 -w, --wait[=#] Wait and retry if connection is down. 41 --connect_timeout=# 42 --shutdown_timeout=# 43 44 Variables (--variable-name=value) 45 and boolean options {FALSE|TRUE} Value (after reading options) 46 --------------------------------- ----------------------------- 47 count 0 48 force FALSE 49 compress FALSE 50 character-sets-dir (No default value) 51 default-character-set (No default value) 52 host (No default value) 53 port 3306 54 relative FALSE 55 socket (No default value) 56 sleep 0 57 user (No default value) 58 verbose FALSE 59 vertical FALSE 60 connect_timeout 43200 61 shutdown_timeout 3600 62 63 Default options are read from the following files in the given order: 64 /etc/my.cnf /usr/local/mysql/data/my.cnf ~/.my.cnf 65 The following groups are read: mysqladmin client 66 The following options may be given as the first argument: 67 --print-defaults Print the program argument list and exit 68 --no-defaults Don't read default options from any options file 69 --defaults-file=# Only read default options from the given file # 70 --defaults-extra-file=# Read this file after the global files are read 71 72 Where command is a one or more of: (Commands may be shortened) 73 create databasename Create a new database 74 debug Instruct server to write debug information to log 75 drop databasename Delete a database and all its tables 76 extended-status Gives an extended status message from the server 77 flush-hosts Flush all cached hosts 78 flush-logs Flush all logs 79 flush-status Clear status variables 80 flush-tables Flush all tables 81 flush-threads Flush the thread cache 82 flush-privileges Reload grant tables (same as reload) 83 kill id,id,... Kill mysql threads 84 password new-password Change old password to new-password, MySQL 4.1 hashing. 85 old-password new-password Change old password to new-password in old format. 86 87 ping Check if mysqld is alive 88 processlist Show list of active threads in server 89 reload Reload grant tables 90 refresh Flush all tables and close and open logfiles 91 shutdown Take server down 92 status Gives a short status message from the server 93 start-slave Start slave 94 stop-slave Stop slave 95 variables Prints variables available 96 version Get version info from server If all these different settings and commands seem confusing at first don’t worry. The default values are fine set just the way they are for the purposes of this chapter.
The mysql Monitor Program
The mysql monitor program is the interactive SQL interpreter through which you enter SQL commands to interact with MySQL databases. When MySQL is first installed it is pre-configured with two databases: mysql and test. To verify this type mysql at the command line and hit return. You should see something similar to figure 21-15.

Figure 21-15: MySQL Monitor Program on Startup
You can enter SQL and MySQL commands at the mysql monitor prompt. To verify the installed databases type “show databases” at the monitor prompt followed by a semicolon and then hit return. The output you see should look similar to figure 21-16.
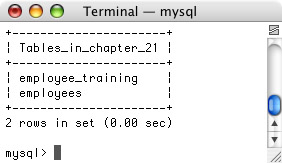
Figure 21-16: Results of Entering “show databases;” at the Monitor Prompt
Referring to figure 21-16 — three databases are listed: chapter_21, which was created to support the employee training management system (you will not see it listed until after you create it), mysql, and test. The mysql database stores admin tables used by the MySQL database application.
To use a particular database enter “use” followed by the database name and a semicolon at the monitor prompt then hit enter. Next, enter “show tables” followed by a semicolon at the monitor prompt then hit enter. You should see an output similar to figure 21-17
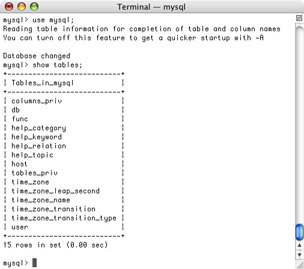
Figure 21-17: Results of Changing to the mysql Database with “use mysql;” and Entering “show tables;”
Helpful MySQL Monitor Commands
Table 21-1 lists and describes several mysql monitor commands you will find helpful. (Note: All commands except exit and quit are followed by a semicolon.)
| Command | Description |
|---|---|
| show databases | Lists the databases available to the MySQL monitor. |
| use database_name | Directs SQL commands against named database. |
| show tables | Lists the tables contained in the current database. |
| describe table_name | Lists table column attributes for named table. |
| exit | Exit MySQL monitor program. |
| quit | Exit MySQL monitor program. |
Creating The chapter_21 Database
Before you can use the chapter_21 database it must be created using the mysqladmin program. Refer to the mysqladmin help listed in example 21.13 and find the create databasename command located on line 73. To create the chapter_21 database type “mysqladmin create chapter_21” at a terminal or command prompt and hit return. If all goes well the terminal or command prompt will return within a second or two as if nothing happened. To check that the chapter_21 database was indeed created start the mysql monitor program and enter the show databases command. Your listing should now look like figure 21-16 and list three databases: chapter_21, mysql, and test.
Establishing Database Security Via MySQL Access Control Tables
Now that the chapter_21 database is created you must establish usage permissions. To do this you must be aware of five tables located within the mysql database: user, db, tables_priv, columns_priv, and host. To control access to a database you will make an entry into one or more of these tables. To switch to the mysql database enter “use mysql;” at the mysql program monitor prompt.
In a nutshell here’s what you need to do. You need to add a user to the user table who has less privileges than root, then create the required tables in the chapter_21 database, then set db permissions, optionally set table permissions, and finally, optionally set column permissions if required.
Adding A New User To The user Table
If you issue “describe user;” at the monitor prompt you will see the complete structure of the user table. Figure 21-18 shows the structure of the user table.
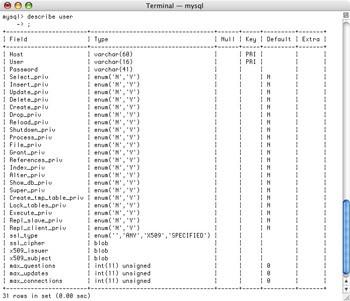
Figure 21-18: Structure of the user Table Located in the mysql Database
Referring to figure 21-18 — the structure of the user table is fairly straightforward. The Host, User, and Password columns each take a string. The various privilege columns (i.e., Select_priv, Insert_priv, etc.) each take either the character ‘Y’ representing yes or the character ‘N’ representing no. I recommend that you create a new user that has fewer privileges than root for security’s sake but enough privileges to perform selects, inserts, updates, and deletes. To insert a new user into the user table you use the SQL insert command.
Creating DB Permissions
After you create a new database you’ll need to set permissions on that database by adding an entry into the db table. Figure 21-19 shows the structure of the db table.
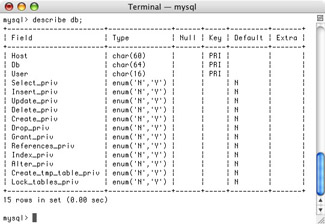
Figure 21-19: Structure of the db Table
Referring to figure 21-19 — for a particular database you can specify an authorized host and user along with the required permissions. To authorize access to a database from any host by any user set the Host and User values to the wildcard character ‘%’. Figure 21-20 shows the contents of the db table listed as a result of issuing the “select * from db;” command at the mysql monitor prompt.

Figure 21-20: Contents of the db Table
Referring to figure 21-20 — the output shown here is a somewhat hard to read because the rows have wrapped due to the length of each row, however, you should be able to correlate the table structure shown in figure 21-19 with what you see here. The db table shows permissions for two databases: test and chapter_21. The ‘%’ in the Host column indicates that any host has access to the database. A ‘%’ in the User column indicates that any user has access as well. The other privilege columns are set as required. For the chapter_21 database I have allowed access from any host by any user with almost all privileges set to ‘Y’.
A blank entry in the Host or User column forces MySQL to verify that access has been granted to the host or user in question by checking the user and host tables for the required entry. The host table is discussed below.
Creating Table Permissions
After you’ve created a table within a database you can optionally set permissions on that table by making an entry in the tables_priv table. Figure 21-21 shows the structure of the tables_priv table. Referring to figure 21-21 — you establish table privileges by host, database, user, table name, and granter. Granter must be an object within a MySQL database that has grant privileges. Again, use the SQL insert command to insert entries into the tables_priv table.

Figure 21-21: Structure of the tables_priv Table
Creating Column Permissions
You can also optionally set privileges at the granularity of a column. Figure 21-22 shows the structure of the columns_priv table.

Figure 21-22: Structure of the columns_priv Table
Referring to figure 21-22 — you can grant column privileges based on host, database, and user.
Granting Access On A Per Host Basis
An additional permissions table named Host allows you to grant access to a database on a host-by-host basis. Figure 21-23 shows the structure of the Host table.
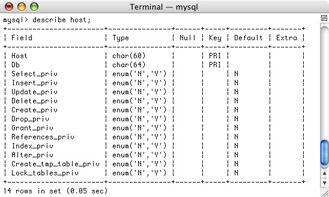
Figure 21-23: Structure of the host Table
General Strategy For Managing Permissions Using The MySQL Access Control Tables
All this talk of access control tables, permissions, and privileges may seem confusing at first but don’t despair. You don’t need to use every table to get simple examples working. For personal use in a learning environment you can pretty much throw access control out the window. If you’re the only one accessing the database give yourself sweeping access rights in the user and db tables and be done with it. If, on the other hand, you want to establish fine grain access control down to the column level you can apply the following general strategy:
-
Establish user accounts with all privileges set to ‘N’. This grants connect access to the MySQL server but allows no other actions
-
If required, establish host access rights in the host table
-
Establish access to individual databases on a per-user or per-host basis, setting privileges as required (Use the ‘%’ and blank values as required for finer control)
-
Establish access permissions on a per-table basis using the tables_priv table
-
Establish access permissions on a per-column basis using the columns_priv table
Creating The Employee Training Management System Tables
Now that you have a general understanding of how to establish and control access permissions to a MySQL database it’s time to create the tables that will be used in the employee training management system. Figure 21-24 shows the entity diagram expressing the relationship between an Employee and an Employee_Training record.

Figure 21-24: Entity Diagram for Employee and Employee_Training Tables
Referring to figure 21-24 — an employee is described by a set of attributes including employee_id, which is the primary key, first_name, middle_name, last_name, ssn, and date_of_birth. An employee_training record contains the attributes employee_training_id (primary key), employee_id (foreign key), date, topic, and result. A one-to-many relationship is established between an employee and employee_training via the employee_id foreign key attribute in the employee_training entity.
These entities map to tables. These tables, with their requisite columns and relationships, can be created in the chapter_21 database by issuing SQL commands at the mysql monitor prompt. They can also be created using a script file like the one shown in example 21.14.
Example 21.14: setup_tables.sql
1 # run this script to create the tables required to support the employee 2 # training tracking system example described in chapter 21 of 3 # Java For Artists. 4 create table employees 5 ( 6 EMPLOYEE_ID INT NOT NULL PRIMARY KEY AUTO_INCREMENT, 7 FIRST_NAME VARCHAR(50), 8 MIDDLE_NAME VARCHAR(50), 9 LAST_NAME VARCHAR(50), 10 SSN VARCHAR(11), 11 DATE_OF_BIRTH DATE, 12 Unique(SSN) 13 ); 14 15 create table employee_training 16 ( 17 EMPLOYEE_TRAINING_ID INT NOT NULL PRIMARY KEY AUTO_INCREMENT, 18 EMPLOYEE_ID INT NOT NULL REFERENCES employees(EMPLOYEE_ID), 19 DATE DATE, 20 TOPIC VARCHAR(200), 21 RESULT VARCHAR(20) 22 ); 23
Referring to example 21.14 — an SQL script can contain any number of comments and commands. Lines 1 through 3 contain comments. The employees table is created with the create table command starting on line 4 and ending on line 13. Notice that the command is terminated on line 13 with a semicolon. The employees table’s columns are defined on lines 6 through 11. Line 12 applies the Unique() function to the SSN column. This will ensure that an employee’s ssn is unique from all the other existing ssns when entered. Several column modifiers are applied to the EMPLOYEE_ID column to flag it as the primary key, ensure it is not null, and have it automatically increment in value with each new entry.
The employee_training table is created in similar fashion beginning on line 15. The relationship between this table and the employees table is established on line 18 with the use of the references modifier.
Executing The setup_tables.sql Script
The setup_tables script can be executed by entering the following command at a terminal or command prompt:
mysql chapter_21 < setup_tables.sql
If you have problems running the script you can check a couple of things: 1) make sure the script is located in the current working directory or give the fully qualified path name to the script when you run the command, 2) make sure you have sufficient permissions to create tables in the chapter_21 database. You will get an error message indicating otherwise if you do not. If you get the permissions error after you’ve made what you believe are correct entries into the user and db tables try restarting MySQL.
After you run the script you can check the existence of the tables by starting the mysql monitor program, switching to the chapter_21 database, and issuing the “show tables;” command. When you do this you should see something similar to the listing shown in figure 21-25.
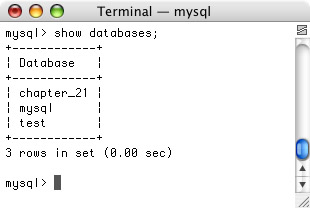
Figure 21-25: Newly Created chapter_21 Database Tables
Populating Tables with Data and Running Queries
To further test the chapter_21 database tables let’s populate them with sample data and run some queries. To do this you’ll be using the SQL insert command and various forms of the select statement. These SQL statements can be entered via the mysql monitor program.
Inserting Data Into Tables
To insert data into the employees table you can issue the SQL insert command. Study the following example:
Referring to example 21-15 — the SQL insert command is used to insert a row of values into a database table. The list of columns affected is given between the parentheses on line 1. The values to insert into each column are given between the parentheses on line 2. The employee_id value is set to 0 because the employee_id value will automatically increment when the insert is executed.
Example 21.15: insert command
1 insert into employees (employee_id, first_name, middle_name, last_name, ssn, date_of_birth) 2 values (0, "Homer", "J", "Simpson", "123-34-2345", "1980-09-21");
Querying a Table with the select Statement
The contents of a database table can be examined (queried) with an SQL select statement. The select statement has three clauses: 1) select - to indicate what columns to retrieve, 2) from - to indicate what tables to retrieve the columns from, and 3) where - to specify a qualification criteria.
To select all the columns and all the rows from the employees tables you can issue the following select statement:
select * from employees;
In this example the where clause is omitted. Figure 21-26 shows the results of running this command against the employees tables in its current state.

Figure 21-26: Results of Executing the Select Statement Against the employees Table
Referring to example 21-26 — the select * from employees; statement returns all the columns and all the rows of data contained in the employees table, which, at this point, only contains one row. If you only wanted to specify certain columns you can do so in the select clause. The following select statement returns the first_name and last_name columns for all the rows in the employees table:
select first_name, last_name from employees;
Figure 21-27 shows the results of executing this select statement.

Figure 21-27: Results of Selecting Only the First_Name and Last_Name Columns from the employees Table
Updating Data In A Table
Table data can be updated using the SQL update statement. Study the following example:
update employees set middle_name = "W" where employee_id = 1;
Figure 21-27 shows the results of the update statement by querying the employees table with the select statement.
Joining Tables With A Select Statement
Two or more related tables can be joined to enhance data analysis. Since the employees table and the employee_training table are related via the employee_id attribute they can be joined in a query. However, before testing this SQL feature you should populate both the employees and employee_training tables with additional data. Figures 21-29 and 21-30 show the data contents of the employees and employee_training tables respectively that will be used to illustrate the concepts in this section.

Figure 21-28: Results of the Update Statement — Note the Middle_Name is Changed to ‘W’

Figure 21-29: Employees Table with Additional Data Added
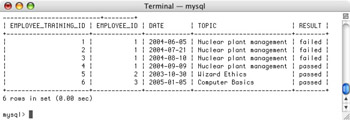
Figure 21-30: Employee_Training Table Populated with Data
Referring to figures 21-29 and 21-30 – the employees table now contains two additional employees and the employee_training table has been populated with employee training data. Can you formulate the relationships between employees and their training by simply examining the data contained in the tables? Yes, in this simple example you can. However, with SQL you can perform a relational join on the tables using the from and where clauses of the select statement. Study the select statement shown in figure 21-31 along with its results.
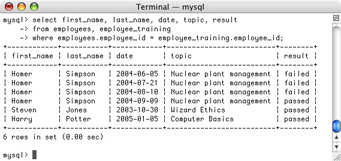
Figure 21-31: Results of Joining the employees Table with the employee_training Table
Referring to figure 21-31 — the select statement is used to extract meaningful data from both tables to answer the question: “What training courses has each employee taken?” The from clause specifies the two tables from which to pull the data and the where clause specifies that the employees.employee_id value must equal the employee_training.employee_id value.
Let’s pose another question to the database. “What training has Homer Simpson completed?” The resulting select statement looks like example 21.16.
Example 21.16: Nested Select Statement
1 select first_name, last_name, date, topic, result 2 from employees, employee_training 3 where employees.employee_id = (select employee_id 4 from employees 5 where (first_name = "Homer" && 6 last_name = "Simpson")) 7 = employee_training.employee_id;
Referring to example 21.16 — a nested select statement is used within the outer where clause to determine Homer Simpson’s employee_id value. Notice the transitivity of the equality operator. Figure 21-32 shows the results of executing this select statement.

Figure 21-32: Results of Executing the Nested Select Statement Shown in Example 21.16
Accessing chapter_21 Database Tables Via JDBC
The SQL statements demonstrated above can be applied to the chapter_21 database via a Java program that uses JDBC. As a quick review, the steps required to utilize JDBC in a Java program include 1) loading the database vendor’s JDBC driver class using the Class.forName() method, 2) using the DriverManager.getConnection() method to establish a connection to the database, 3) using the connection object to create a statement or prepared statement object, 4) using the statement or prepared statement objects to execute SQL statements against the database, and 5) manipulating the data contained in the returned resultset object if applicable.
A Short JDBC Example Program
The following short Java program executes these five steps to retrieve and display data contained in the chapter_21 database.
Referring to example 21.17 — the Class.forName() method is used on line 6 to load the MySQL database driver class. The name of the MySQL driver class is “com.mysql.jdbc.Driver”. Next, the DriverManager.getConnection() method is used on lines 7 and 8 to create a Connection object. The getConnection() method requires a URL to the target database. In this example the URL to the chapter_21 database located on the local host computer running on port 3306 connecting as user swodog is: “jdbc:mysql://127.0.0.1:3306/chapter_21?user=swodog”.
Example 21.17: JDBCTestApp.java
1 import java.sql.*; 2 3 public class JDBCTestApp { 4 public static void main(String[] args){ 5 try{ 6 Class.forName("com.mysql.jdbc.Driver"); 7 Connection conn = DriverManager.getConnection("jdbc:mysql://127.0.0.1:3306/" + 8 "chapter_21?user=swodog"); 9 String default_query = "select * from employees"; 10 Statement statement = conn.createStatement(); 11 ResultSet rs = statement.executeQuery(default_query); 12 while(rs.next()){ 13 System.out.print(rs.getInt(1) + "\t\t"); 14 System.out.print(rs.getString(2) + "\t"); 15 System.out.print(rs.getString(3) + "\t"); 16 System.out.print(rs.getString(4) + "\t"); 17 System.out.print(rs.getString(5) + "\t"); 18 System.out.println(rs.getDate(6).toString()); 19 } 20 }catch(Exception e){ 21 e.printStackTrace(); 22 } 23 24 }// end main() method 25 }// end JDBCTestApp class definition A default query string is formulated on line 9 and a Statement object is created on line 10 using the Connection.createStatement() method. Next, the default_query string is used as an argument to the Statement.executeQuery() method on line 11 to create a ResultSet object. Finally, the reference to the ResultSet object, rs, is used in the body of the while loop to access the returned query results. Figure 21-33 shows the results of running example 21.17.

Figure 21-33: Results of Running Example 21.17
Accessing ResultSet Metadata
You can access descriptive data (metadata) about a ResultSet object by using its getMetaData() method. Accessing resultset metadata comes in handy for many reasons, especially if you want to determine table column name and type information. Example 21.18 is a slightly modified version of the JDBCTestApp program given in the previous example. The new version accesses and displays column name and type information for the employees table with the help of a ResultSetMetaData object.
Example 21.18: JDBCTestApp.java (mod 1)
1 import java.sql.*; 2 3 public class JDBCTestApp { 4 public static void main(String[] args){ 5 try{ 6 Class.forName("com.mysql.jdbc.Driver"); 7 Connection conn = DriverManager.getConnection("jdbc:mysql://127.0.0.1:3306/" + 8 "chapter_22?user=swodog"); 9 String default_query = "select * from employees"; 10 Statement statement = conn.createStatement(); 11 ResultSet rs = statement.executeQuery(default_query); 12 ResultSetMetaData meta_data = rs.getMetaData(); 13 for(int i = 1; i <= meta_data.getColumnCount(); i++){ 14 System.out.print(meta_data.getColumnName(i)+ ':' + 15 meta_data.getColumnTypeName(i) + '\t'); 16 } 17 System.out.println(); 18 while(rs.next()){ 19 System.out.print(rs.getInt(1) + "\t\t"); 20 System.out.print(rs.getString(2) + "\t"); 21 System.out.print(rs.getString(3) + "\t"); 22 System.out.print(rs.getString(4) + "\t"); 23 System.out.print(rs.getString(5) + "\t"); 24 System.out.println(rs.getDate(6).toString()); 25 } 26 }catch(Exception e){ 27 e.printStackTrace(); 28 } 29 30 }// end main() method 31 }// end JDBCTestApp class definition Referring to example 21.18 — on line 12 a ResultSetMetaData reference named meta_data is declared and initialized with the help of the ResultSet.getMetaData() method. The for statement on line 13 prints the column name and column type name for each column in the employees table. This information is displayed above the employee data as is shown in figure 21-34.
![]()
Figure 21-34: Results of Running Example 21.18 with employee Table Metadata Displayed
Quick Review
MySQL is a relational database server. Before connecting to a MySQL database with JDBC you must install it, create a database, create database tables, and establish the necessary database access permissions. MySQL access control is essentially managed with the use of five tables located in the mysql database: user, db, host, tables_priv, and columns_priv. To alleviate complexity, database security can be ignored in a learning environment, however, in a production environment it is a subject of which you must be keenly aware.
The general steps to employing JDBC include 1) loading the database vendor’s JDBC driver class using the class.forName() method, 2) using the DriverManager.getConnection() method to establish a connection to the database, 3) using the connection object to create a statement or prepared statement object, 4) using the statement or prepared statement objects to execute SQL statements against the database, and 5) manipulating the data contained in the returned resultset object if applicable.
EAN: 2147483647
Pages: 452