Adding Images Within Your Item Description
| Now let's get down to business. We'll start with five basic eBay templates that include one or more photos in various places within your listing. All of these templates incorporate the HTML <img> tag, which is used to reference the location of a picture file stored elsewhere on the web. Note In most of these templates, you can include more or fewer photos simply by editing the HTML code to add or delete <img> tags. Template 7.1. Pictures on Top Our first template places one or more photos centered at the top of your auction listing, below the title but above the first paragraph, as shown in Figure 7.1. Naturally, you can edit this code to incorporate different font styles and alignment, as discussed in Chapter 6, "Creating Text-Based HTML Auction Templates." Figure 7.1. One or more photos displayed between the title and the first paragraph of the description.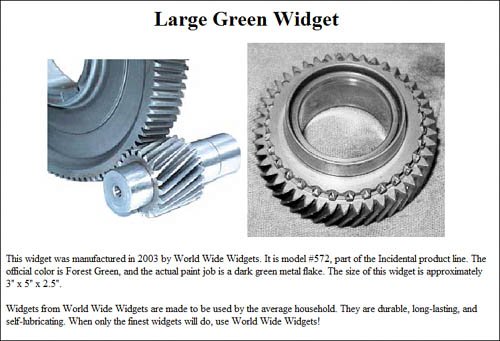 For our example code, we'll include tags for two side-by-side photos. To use just a single photo, delete one of the <img> tags; to use more photos, insert one or more additional <img> tags. Here's the code: <h1 style="text-align: center">This is the title</h1> <center> <img src="URL1"> <img src="URL2"> </center> <p style="text-align: left"> This is the first paragraph of the description </p> <p style="text-align: left"> This is the second paragraph of the description </p> Obviously, you should replace URL1 and URL2 with the full URL and filename of each photo file. Also, know that if your photos are too large, the centered photos will wrap over to a second line. Using this basic code, it's your responsibility to size your photos appropriately beforehand; with two photos in a row, I'd recommend keeping the width of each to a maximum of 300 pixels. (You can force the 300-pixel width by adding the width="300" attribute to each of the <img> tags, like this: <img src="/books/2/949/1/html/2/URL" width="300">.) Template 7.2. Pictures on the Bottom This next template is a variation of Template 7.1, with the photos centered below the description text. The result is shown in Figure 7.2. Figure 7.2. One or more photos displayed after the text description. As you can see, the code is very similar, with the <img> tags placed below the final paragraph. Replace URL1 and URL2 with the full URL and filename for each photo, of course. And, again, you can force a standard 300-pixel width by rewriting the <img> tags like this: <img src="/books/2/949/1/html/2/URL" width="300">. <h1 style="text-align: center">This is the title</h1> <p style="text-align: left"> This is the first paragraph of the description </p> <p style="text-align: left"> This is the second paragraph of the description </p> <center> <img src="URL1"> <img src="URL2"> </center> Template 7.3. Picture on the Left This next template changes things up a bit, by inserting a picture in-line with the description text, as shown in Figure 7.3. In this instance, the photo is left-aligned, with the text wrapping around the picture. Figure 7.3. A single photo displayed to the left of the description text.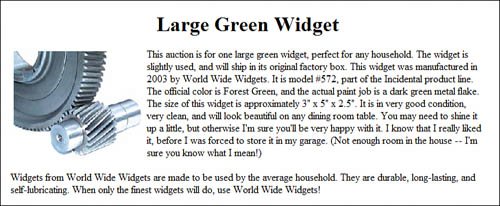 For this template to work, the <img> tag must be inserted just after the <p> tag for the first paragraph, and before the start of the text itself. To wrap the text around the photo, the <img> tag includes the align="left" attribute. We've also added just a little white space around the picture with the hspace="5" and vspace="5" attributes. <h1 style="text-align: center"> This is the title</h1> <p style="text-align: left"> <img src="URL" align="left" hspace="5" vspace="5"> This is the first paragraph of the description </p> <p style="text-align: left"> This is the second paragraph of the description </p> You can customize this template to add a second photo to the left of the second paragraph; just add a similar <img> tag inside the second paragraph's <p> tag. If you do this, make sure that the text for the first paragraph is long enough to extend past the bottom of the first picture; if not, the second photo will be displayed to the right of the first photo! Template 7.4. Pictures on the Right Now we'll create a flipped version of Template 7.3, with a single photo inserted to the right of the text description. As with the previous template, the text wraps around the photo. The result is shown in Figure 7.4. Figure 7.4. A single photo displayed to the right of the description text.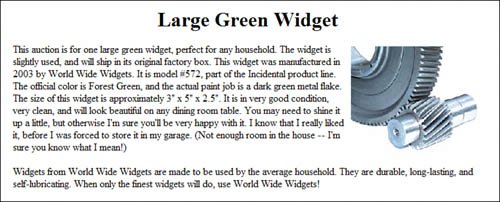 The code for this template is identical to that of Template 7.3, except that the align attribute for the <img> tag is set to "right" instead of "left". Amazing what changing one little attribute can do! <h1 style="text-align: center">This is the title</h1> <p style="text-align: left"> <img src="URL" align="right" hspace="5" vspace="5"> This is the first paragraph of the description </p> <p style="text-align: left"> This is the second paragraph of the description </p> As with Template 7.3, you can insert a second photo by adding a similar <img> tag after the <p> tag for the second paragraph. |

EAN: 2147483647
Pages: 101