| Even after you have your blog up and running, you still have to perform a bit of ongoing maintenance. Fortunately, you can do everything you need to do from the Blogger Dashboardand you don't have to do much. Editing Your Posts No one's perfect. Every now and then you'll post something to your blog and later discover an egregious spelling error, or a bad link, or maybe just something you wish you'd never written in the first place. Have no fear, gentle blogger; Blogger lets you edit any post you like. To edit a Blogger post, follow these steps: 1. | From the Blogger Dashboard, click the Manage: Posts link for your blog.
| 2. | When the list of recent posts appears, as shown in Figure 32, click the Edit link next to the post you want to edit.
Figure 32. Click the Edit link to edit any recent post. 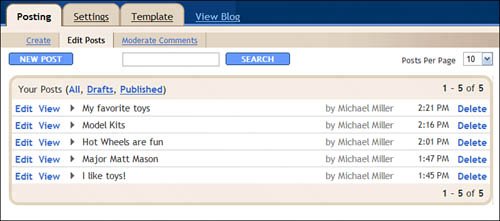
| 3. | When the Edit Posts window appears, as shown in Figure 33, edit your post accordingly.
Figure 33. Editing a post. 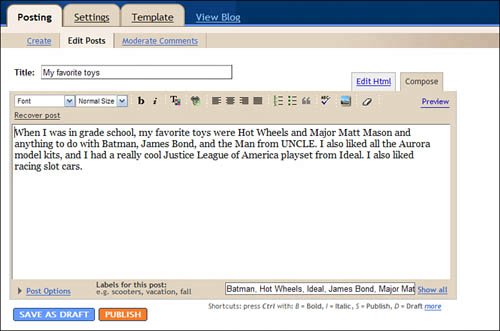
| 4. | When done editing, click the Publish button.
|
Limiting Comments By default, anyone can post comments to your blog postings. These comments appear below each posting when a visitor clicks the Comments link. If you'd rather not have everyone and their brother comment on your blog, you can limit comments to either registered Blogger users or members of your blog. You do so by following these steps: | | 1. | From the Blogger Dashboard, click the Settings link next to your blog name.
| 2. | When the Settings page appears, click the Comments link.
| 3. | When the next page appears, as shown in Figure 34, pull down the Who Can Comment? list and select either Anyone (the default setting), Only Registered Users, or Only Members of This Blog.
Figure 34. Configuring comments for your blog. 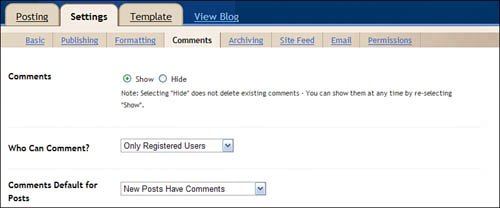
| 4. | Click the Save Settings button.
|
Moderating Comments The Comments screen of the Settings tab also lets you configure several other ways to display comments on your blog. One of the key settings concerns comment moderation. When you choose to moderate comments, you must approve any comments to your blog before the user can post them. You turn on moderation by checking the Enable Comment Moderation? option on the Comments screen of the Settings tab. This displays a new Moderate Comments link on the Posting tab, which is where all user-written comments appear. (You also receive an email to alert you to all new comments.) On this page, you can choose to publish or reject any listed comment; click the Publish button and the comment is posted to your blog. Fighting Comment Spam Another problem with blog comments is that, without any moderation, they can be used for spamming purposes. That's right, unscrupulous spammers use spam robots to seed blog postings with unwanted spam messages. It's all done automatically; don't be surprised if you wake up one morning and find a ton of comments to your blog that have nothing at all to do with your original postings. There's an easy way to defeat these spam robots. All you have to do is require some sort of human input for posting a comment. Blogger does this by adding a word verification section, like the one shown in Figure 35, to the comments posting page. Readers have to enter the word verification code before posting their comments; because robots can't read graphic images like this, they can't enter the word verification code, and no spam is left. Figure 35. Word verification codes, like this one, stop blog spam. 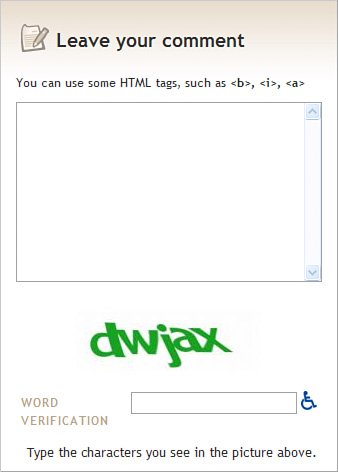
You turn on word verification by going to the Comments screen on the Settings tab and checking the Show Word Verification for Comments? option. Controlling Access to Your Blog By default, your blog is completely public, and anyone on the Internet can read it. However, there's a way to make your blog private so that only invited guests can view it. To control access to your blog, follow these steps: 1. | From the Blogger Dashboard, click the Settings link next to your blog name.
| 2. | When the Settings page appears, click the Permissions link.
| | | 3. | When the next page appears, as shown in Figure 36, go to the Blog Readers section and select who can view your blog: Anybody (keeps the blog public), Only People I Choose, or Only Blog Authors.
Figure 36. Deciding who gets access to your blog. 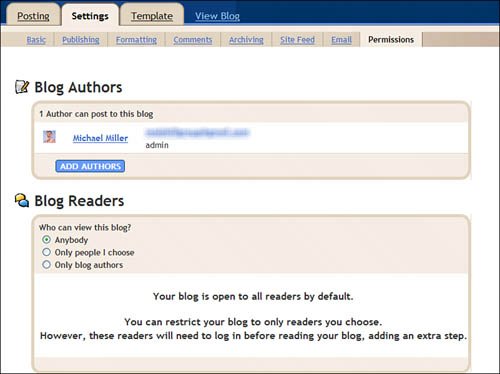
| 4. | If you choose the Only People I Choose option, you'll have to invite people to view your blog. The page expands to include a new text box; enter the invitees' email addresses, and then click the Invite button. (If the invitee already has a Google account, he's automatically granted access; if he doesn't yet have a Google account, he's sent an invitation via email.)
| 5. | If you choose the Only Blog Authors option, you'll have to enable some authors other than yourself. Click the Add Authors button to invite other authors to post on your blog.
|
Note A blog author is someone like you, who can create new blog postings. Although anyone can add comments to existing postings, only blog authors can create new postings.
Displaying Backlinks Interested in who is linking to your blog? If so, Blogger lets you display backlinks for each of your postings. Note A backlink is a link to a website that links to your particular blog posting.
To display backlinks, follow these steps: 1. | From the Blogger Dashboard, click the Settings link next to your blog name.
| 2. | When the Settings page appears, click the Comments link.
| 3. | When the next page appears, check the Show option in the Backlinks section.
| 4. | Make sure that the Backlinks Default for Posts has the New Posts Have Backlinks option selected.
| 5. | Click the Save Settings option.
|
Changing Your Blog's Settings Blogger has a lot of operational options you can apply to your blog. These options are on the Settings tab, which you get to by clicking the Settings link next to your blog's name in the Blogger Dashboard. What settings are where, and which do what? Fair questions; Table 2 answers them all. Table 2. Blogger SettingsSettings Page | Individual Settings | Description |
|---|
Basic | Title | The name of your blog | | | Description | Appears beneath the title on your blog page | | | Add Your Blog to Our Listings? | Ensures that your blog is searchable from the Blogger search page; select No if you want your blog to remain somewhat private | | | Show Quick Editing on Your Blog? | Lets you edit your blog with a single click when you're logged on | | | Show Email Post Links? | Lets visitors email posts from your blog to other users | | | Show Compose Mode for All Your Blogs? | Displays a WYSIWYG mode on the post editor page | | | Delete Your Blog? | Use to delete your blog and all existing posts (warning: this can't be undone!) | Publishing | Blog*Spot Address | The URL of your blog (the part before blogspot.com) | | | Notify Weblogs.com | Feeds your blog content to the Weblogs.com service that automatically notifies subscribers when new content has been posted | Formatting | Show | Determines how many posts or how many days are displayed on your blog's main page | | | Date Header Format | Determines how dates are displayed | | | Archive Index Date Format | Determines the dates for archived posts are displayed | | | Timestamp Format | Determines how post times are displayed | | | Time Zone | Sets the time zone for your blog | | | Language | Sets the default language for your blog posts | | | Decoding | Determines which character sets are used in your blog posts | | | Convert Line Breaks | Determines how line breaks are handled in posts | | | Show Title Field | Displays the title field for all blog posts | | | Show Link Field | Displays the link field for all blog posts | | | Enable Float Alignment | Enables different image alignment (select No if you're having trouble with the layout of your posts) | | | Post Template | Creates a template for all future blog posts; whatever you enter in this box automatically appears in the post edit box when you create a new blog post | Comments | Comments | Shows or hides comments from visitors | | | Who Can Comment? | Determines who can write comments to your posts: anyone, only registered Blogger users, or only members of the blog | | | Comments Default for Posts | Determines whether new posts have comments | | | Backlinks | Shows or hides backlinks (other sites linking to your post) | | | Backlinks Default for Posts | Determines whether new posts have backlinks | | | Comments Timestamp Format | Determines how time is displayed in comments | | | Show Comments in a Popup Window? | When selected, lets visitors click a link to display comments in a pop-up window | | | Enable Comment Moderation | When selected, requires your approval before comments are posted | | | Show Word Verification for Comments? | Enable this option to require input of a word verification code before comments can be posted; used to reduce spam comments | | | Show Profile Images on Comments? | Displays the profile image from anyone posting a comment | | | Comment Notification Address | Blogger emails you whenever comments are made to your blog posts; enter your email address here | Archiving | Archive Frequency | Determines how older posts are grouped in your blog archivesmonthly (default), weekly, daily, or no archive | | | Enable Post Pages? | Select Yes to each post on its own web page (in addition to appearing on your main blog page) | Site Feed | Allow Blog Feed | Determines how you want your posts syndicated: full, short, or none | | | Feed Item Footer | Use this box to enter code for Google AdSense ad module | Email | BlogSend Address | Blogger will email you whenever you add to your blog; enter your email address here | | | Mail-to-Blogger Address | Blogger lets you create new posts via email; enter the email address you want to send your posts to here, and then check the Publish option | Permissions | Blog Authors | Use this section to add new authors to your blog | | | Blog Readers | Determines who can view your blog: anybody, only people you choose, or only blog authors |
|