Configuring WMP
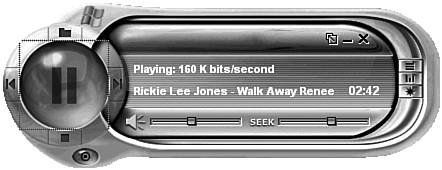
| WMP is a very customizable device. Not only can you resize it, as you can any Windows application, but you also can display it in the compact Skin mode, or with completely different looks and feels. Changing the Size of the PlayerThe default display mode for WMP is the Full mode. If you'd rather display the player without all the extraneous controls, you can switch to Skin mode. As you can see in Figure 14.2, Skin mode focuses your attention on the video/visualization window. Some controls are shrunk and others are hidden. Figure 14.2. Windows Media Player in Skin mode.
NOTE Skin mode is sometimes called Compact mode. You switch to Skin mode by clicking the Switch to Skin Mode button at the lower-right of the WMP window, or by selecting View, Skin Mode. Whether you're in Full or Skin mode, you can manually resize the main WMP window. When you resize the main window, the size of the video/visualization window also changes. All you have to do is use your mouse to grab any side or corner of the window, and then drag it to a new size. TIP Resize the WMP window to view a DVD movie at a larger size. You also can resize the size of the video window when you're playing a DVD movie. Select View, Zoom, and then select a new zoom percentage. Or, if you prefer, you can view a DVD using your entire computer screen. Just click the Full Screen button (at the top-right corner of the video window) or select View, Full Screen, and the movie will fill your entire screen. Press Esc to return to normal viewing mode. Finally, with WMP 10, you can switch to an ultra-compact display called the Mini Player whenever you minimize the WMP window. To enable the Mini Player (shown in Figure 14.3), right-click an empty area of the Windows taskbar to display the pop-up menu, then select Toolbars, Windows Media Player. Figure 14.3. The new Mini Player.
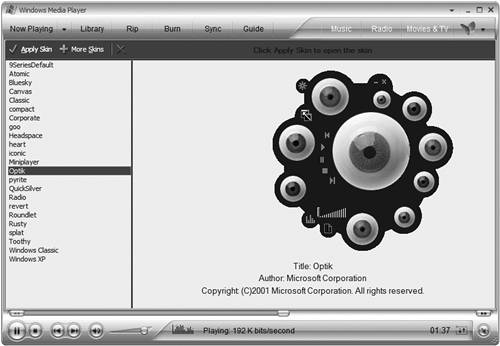
The Mini Player offers the basic playback controls, as well as a Quick Access Panel that displays a pop-up menu with access to your favorite playlists and radio stations. (You display the Quick Access Panel by clicking the down-arrow button on the far left of the Mini Player controls.) You also can display a small video/visualization window (by clicking the button at the top right of the Mini Player controls), or return to full display mode (by clicking the button at the top left of the toolbar). TIP You change skins when you're in the Skin mode by clicking the Anchor window and selecting Select a New Skin from the pop-up window. Changing SkinsIf you don't like the default look and feel of WMP, you can change it. WMP lets you change its basic interface by applying new "skins" to its Skin mode. A skin is a complete interface that includes the window frame and background and all the controls. In fact, some skins have fewer controls than the default WMP interface. To give you an idea of how different skins can change the way WMP looks, check out Figures 14.4 and 14.5. Compare these two skins to WMP's default skin in Figure 14.2. It's a great way to put your personal stamp on your media player. Figure 14.4. WMP with the Quicksilver skin.
Figure 14.5. WMP with the Headspace skin.
To change skins, follow these steps:
Windows XP includes a fair selection of skins built-in, but there are a lot more skins available from the Internet at Microsoft's WindowsMedia.com Web site (www.windowsmedia.com). Just click the More Skins button (in the Skin Chooser window), and WMP launches Internet Explorer and connect to the WindowsMedia.com Web site. Pick a new skin and follow the onscreen instructions to download it to your system. Changing VisualizationsThe default view for WMP is the Info Center view. (This is the one with the big picture of the album cover.) If you get bored looking at that album cover, you can choose to display something a little more visually interesting what Microsoft calls visualizations. A visualization is a splash of colors and shapes that move to the beat of the music; these visualizations are displayed where the video picture would normally be displayed. WMP includes a slew of visualizations you can watch while you're listening to music. The visualizations are grouped into collections based on specific themes. You can pick a specific visualization to watch, and even (for some visualizations) configure individual visualization properties. To select a visualization, be sure you're in the Now Playing screen in Full mode, then select View, Visualizations. Choose a collection and then select an individual visualization. TIP You can cycle through all available visualizations by simply clicking the Previous Visualization and Next Visualization buttons directly underneath the visualization window. As you might suspect, additional visualizations are available online. Just select View, Visualizations, Download Visualizations to go to the WindowsMedia.com Web site and browse for new visualization collections. Changing Audio and Video SettingsBesides skins and visualizations, there are a number of useful settings in WMP that you might want to configure. For example, you can use WMP's built-in graphic equalizer to fine-tune your PC's audio playback. Select View, Enhancements, Graphic Equalizer to display the equalizer below the video/visualization window (see Figure 14.7). Be sure the equalizer is clicked On, then drag the equalizer controls to shape the sound to your liking. Figure 14.7. Fine-tune your bass and treble with WMP's graphic equalizer. WMP also includes a variety of digitally processed audio effects or what Microsoft calls SRS WOW Effects. (It sounds cooler.) You access these effects by selecting View, Enhancements, SRS WOW Effects. Be sure the control is clicked On, then adjust the controls as follows:
If you're playing a DVD, you can adjust the picture's brightness, contrast, and color hue and saturation. Just select View, Enhancement, Video Settings to display these video controls, and adjust the sliders as appropriate. Configuring Player OptionsFinally, there are a bunch of general program options you can configure. These are available on separate tabs in the Options dialog box. (You open this dialog box by selecting Tools, Options.) Table 14.2 details what configuration settings you can adjust.
|

EAN: 2147483647
Pages: 270
- Integration Strategies and Tactics for Information Technology Governance
- Measuring and Managing E-Business Initiatives Through the Balanced Scorecard
- A View on Knowledge Management: Utilizing a Balanced Scorecard Methodology for Analyzing Knowledge Metrics
- Governance in IT Outsourcing Partnerships
- The Evolution of IT Governance at NB Power