Lesson 2: Exploring the Development Environment
Microsoft Visual Studio 6.0 provides developers a rich, visual environment, known as the integrated development environment (IDE). A common IDE is shared by Visual C++, Microsoft Visual J++, and Microsoft Visual InterDev, and it can host projects created with these tools as well as other types of files.
In this lesson, you will examine some of the features of the Visual C++ development environment typically used in the course of developing applications.
After this lesson, you will be able to:Estimated lesson time: 30 minutes
- Understand the elements of the Visual C++ user interface, including its windows, menus, and toolbars, and how they can be configured and customized.
- Get help from within the development environment.
- Change the project configuration settings.
- Build the MyApp project.
Visual C++ User Interface
Figure 2.11 shows the MyApp project workspace as it was at the end of Lesson 1. It is divided into two main areas: the workspace window and the edit window.
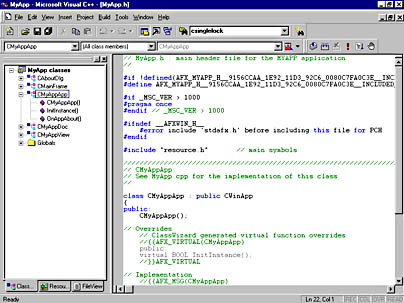
Figure 2.11 Features of the Visual C++ user interface
The workspace window uses hierarchical tree controls to display a graphical view of the objects in your workspace. As you saw in Lesson 1, the projects in the workspace form the root items of this hierarchy. The workspace window offers three different views of the contents of your project, which are accessed by the three tabs along the bottom of the window:
- ClassView Presents an object-oriented view in terms of the C++ classes, their data members, and their member functions. Double-clicking any of these objects will take you directly to their definition or implementation in the source code.
- ResourceView Displays resource objects grouped by category. Double-clicking any object will load the appropriate editor.
- FileView Shows all the editable files in your project.
Right-clicking an object in any of the views will bring up a shortcut menu with a set of object-related options.
The edit window is the area in which you work on open files, either with the program editor or one of the resource editors. If you would like more space while editing, click the Full Screen command on the View menu.
Menus and Toolbars
The Visual C++ development environment provides you with a complete set of menus that enable you to manage files and project workspaces, configure the environment, and access the help system, source control, and other external tools. Most of the menus have corresponding toolbars that allow you to select options with a single button click. Toolbars in Visual C++ are fully configurable. You can specify which toolbars are displayed and which buttons are included on a toolbar. This means that you can configure your environment so that your most commonly used options are easily accessible.
A new installation of Visual C++ shows the three most commonly used toolbars. The Standard toolbar, which contains the most frequently used commands for working with files; the Build MiniBar, which contains the most frequently used commands for building and running applications; and the WizardBar, which provides commands for working with classes.
Right-clicking an empty area of any of the toolbars or the main window frame will show you a list of available toolbars and will allow you to toggle their display status on or off.
The following exercises will demonstrate how you can customize your user interface and will provide you with a means to turn a full-screen edit window on or off with a single mouse click or keystroke.
- From the Tools menu, choose Customize. The Customize dialog box appears.
- Click the Commands tab.
- In the Category list, click View.
- Click the Full Screen icon (the third from the left in the top row of icons), and note that a description of the command appears below the Category drop-down list. The dialog box should now look like the one shown in Figure 2.12.
- Drag the Full Screen icon onto your Standard toolbar.
- Close the Customize dialog box.
- Open a program source file by double-clicking a file in FileView.
- Test your new button by clicking it to show the source file in full-screen mode. When you want to switch back from full-screen, click the button again.
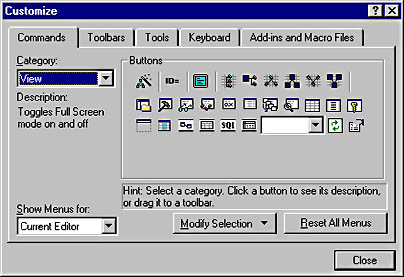
Figure 2.12 The Commands tag of the Customize dialog box
NOTE
While the Customize dialog box is open, you can delete buttons from toolbars by right-clicking them and choosing Delete from the shortcut menu. You can also delete buttons by simply dragging them off the toolbar you want to remove them from and dropping them anywhere but on another toolbar.
- On the Tools menu, click Customize. The Customize dialog box appears.
- Click the Keyboard tab.
- In the Category list, click View.
- In the Commands box, click ToggleFullScreen. Note that a description of the command appears below the Category drop-down list.
- Click in the Press new shortcut key edit control, and then press PAUSE on your keyboard.
- Click Assign. The dialog box should now appear as it is shown in Figure 2.13.
- Close the Customize dialog box.
- Test the effect of pressing PAUSE. Your edit window should switch back and forth between window mode and full-screen mode.
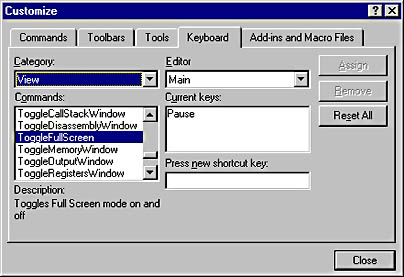
Figure 2.13 Assigning a shortcut key
Setting Environment Options
Display the Options dialog box (Figure 2.14) by clicking Options on the Tools menu. This tabbed page allows you to configure the design environment options for your installation of Visual C++. These options affect the appearance and behavior of the integrated tools that make up the development environment and apply to all projects and configurations of project settings.
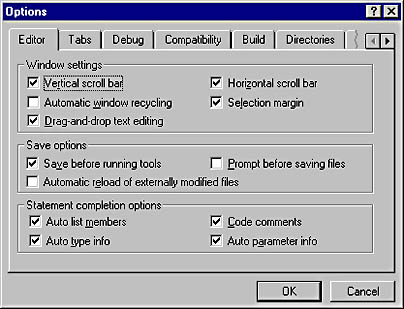
Figure 2.14 The Options dialog box
The Options dialog box can be used to configure:
- Aspects of the code editor, from basics such as window settings and save options, to advanced features such as automatic code completion and colored syntax highlighting. The editor can even be configured to emulate other popular editors such as BRIEF.
- The information displayed by the debugger.
- Options for integrated source control.
- The directory paths to search when loading executable files and when looking for source files, include files, and library files.
Getting Help
Visual Studio 6.0 ships with its own release of the Microsoft Developer Network (MSDN) library. This is an essential reference for developers, containing more than a gigabyte of technical programming information, including documentation, technical articles, sample code, the Microsoft Knowledge Base, and anything else you might need to develop solutions using Microsoft technology.
The MSDN library runs in its own HTML-based environment, complete with a fast, intelligent search engine. It is integrated with the Visual C++ development environment so that context-sensitive help is always available from within the Text editor (and from the output windows) simply by pressing F1.
Microsoft has provided further assistance in the form of context-sensitive Automatic Statement Completion. This feature, also known as IntelliSense, puts the MFC, Win32, and ATL libraries at your fingertips by displaying class members, function prototypes, identifier declarations, and code comments at the insertion point while you're editing your code. IntelliSense instantly shows all the available options. IntelliSense also optionally completes recognized words for you, saving you from continually having to type lengthy class or member names.
Project Configuration Settings
Display the Project Settings dialog box, shown in Figure 2.15, by clicking Settings on the Project menu. This dialog box is used to configure a wide range of options for the project, including options for compilers and the linker used by Visual C++.
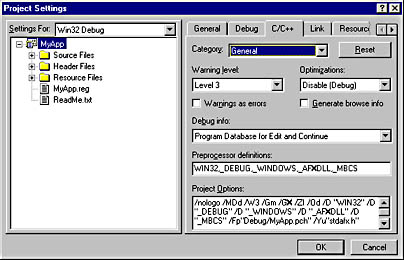
Figure 2.15 The Project Settings dialog box
Changes made to any settings on any of the tabbed pages apply only to the currently selected project and the build version specified in the Settings For list. Each build type of each project has its own combination of settings. To maintain the same settings for all build versions of a project, select All Configurations in the Settings For list. When changing project settings, be careful to check the build version you are modifying. It is easy to apply settings to the wrong build version if you aren't careful.
- On the Project menu, click Settings. The Project Settings dialog box appears.
- Click the C/C++ tab.
- In the Category list, click C++ Language.
- In the Settings For box, click All Configurations. Note that now only the settings common to all configurations are displayed in the Common Options box on the property sheet.
- Select Enable Run-Time Type Information (RTTI) to make RTTI available for all configurations of the MyApp project. Note how the /GR compiler switch is added to the Common Options box.
- Click OK to close the Project Settings dialog box and save your changes.
When editing settings at the project level, the current project should be selected in the tree view in the left pane. You can move through the project's category folders and the individual files in the category folders. The settings available to you on the property sheets in the dialog box will correspond to the object that you selected in the tree. A common setting that occurs at file or folder level is the exclusion of a particular file, or set of files, from a build.
The Debug, C/C++, and Link tabs actually contain several pages of settings within a single page. To switch between these different groups of settings, select one of the options from the Category list on each page.
Some of the options you can set using the Project Settings dialog box are:
- General Settings Here you can specify whether to link your executable program with the static MFC libraries (in case you change your mind after specifying this in Step 5 of the AppWizard). You can also specify directories for your output files.
- Debug Settings Here you can pass command-line arguments to your program when it is started in the debugger. You can also use I/O redirection as you would from the command prompt.
- C/C++ Settings Here you can set general compiler settings, language features, calling conventions, processor-dependent settings, optimizations, preprocessor definitions, and so on.
- Linker Settings Here you can specify additional libraries to link to your executable program.
Building a Project
Now that you have a better understanding of the working environment, you are going to build the MyApp application from the project you created in Lesson 1.
- On the Build menu, click Set Active Configuration. Ensure that MyApp—Win32 Debug is selected and click OK.
TIP
When you are working with multiple projects and configurations, consider using the full Build toolbar rather than the Build MiniBar. The Build toolbar contains drop-down list box controls that allow you to switch between projects or configurations quickly and easily. These controls also remind you which project or configuration you are currently working on.
- On the Build menu, click Build MyApp.exe
or
On the Build MiniBar (shown in Figure 2.16), click Build
or
Press F7.

Figure 2.16 The Build button on the Build Minibar
The program will compile and link, and the MyApp.exe file will be generated in the Debug directory.
- On the Build menu, click Execute MyApp.exe
- Once the build process has completed, test the functionality that has been provided for free by the AppWizard. On the File menu, click Open to see how a standard file dialog box is opened for you. You will need to implement File Open and Save routines yourself.
- On the File menu, click Print Preview and see how the Print Preview architecture is already in place. Code that you add to display output in your application main window will also display in this Print Preview window, formatted as it would appear on printed pages.
- Click Close to close the Print Preview window, and choose Exit from the File menu to close the MyApp application.
or
On the Build MiniBar, click the Execute Program button (the red exclamation mark that is two buttons to the right of the Build button)
or
Press CTRL+F5.
Notice that the output window appears at the bottom of the screen. The output window contains a number of views that are accessible by clicking the tabs at the bottom. The appropriate view is generally displayed automatically according to what kind of output is being generated by the environment. As the build process runs, the Build tab displays messages from the compiler and linker.
Lesson Summary
Visual Studio 6.0 provides a rich, visual environment for developers, known as the integrated development environment, or IDE.
A new installation of Visual C++ will arrange a project for you. Along with the menus and toolbars, the user interface is organized into three main areas: the workspace window, the edit window, and the output window. The workspace window offers three different views of the contents of your project. ClassView presents an object-oriented view in terms of the C++ classes, their data members, and their member functions. ResourceView displays resource objects grouped by category. FileView presents a view of all the editable files in your project.
Visual C++ provides a wide range of toolbars that you can hide, show, and configure according to your needs. You can configure toolbars using the Customize command on the Tools menu.
Visual C++ provides a fully configurable environment. You can configure the environmental options for your installation of Visual C++ using the Options command on the Tools menu.
Visual Studio 6.0 ships with its own release of the MSDN library, an essential reference for developers.
Visual C++ provides a central location for configuring project settings. You can use the Project Settings dialog box to configure the options for the compilers and the linker used by Visual C++. You can specify any number of different configurations of project settings.
EAN: 2147483647
Pages: 95