Lesson 1: Creating an MFC Project
This lesson introduces you to Visual C++ development projects and shows you how to use the AppWizard to create projects based on the Microsoft Foundation Classes (MFC). You will use the AppWizard to generate a framework of code and resources that can be compiled into a working executable program. This program can be used as a basis for the development of an application to suit your specific requirements.
After this lesson, you will be able to:Estimated lesson time: 30 minutes
- Describe how projects and workspaces are organized in Visual C++.
- Describe the types of projects you can create with the AppWizard.
- Understand the steps involved in using the AppWizard to create an MFC executable application.
Projects, Configurations, and Workspaces
In Visual Studio, application source code files and the files that specify application resources, such as menus, toolbars and dialog boxes, are grouped together into projects. A project allows you to edit your files and manage the relationships—such as build dependencies—between them.
In a Visual C++ project, settings for the build tools such as the compiler, resource compiler, and linker are centrally controlled through the Project Settings dialog box. You can specify any number of independent configurations of settings for your project. When you use the AppWizard to create a project, both Debug and Release configurations are created for you automatically.
Projects are always contained within a workspace. By default, a single project will be created inside a workspace, and both configurations will have the same name. To organize your development more effectively, you can group related projects together into a single workspace. You can also set dependency relationships between them to ensure build consistency between projects that share files.
Although your workspace might contain more than one project, you work on only one project at a time, known as the active project. Figure 2.1 is an illustration of a workspace that includes three projects. Note that the active project is displayed in bold type.
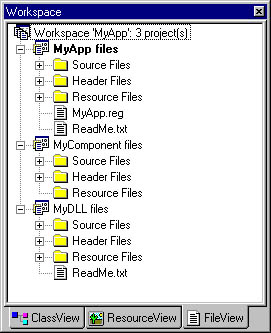
Figure 2.1 Workspace window (FileView)
Creating a New Project
The starting point for any development in Visual C++ is the Visual C++ New Project dialog box (shown in Figure 2.2), which lists project types.
Start Visual C++ by clicking Start, pointing to Programs, pointing to Microsoft Visual C++ 6.0, and then clicking Visual C++. On the File menu, click New.
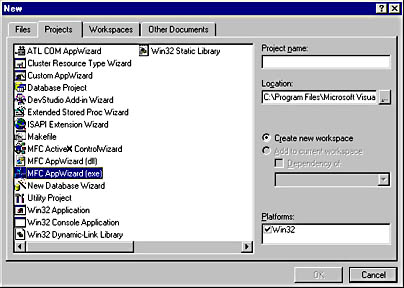
Figure 2.2 Visual C++ New dialog box (Enterprise Edition)
You use the New command to create new workspaces, projects, source files, or resource files. You can also create blank documents for other Microsoft applications such as Microsoft Word or Microsoft Excel.
Visual C++ Project Types
The Visual C++ New Project dialog box gives you the option of creating a project for the development of applications, components, or libraries using the following methods:
- MFC development The MFC development option generates a framework based on MFC, which you can use to develop applications, DLLs, or ActiveX controls. Other project types, such as those generated by the Internet Server API (ISAPI) Extension Wizard, are also based on an MFC framework.
- Win32 development The Win32 options allow you to create simple Windows-based programs without the overhead of MFC. You can choose to create an empty project configured with the appropriate settings for generating Windows programs, which allows you to start developing a Windows application from scratch. Alternatively, you may choose to have the wizard implement the basic architecture of a Windows application. The wizard will handle basic tasks such as registering your window classes, setting up a message loop to process user input to the program, and implementing a basic window procedure to perform actions based on messages generated by the user input. You also have an option to create a Windows DLL. Here, too, you may create a completely empty project or create a project with sample code that shows you how to export classes, functions, and variables from a DLL. You can also choose to create a simple console application that will run without a graphical user interface from the command prompt, or choose an option to create a static library for linking to an executable program at build time. These options allow you to include support for MFC, which you might do if you want to take advantage of the MFC string or collection classes.
- ATL development The ActiveX Template Library (ATL) is a set of template-based C++ classes that helps you create small, fast COM objects. We will be covering ATL in depth in Chapters 9 through 11. The ATL COM AppWizard allows you to create a COM server, a DLL, or an .exe file that can host COM components. Once you have used the wizard to create your ATL project, you can add a number of different types of ATL-based COM objects. These can include simple COM objects, objects that can be used with Microsoft Transaction Services or in Active Server Pages, Microsoft Management Console SnapIns, ActiveX user-interface controls, and OLE DB data providers and consumers. Other project types, such as those generated by the DevStudio Add-in Wizard, are also based on ATL templates.
- Miscellaneous projects A number of C++ development options do not fall into the above categories. These include options that allow you to create DLL resources to run on Microsoft Internet Information Server (IIS) or on Microsoft Cluster Server. You can also write your own Visual Studio add-ins, create general-purpose utility projects, and develop your own custom AppWizards.
Although MFC saves you time and effort in the creation of Windows programs, simple programs might not justify the code size and performance overhead of MFC. To use MFC in an application, you need to link the MFC static libraries to your code or ensure that the MFC DLLs are installed on each computer that will run your application. Consider whether your application needs the types of application framework created by the MFC project options.
NOTE
The Enterprise edition of Visual C++ contains some project options not found in the Standard or Professional editions. These allow you to work with DEFINTION (ODBC) databases directly from Visual Studio and to create SQL Server extended stored procedures.
Using the AppWizard
In this exercise, you will use the AppWizard to create an MFC executable project.
- Select the MFC AppWizard (exe) option (shown in Figure 2.2).
- Type MyApp in the Project name box and click OK.
NOTE
AppWizard will create your project in the default location in the directory: C:\Program Files\Microsoft Visual Studio\MyProjects. If you want, you can enter a different location in the Location edit box.
The first dialog box of the MFC AppWizard, shown in Figure 2.3, appears.
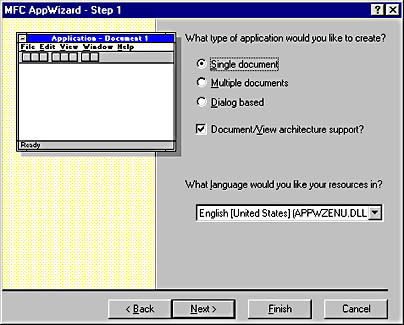
Figure 2.3 MFC AppWizard—Step 1
Step 1 of the MFC AppWizard gives you the option to choose whether your project is to produce a single-document interface (SDI) application (the Single document option); a multiple-document interface (MDI) application (the Multiple documents option); or an application that is based around a dialog box (Dialog based option). SDI applications permit only one document, displayed within the application's main window, to be open at a time. MDI applications allow multiple documents, displayed in multiple child windows, to be opened within a single instance of an application. Dialog-based applications use a dialog box as their main application window rather than the style of window that displays a client area inside a frame. Lesson 4 in Chapter 3 discusses these application types in more detail.
You can get help on any of the options in the AppWizard by selecting the appropriate option and pressing F1.
The following steps show you how to make MyApp.exe an SDI application.
- Change the application type option from Multiple documents to Single document. Click Next to proceed to the next dialog box (shown in Figure 2.4).
- A discussion of MFC database support can be found in Chapter 7, Adding Database Support. Leave None selected and click Next to proceed to the next dialog box (shown in Figure 2.5).
- This dialog box presents you with options associated with ActiveX technologies. ActiveX technologies use COM to enable software components to interact with one another, regardless of the language in which they were created. OLE is another COM-based technology used for creating and working with compound documents—documents that can contain data of different formats, created by different applications. We cover COM and the ActiveX technologies in depth in Chapters 8 through 12. Leave the default options selected, and click Next to move to Step 4 (shown in Figure 2.6).
- The AppWizard options presented allow you to specify the features your application will support. Leave the default options selected and click Advanced.
- The Advanced Options dialog box has two tabs. The Document Template Strings tab (shown in Figure 2.7) allows you to set options for the document type associated with your application. This is useful so that Windows can associate a document type with an application. A user can then double-click a filename and have Windows automatically start the application appropriate for using that file. The Window Styles tab (shown in Figure 2.8) provides settings that allow you to specify display characteristics of the application window.
- On the Document Template Strings tab, type mya in the File extension box and click Close. Click Next to move to the next dialog box (shown in Figure 2.9).
- The first option on this dialog box allows you to create an application with an interface similar to that provided by Windows Explorer—essentially a tree control view and a list control view side by side in a split window. Leave MFC Standard selected. Leave the second option set to the default. The last option deals with how the MFC Libraries are to be distributed with your application. Leave the As a shared DLL option selected, and click Next to continue to proceed to the final AppWizard dialog box, shown in Figure 2.10.
- The final AppWizard dialog box (shown in Figure 2.10) provides information about the classes and files that will be created for you. You can change the automatically generated names if you are not happy with the defaults. Notably, it allows you to change the base class from which your view class is derived. The view class is used in an MFC application to display the application data. Click the Base class drop-down list to see the options available.
- In the Base Class, click CScrollView. Click Finish to proceed to the New Project Information dialog box. The AppWizard presents a summary of the project so that you can double-check the selections you've specified. The AppWizard cannot be rerun (against the same project) once the project has been generated. For this lesson, simply read the summary and click OK. The project is created and opened for you in a new workspace.
- The MyApp Classes icon will appear in the Workspace window. Click the icon's plus sign to view the classes that the AppWizard has created. In the next lesson, you will compile these classes into a working application. Double-click the CMyAppApp Class icon to view the source code for the class declaration.
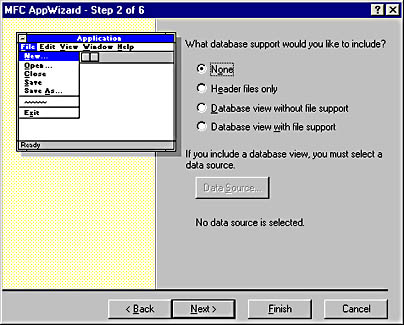
Figure 2.4 MFC AppWizard—Step 2

Figure 2.5 MFC AppWizard—Step 3

Figure 2.6 MFC AppWizard—Step 4
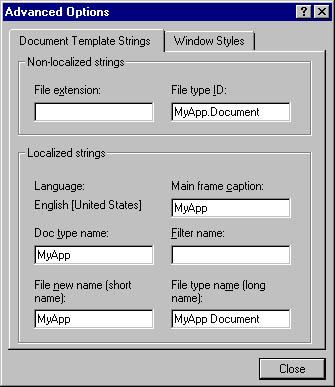
Figure 2.7 The Document Template Strings tab of the Advanced Options dialog box
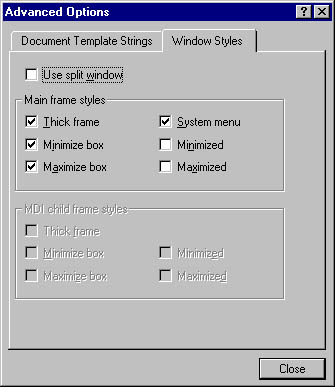
Figure 2.8 The Window Styles tab of the Advanced Options dialog box
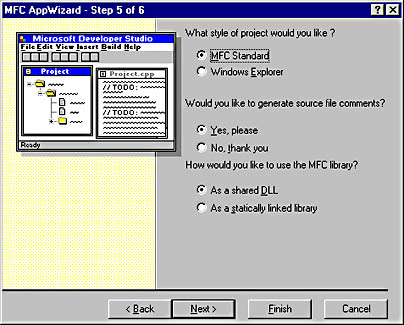
Figure 2.9 MFC AppWizard—Step 5
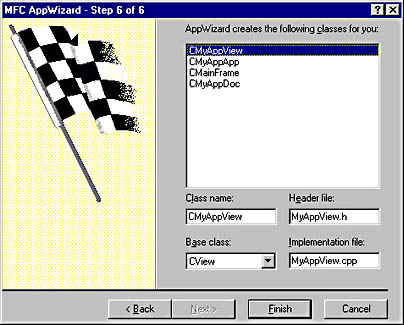
Figure 2.10 MFC AppWizard—Step 6
Powerful features are available from this drop-down list. Many of the base classes listed incorporate functionality based on Windows common controls, which you can use to help you organize the display of your application data. If you select CRichEditView, you can construct an application based on a full-featured text editor. With CHtmlView, your application would be based on an HTML browser. The default CView provides your application with a blank window where you can display your application data in any form you choose. CScrollView is similar to CView, but it creates a scrollable view that enables you to display more data than can be shown in a single screen window.
Lesson Summary
The source code and resource files that make up an application or component are grouped together in projects. Projects enable you to easily manage your files and build settings. You can specify any number of independent configurations of settings for your project. Related projects may be grouped together into a single workspace.
Visual C++ provides a number of project wizards that provide frameworks from which you can develop different types of applications and components, using a variety of technologies.
The MFC AppWizard allows you to quickly and easily create a set of classes and resources that can be compiled to produce a complete MFC executable application. By using the AppWizard you can:
- Create SDI, MDI, or dialog-based applications.
- Add database, ActiveX, or OLE support to your application.
- Specify application features such as toolbars or context-sensitive help.
- Choose from a number of specialized base classes for your application view.
EAN: 2147483647
Pages: 95