Lesson 3: Source Code Control
Source code control provides the ability to track changes made to source code files and is an important part of team software development. Visual C++ provides facilities for integrating a source code control system into the development environment.
In this lesson, you will learn how to set up a source code control system using Microsoft Visual SourceSafe (VSS) 6.0, which comes as a part of Visual Studio 6.0, and you will use the features of Visual SourceSafe from within the Visual C++ development environment.
After this lesson, you will be able to:Estimated lesson time: 30 minutes
- Understand how Visual SourceSafe is used to implement a source code control system.
- Describe how to use the Visual SourceSafe Administrator to set up a new database, add a user, and maintain passwords.
- Describe how to place a Visual C++ development project under source code control.
- Describe how the integrated source code control features of Visual C++ simplify the tasks of maintaining source code control for the developer.
Setting Up Source Code Control Using Visual SourceSafe
To maintain the security and consistency required of a source code control system, VSS stores a central copy of your source code files in a database. Files of any type, including text files, graphic files, binary files, sound files, and video files, can be stored under source control. When you add a file to VSS, the file is stored in the database and made available to other people. Members of your team can see the latest version of any file, make changes, and save a new version in the database. Changes that have been made to the file are saved so that you can recover an old version at any time.
As a developer of a source code control system, you will keep a read-only copy of the source files in a working folder on your local hard drive. When you want to modify a file, you check out the file from the VSS database. This places an editable copy of the file in your working folder and prevents other users from overwriting the current versions. When you have finished making changes, you check in the file to make your newly edited version the latest version that is available to the other developers. If you want to abandon the changes that you have made, you can undo the check out, thereby replacing your local edited version with the previous copy of the file held in the database.
To make sure that you have the latest version of all the files in the project, you use the Get Latest Version command to copy the current versions of the project source files to your working folder.
By default, a user cannot check out a file that is already checked out to another. This ensures that only one person at a time is modifying a file. Suppose that developer A and developer B are allowed to work on the same file at the same time. If A saves his changes, and subsequently B saves hers, all the changes made by A will be lost. The VSS administrator can change the default setting to allow multiple simultaneous checkouts of a single file and prevent overwrites of other changes. This will require some extra work on the part of the administrator, who must use the VSS Merge facility to ensure that the simultaneous changes do not conflict.
When you check out a source code file for editing, you must always be sure that you have the latest version of all the other files in the project. Otherwise, you might make changes that render your code incompatible with other recently-edited modules. VSS supplies the Get Latest Version command to copy read-only copies of source files to your working folder.
Files are organized within a VSS database in projects. A project typically contains all the files required to develop a software component, although projects can be defined in any way that is meaningful to the user. Projects tend to be organized in the same way as file directories.
It is usual to appoint an administrator to be responsible for the VSS database. The administrator uses the Visual SourceSafe Administrator program to control the location of the database, maintain the user list and access rights of each user, and back up the database.
The Visual SourceSafe Explorer is a utility that provides users with an interface to VSS projects. However, many of the common tasks—checking files in and out, getting latest versions, and so forth—are directly available to developers from within the Visual C++ development environment. The integration of VSS with Visual C++ actually simplifies the process of source code control for the developer.
NOTE
The source code control features of Visual C++ are designed to work with other products in addition to Visual SourceSafe. Any source code control system that conforms to the Microsoft standard source code control interface will allow you to access source code control functionality directly from the Visual C++ menus.
Setting up a VSS Database
In the following exercise, you will be using the VSS Administrator program to set up a VSS database for the MyApp code that you created in Lesson 1. If you have not yet installed the VSS Workstation components, you should do this now.
- Run Setup.exe from the root directory of the Visual Studio CD 1.
- Select Workstation Tools And Components. Click Next.
- On the Visual Studio setup screen, click Add/Remove.
- On the Visual Studio maintenance screen, select Microsoft Visual SourceSafe 6.0. Click Continue to install VSS.
- When the installation is complete, close the Visual Studio setup program.
A VSS Workstation installation sets up a private VSS database on your computer and the VSS client software. In a live team development situation, you would install the VSS Server components and create a shared VSS database on a secure, regularly backed-up server.
- On the Start menu, point to Programs, point to Microsoft Visual Studio 6.0, point to Microsoft Visual SourceSafe, and click Visual SourceSafe 6.0 Admin.
- Log on to VSS as Admin with no password. If the program warns you that the Admin account has no password, just click OK.
- On the Tools menu, click Create Database. The Create New VSS Database dialog box appears.
- In the text box, type C:\Source Control\MyVSS. Leave the check box selected. Click OK to create a new VSS database named MyVSS at the specified location and to create any necessary directories.
- On the Users menu, click Open SourceSafe Database.
- In the Open SourceSafe Database dialog box, click Browse. Use the File dialog box to locate and open the srcsafe.ini file in the C:\Source Control\MyVSS folder.
- Click OK. The MyVSS database should now appear in the Open SourceSafe Database dialog box. Make sure that it is selected and click Open.
- Click OK.
- Note that the name of the current database appears in the window's title bar.
- Make sure the Admin user is selected.
- On the Users menu, click Change Password.
- In the Change Password dialog box, leave the Old Password box blank. Type and confirm a new password.
- On the Users menu, click Add User.
- Using the Add User dialog box, type your user name and a password. Note that you can use a check box to specify that a user has read-only access. Leave this unselected.
- Click OK.
Placing the MyApp Project Under Source Code Control
You are now going to add the project you created in Lesson 1 to the MyVSS database. This is most easily accomplished from within the Visual C++ development environment.
- Start Visual C++. Open the MyApp workspace.
- Right-click an empty area of the main window frame. On the toolbars menu, click Source Control.
- The Source Control toolbar, shown in Figure 2.17, appears. Commands in the following exercises refer to buttons on this toolbar. Alternatively, you can use the equivalent commands from the Source Control submenu of the Project menu.
- Click Add To Source Control (as shown in Figure 2.17).
- The Visual SourceSafe Login box appears. Make sure that MyVSS is displayed in the Database box. Enter the user name and password that you created for yourself on the MyVSS database.
- When you click OK, the Add To SourceSafe Project dialog box appears, displaying the MyApp project name. Click OK (and Yes to create the new project) to add your MyApp project to source control.
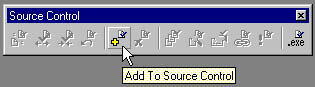
Figure 2.17 Source Control toolbar
NOTE
The $/ symbol signifies the root project of the database. All projects in a VSS database are subprojects of the root project.
- The Add To Source Control dialog box appears with all the files in your project selected. Click OK to add the selected files to source control.
Using the VSS Explorer
In the next exercise, you will view your new VSS project using VSS Explorer.
- Start VSS Explorer (shown in Figure 2.18) by clicking the Source Control button on the rightmost side of the Source Control toolbar.
- Experiment with the interface by expanding the folders in the left pane and looking at which files have been placed in the project. Explore the menus and use the ToolTip feature to identify the buttons on the toolbar.
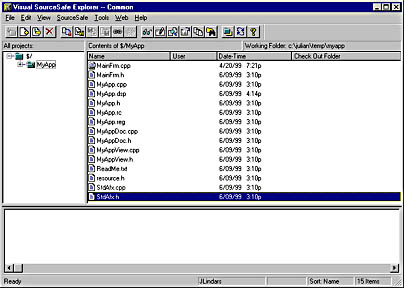
Figure 2.18 Visual SourceSafe Explorer
- Click the MyApp folder in the left pane.
- Click the ReadMe.txt file in the right pane.
- On the SourceSafe menu, click Check Out (or use the corresponding toolbar button).
- Click OK to check out the ReadMe.txt file. Notice how Visual SourceSafe Explorer displays the checked-out status.
- Switch back to Visual C++. Look at the project files in the FileView window. Notice that the file icons are now gray to indicate that they are under source control. Notice that the ReadMe.txt file has a check mark to indicate that it is checked out.
- Switch back to VSS Explorer.
- In VSS Explorer, click the ReadMe.txt file in the right pane.
- As an alternative to using the menu and toolbar, check in the ReadMe.txt file by right-clicking the file and clicking Check In on the shortcut menu.
- Click OK to check in the ReadMe.txt file.
Close VSS Explorer and return to Visual C++. You might now want to try repeating the above actions from within the Visual C++ development environment. You will find that the procedure is virtually identical. You can use commands on the Source Control submenu of the Project menu, the Source Control toolbar buttons, or you can right-click the icon in the FileView window.
Source Code Control Configuration
The integrated source code control features of Visual C++ are configured from the Source Control tab of the Options property sheet (shown in Figure 2.19), which is available from the Tools Menu. Note that you may have to use the arrow keys to bring the Source Control tab into view.
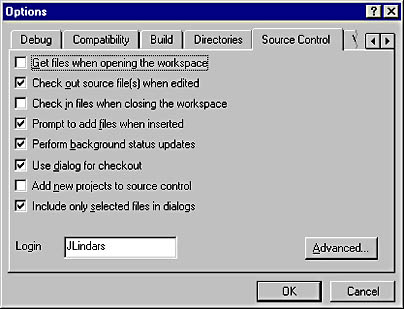
Figure 2.19 Source Control tab options
Figure 2.19 shows the default settings for source control options. These settings will affect the way you work with Visual C++ in the following ways:
- Check out source files when edited When you attempt to edit a file that is not already checked out to you, a Check Out dialog box will appear to allow you to check out the file. (Note that you are prohibited from editing files that are not checked out to you.)
- Prompt to add files when inserted When you add files to a project, you will be prompted to add them to source control.
- Perform background status updates The status of the files under source code control is updated as a background task rather than immediately.
- Use dialog for checkout When you check out files directly from ClassView, ResourceView, or FileView, a dialog box appears prompting you to confirm the action. If this option is not selected, the selected files are checked out immediately.
- Include only selected files in dialogs When you elect to perform an action (such as Add to Source Control or Check In) on selected files in ClassView, ResourceView, or FileView, only those selected files will appear in the dialog box. Otherwise, all of the files to which the action could be applied are listed in the dialog box.
You can also set the following options:
- Get files when opening the workspace When this option is set, VSS asks you if you want to get the latest versions of all files not checked out to you when the workspace is opened. This might not always be what you want, especially if your development is in an interim stage.
- Check in files when closing the workspace When this option is set, VSS prompts you to check in any files that are checked out to you when you close your Visual C++ workspace. Again, this might not be a good idea if your development is still in progress. Other users might get incomplete versions of your files.
- Add new projects to source control When this option is set and you create a new project, you will be prompted to add the new project to source control.
Clicking Advanced on this property sheet exposes a relevant subset of the source code control program's configuration settings.
Reusing Visual SourceSafe Files
You can reuse files within the same VSS project or between VSS projects. Some of the commands for reusing files are Share, Branch, and Merge.
Sharing
In VSS, one file can be shared among multiple projects. Changes to the file from one project are automatically seen by other projects sharing the same file. For example, suppose you want to share all the header files in your MyApp project with another project. To share a file, you create a share link between two (or more) projects. The same file then appears in those projects at the same time. When you check in the file to any one of the projects, your changes are automatically updated in all of the linked files.
- Open Visual SourceSafe Explorer.
- To create another project with which to share files, right-click the MyApp project icon and click the Create Project button.
- In the Create Project dialog box, type NewProject as the project name and click OK.
- Click the newly created NewProject icon.
- On the SourceSafe menu, click Share.
- In the Share with dialog box, click the MyApp project in the projects pane.
- In the File to share text box, type *.h and press ENTER to display only the MyApp header files.
- Select all the files in the list of header files displayed. (Click the first item in the list, and then press and hold SHIFT while clicking the last item in the list.) Click Share.
- Click Close. Note that the shared files have been added to the NewProject project and that they have special icons to indicate their shared status.
- Right-click one of the files with a shared file icon. From the shortcut menu, select Properties.
- Click the Links tab on the property sheet. The projects that share this file will appear in the list box.
Branching
Normally when you share files, only one version of the file exists. However, you might want to create a custom copy of the file for a particular project. For example, suppose you want to create a custom version of the MyAppDoc.h file in the NewProject project. To achieve this, you can use the VSS branching feature. Branching duplicates files from one project and uses the duplicates to create a new version of the project. These duplicate files can be altered without affecting the original version of the files. At a later stage, you can use the Merge facility to merge the changes in both these versions to recreate a single version of the file.
- In Visual SourceSafe Explorer, click the NewProject project. In the right pane, click the MyAppDoc.h file.
- On the SourceSafe menu, click Branch.
- Click OK. Note how the file icon reverts to a non-shared type.
Merging
As mentioned above, files that have been branched into parallel versions can be merged back into one file. For example, suppose now that your team has made changes to the original version of MyAppDoc.h in the MyApp project, and you want to merge these changes into the custom version that is contained in the NewProject project. Merging compares the differences between files and creates a single file containing all the changes.
- In the Visual SourceSafe Explorer, click the NewProject project. In the right pane, click the MyAppDoc.h file.
- On the SourceSafe menu, click Merge Branches.
- In the Merge to $/ NewProject /MyAppDoc.h dialog box, select the MyApp project. Note how the versions that are to be merged are displayed in the Versions column. Click Merge, and then click OK in the message box that follows.
Merging might commonly take place when the administrator enables multiple checkouts of the same file to allow parallel development to take place on a single source file. Users can also merge the differences between an existing local copy of a file and the most up-to-date version saved in the VSS database by using the Get Latest Version command.
Viewing Version History
VSS contains several features you can use to keep track of version history. The Show History feature is commonly used to view a summary of a file's version history.
- In the Visual SourceSafe Explorer, click the NewProject project. In the right pane, click the MyAppDoc.h file.
- On the shortcut menu, click Show History.
- Click OK to accept the default options. The file's version history is displayed.
- Close the History window.
Archiving a VSS Project
The Visual SourceSafe Administrator program makes it easy for you to archive your SourceSafe project. By clicking Archive Projects on the Archive menu, you can back up your project files to a compressed file as a secure backup. You can also use Archive Projects along with the Restore Projects command to move projects between VSS databases.
- Open the VSS Administrator program. You should be taken directly to the MyVSS database you created earlier.
- On the Archive menu, click Archive Projects.
- In the Choose Project to Archive dialog box, select the MyApp project and click OK.
- With the MyApp project displayed in the Archive Wizard Projects to archive box, click Next.
- In Step 2 of the Archive Wizard, select the Save data to file option and specify C:\SourceControl\backup.ssa as an archive file name. Click Next.
- In Step 3 of the Archive Wizard, select Archive all of the data and click Finish.
- When the archive process is complete, close the VSS Administrator program.
To restore from an archive, simply open the database you want to restore to from within the VSS Administrator program. Choose Restore Projects from the Archive menu, and use the Restore Wizard to locate and load the .ssa file that contains the archive.
Lesson Summary
Source code control provides the ability to track changes made to source code files and is an important part of team software development. Visual SourceSafe (VSS) 6.0, which comes as a part of Visual Studio 6.0, is a source code control system that is fully integrated with the Visual C++ development environment.
VSS stores a central copy of your source code files in a database. Members of your team can see the latest version of any file, make changes, and save a new version in the database. Changes that have been made to the file are saved so that you can recover an old version at any time.
Users of a source code control system keep a read-only copy of the source files in a working folder on their local hard drive. When you want to modify files, you can use the Visual SourceSafe Explorer program to check out the file from the VSS database. This places an editable copy of the file in your working folder. When you have finished making changes, you check in the file to make your newly edited version the latest version that is available to the other developers. To make sure that you have the latest version of all the files in the project, you use the Get Latest Version command to copy the current versions of the project source files to your working folder.
The VSS Administrator Program allows you to set up and administer a VSS project for your development team. You can use this program to control access to the VSS database and to archive and restore projects.
Visual SourceSafe is fully integrated with the Visual C++ development environment. Visual C++ can be configured to perform many of the source code control tasks automatically—for example, you can configure the environment so that when you add files to a Visual C++ project, you will be prompted to add them to source control.
The Visual SourceSafe Share command allows you to share a single copy of a file between multiple projects. The VSS Branch command allows parallel development on different versions of the same file, and the Merge command allows you to merge the changes made to two different versions of a file into a single file.
The Show History command is one of the many features you can use to keep track of a file's version history.
EAN: 2147483647
Pages: 95